How to Build a Custom Lead Scoring Model for Salesforce

A lead score trapped in a warehouse is just a number. The useful version appears on the Salesforce Lead record while a sales rep is deciding who to call next.
Supaflow Python tasks close that loop. You can ingest CRM and behavioral data into Snowflake, apply transparent scoring rules with Python and pandas, write the results to an activation table, and then sync those fields back to Salesforce. The same output can also feed a Salesforce Marketing Cloud Data Extension for a high-intent nurture journey.
A Supaflow orchestration turns those pipelines and tasks into one dependency-aware workflow, so activation cannot start before ingestion and scoring finish. This guide builds that end-to-end data pipeline.
The Use Case: Prioritize Leads with More Than CRM Data
Salesforce leads contain useful firmographic signals such as title, industry, and company. Product and marketing systems contain the behavioral signals that show intent: product activity, pricing-page visits, webinar attendance, and demo requests.
Salesforce's lead qualification guidance recommends combining those two categories. Fit helps answer whether a lead resembles a good customer. Behavior helps answer whether the lead is ready for a conversation.
The warehouse is the natural place to combine them because the inputs already come from different systems. Python is useful when the scoring logic includes text classification, weighted rules, null handling, reusable functions, or logic that changes often.
The completed flow looks like this:
| Stage | Supaflow component | Input | Output |
|---|---|---|---|
| Ingest | Salesforce and product ingestion pipelines | Leads, accounts, and activity | Snowflake source tables |
| Transform | Python task | CRM and behavioral signals | A scored activation table |
| Activate | Salesforce activation pipeline | Lead IDs, scores, tiers, and reasons | Updated Salesforce Lead records |
| Optional activation | Marketing Cloud activation pipeline | The same scored audience | An existing Data Extension |
An orchestration connects the stages so activation starts only after ingestion and scoring succeed.
What You Need
Before building the workflow, prepare:
- An active Salesforce source connected to Snowflake
- A second ingestion pipeline for product or engagement data, such as PostgreSQL to Snowflake
- An active Snowflake datasource for the Python task
- An active Salesforce destination for reverse ETL
- Custom writable fields on the Salesforce Lead object for the score, tier, reason, and scoring timestamp
- Optionally, an active Salesforce Marketing Cloud destination and an existing Data Extension with a primary key
This walkthrough uses illustrative table and field names. Replace them with the names in your Snowflake database and Salesforce org.
Step 1: Ingest the Inputs into Snowflake
Create the ingestion pipelines before writing the scoring task. The example expects two tables:
Salesforce Leads
The Salesforce ingestion pipeline loads the Lead object into:
SUPA_DB.SALESFORCE.LEAD
The scoring task uses these fields:
IDEMAILTITLEINDUSTRY
Keep the Salesforce record ID. It becomes the merge key when the score is activated back to the Lead object.
Product or Marketing Activity
A second ingestion pipeline loads a rolling activity summary into:
SUPA_DB.PRODUCT.LEAD_ACTIVITY_30D
The example uses:
SALESFORCE_LEAD_IDPRODUCT_EVENTS_30DPRICING_PAGE_VISITS_30DDEMO_REQUESTED
That table can come from a product database, an event model, or another source already summarized in Snowflake. What matters is a stable key that joins each activity record to the Salesforce lead.
Run both ingestion pipelines once and confirm that the two tables contain matching lead IDs.
Step 2: Define the Activation Table
Design the Python task output around what the destination needs. For Salesforce, a useful contract is:
| Snowflake field | Purpose | Example Salesforce mapping |
|---|---|---|
SALESFORCE_ID | Match the existing Lead | Id |
EMAIL | Optional destination or audit field | Email |
LEAD_SCORE | Numeric score from 0 to 100 | Lead_Score__c |
PRIORITY_TIER | Sales-ready, review, or nurture | Priority_Tier__c |
SCORING_REASON | Explain the strongest signals | Scoring_Reason__c |
SCORED_AT | Record when the score was produced | Last_Scored_At__c |
The custom Salesforce API names depend on your org. Ask your Salesforce administrator to create or confirm writable fields before configuring the activation.
Step 3: Score the Leads with Python and pandas
Create a Python Task, choose the Snowflake datasource, leave Handler set to run, and start with the following code:
import json
import logging
from datetime import datetime, timezone

import pandas as pd
from snowflake.snowpark import Row


LEADS = ["SUPA_DB", "SALESFORCE", "LEAD"]
ACTIVITY = ["SUPA_DB", "PRODUCT", "LEAD_ACTIVITY_30D"]
OUTPUT = ["SUPA_DB", "ACTIVATIONS", "SALESFORCE_LEAD_SCORES"]

FIT_INDUSTRIES = {"Software", "Financial Services", "Healthcare"}

logger = logging.getLogger("supaflow.lead_scoring")
logger.setLevel(logging.WARNING)


def to_pandas(session, table_name, columns):
    rows = session.table(table_name).select(*columns).collect()
    return pd.DataFrame(
        [row.as_dict(recursive=True) for row in rows],
        columns=columns,
    )


def scoring_reason(row):
    reasons = []
    if row["DEMO_REQUESTED"]:
        reasons.append("requested a demo")
    if row["PRODUCT_EVENTS_30D"] >= 5:
        reasons.append("active product usage")
    if row["PRICING_PAGE_VISITS_30D"] >= 2:
        reasons.append("repeated pricing interest")
    if row["SENIOR_TITLE"]:
        reasons.append("senior decision-maker")
    if row["INDUSTRY_FIT"]:
        reasons.append("target industry")
    return ", ".join(reasons) or "limited fit and engagement signals"


def run(session):
    leads = to_pandas(
        session,
        LEADS,
        ["ID", "EMAIL", "TITLE", "INDUSTRY"],
    )
    activity = to_pandas(
        session,
        ACTIVITY,
        [
            "SALESFORCE_LEAD_ID",
            "PRODUCT_EVENTS_30D",
            "PRICING_PAGE_VISITS_30D",
            "DEMO_REQUESTED",
        ],
    )

    if leads.empty:
        raise Exception("No Salesforce leads were available to score")

    activity = activity.groupby("SALESFORCE_LEAD_ID", as_index=False).agg(
        PRODUCT_EVENTS_30D=("PRODUCT_EVENTS_30D", "sum"),
        PRICING_PAGE_VISITS_30D=("PRICING_PAGE_VISITS_30D", "sum"),
        DEMO_REQUESTED=("DEMO_REQUESTED", "max"),
    )

    scored = leads.merge(
        activity,
        how="left",
        left_on="ID",
        right_on="SALESFORCE_LEAD_ID",
    )

    numeric_fields = ["PRODUCT_EVENTS_30D", "PRICING_PAGE_VISITS_30D"]
    scored[numeric_fields] = (
        scored[numeric_fields]
        .apply(pd.to_numeric, errors="coerce")
        .fillna(0)
    )
    scored["DEMO_REQUESTED"] = scored["DEMO_REQUESTED"].fillna(False).map(
        lambda value: value is True or str(value).lower() in {"true", "1", "yes"}
    )
    scored["SENIOR_TITLE"] = scored["TITLE"].fillna("").str.contains(
        r"\b(?:CEO|CFO|CTO|CIO|VP|VICE PRESIDENT|DIRECTOR)\b",
        case=False,
        regex=True,
    )
    scored["INDUSTRY_FIT"] = scored["INDUSTRY"].fillna("").str.title().isin(FIT_INDUSTRIES)

    scored["LEAD_SCORE"] = (
        scored["DEMO_REQUESTED"].astype(int) * 30
        + scored["SENIOR_TITLE"].astype(int) * 20
        + scored["INDUSTRY_FIT"].astype(int) * 15
        + scored["PRODUCT_EVENTS_30D"].clip(upper=10) * 2
        + scored["PRICING_PAGE_VISITS_30D"].clip(upper=5) * 3
    ).clip(upper=100).astype(int)

    scored["PRIORITY_TIER"] = pd.cut(
        scored["LEAD_SCORE"],
        bins=[-1, 39, 69, 100],
        labels=["Nurture", "Review", "Sales Ready"],
    )
    scored["SCORING_REASON"] = scored.apply(scoring_reason, axis=1)

    scored_at = datetime.now(timezone.utc).isoformat()
    output_rows = [
        Row(
            SALESFORCE_ID=str(row["ID"]),
            EMAIL=None if pd.isna(row["EMAIL"]) else str(row["EMAIL"]),
            LEAD_SCORE=int(row["LEAD_SCORE"]),
            PRIORITY_TIER=str(row["PRIORITY_TIER"]),
            SCORING_REASON=str(row["SCORING_REASON"]),
            SCORED_AT=scored_at,
        )
        for _, row in scored.iterrows()
    ]

    session.create_dataframe(output_rows).write.mode("overwrite").save_as_table(OUTPUT)

    summary = {
        "input_leads": len(scored),
        "sales_ready": int((scored["PRIORITY_TIER"] == "Sales Ready").sum()),
        "output_table": ".".join(OUTPUT),
    }
    logger.warning("lead scoring summary %s", json.dumps(summary, sort_keys=True))
    return "Lead scoring complete: " + json.dumps(summary, sort_keys=True)
The rules are deliberately easy to audit:
- A demo request adds 30 points
- A senior title adds 20
- A target industry adds 15
- Product activity and pricing interest add up to 35 more
Change the weights and thresholds to match how your sales and marketing teams qualify leads. The point is not that this formula is universal. The point is that the logic is visible, versionable, and close to the data it uses.
Keep pandas Workloads Bounded
This example collects selected Snowflake rows into a pandas DataFrame inside the task. That is appropriate for a bounded scoring batch, but it should not be your default for millions of raw events.
For larger workloads, use Snowpark to filter, join, and aggregate in Snowflake first. Convert only the smaller result to pandas for the rules that benefit from it. This keeps memory use predictable and lets Snowflake do the heavy scan and join work.
The task editor does not currently provide a general package selector. The current Snowflake task environment resolves snowflake-snowpark-python and its dependencies, but you should use Run to verify non-standard imports such as pandas before saving the task.
Step 4: Test the Python Task
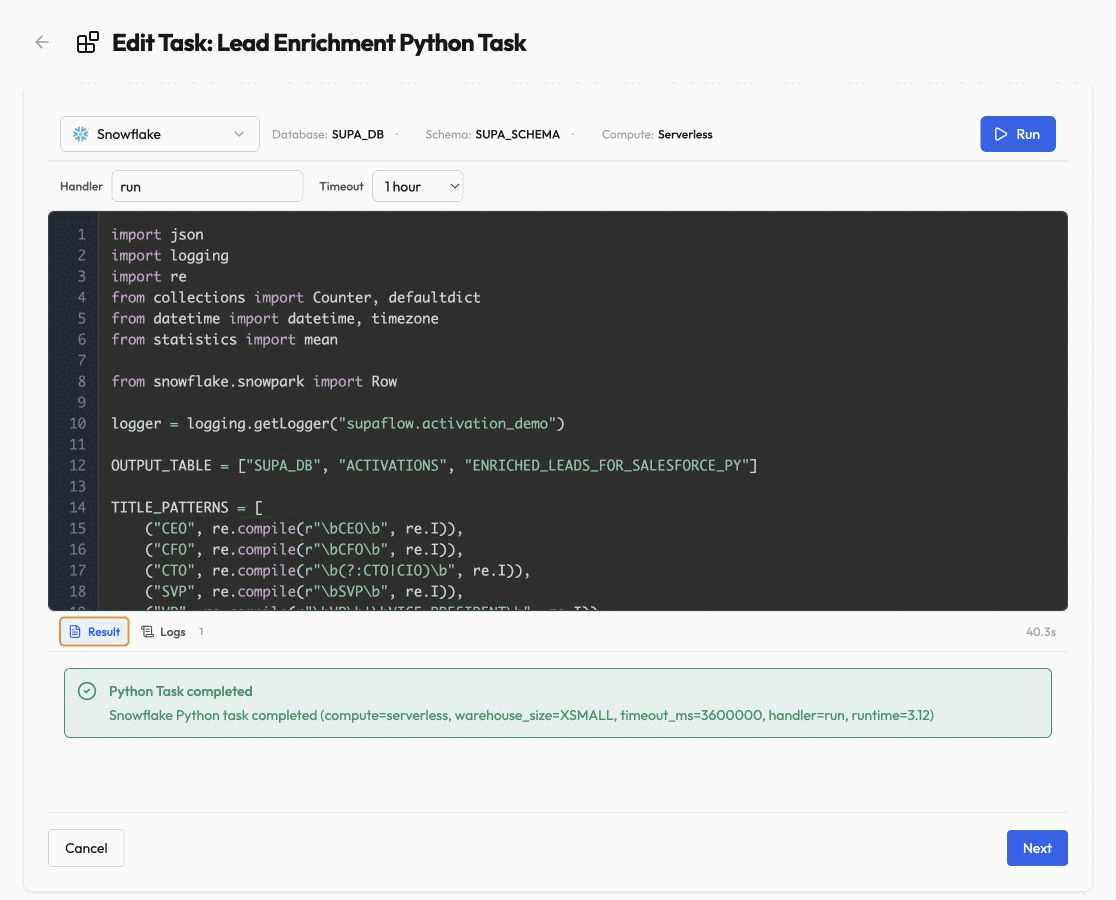
Click Run. Supaflow executes the handler on Snowflake-managed serverless compute and requires the current code and settings to succeed before you continue.
A completed run shows the handler, timeout, duration, and Snowflake result in the same editor:
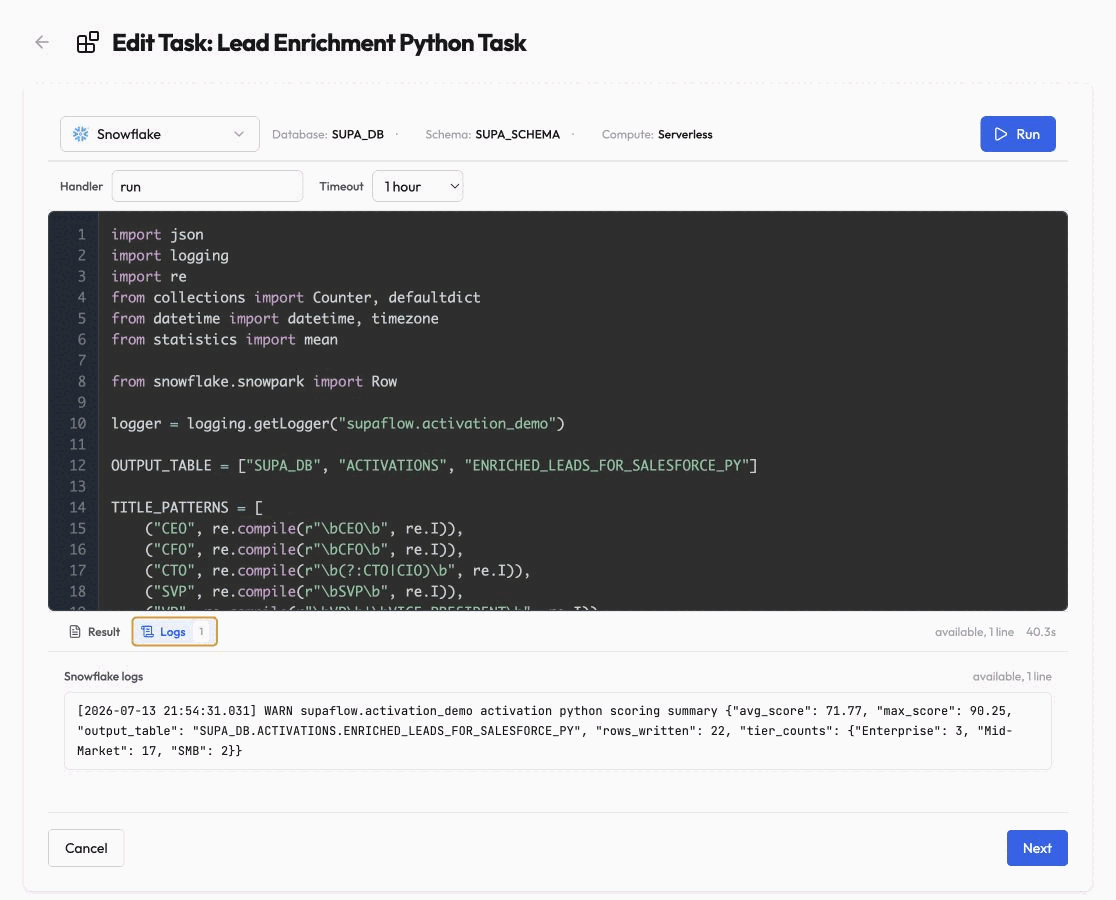
Open Logs to verify the summary emitted by the task. Snowflake telemetry is asynchronous, so logs can arrive after the task result. The Result tab remains the authoritative execution outcome if telemetry is pending or unavailable.
After the test succeeds, name the task Score Salesforce Leads and save it.
Step 5: Activate the Scores to Salesforce
Create an activation pipeline with Snowflake as the warehouse source and Salesforce as the destination.
-
Select
SUPA_DB.ACTIVATIONS.SALESFORCE_LEAD_SCORES. -
Choose the Salesforce Lead object.
-
Set the load mode to Merge.
-
Map the fields from the activation table to the Salesforce fields.
-
Set
SALESFORCE_ID→Idas the merge key. -
Review the mappings and create the activation.
A typical mapping looks like this:
| Snowflake source | Salesforce Lead target |
|---|---|
SALESFORCE_ID | Id |
LEAD_SCORE | Lead_Score__c |
PRIORITY_TIER | Priority_Tier__c |
SCORING_REASON | Scoring_Reason__c |
SCORED_AT | Last_Scored_At__c |
The merge key is the safety rail. Salesforce upsert uses an ID or external ID to decide which record to update; without the correct mapping, an activation can create duplicates instead of updating the intended lead.
The same identity rule applies when people review CRM changes in a spreadsheet. See the Salesforce Google Sheets two-way sync guide for a separate writeback-workbook pattern and run-order safeguards.
This example overwrites the complete scoring table and gives every row a new SCORED_AT value. That is simple for an initial walkthrough, but it makes every row eligible for activation on every run. For a production incremental flow, persist the previous results, update SCORED_AT only when the score or tier changes, and use that field as the activation cursor.
Optional: Send the Audience to Marketing Cloud
The same output can feed a Salesforce Marketing Cloud Data Extension. Marketing Cloud uses Data Extensions to store subscriber attributes that can target or exclude people from messaging, and a primary key allows existing rows to be updated rather than duplicated.
Create the Data Extension in Marketing Cloud first, with fields such as:
SubscriberKeyEmailAddressLeadScorePriorityTierScoringReasonScoredAt
Then create a second activation pipeline, choose the existing Data Extension, and map the scored table into it. Use the SubscriberKey or ContactKey used by your Marketing Cloud account as the merge key. Do not assume it is the Salesforce Lead ID; the identity model differs between organizations.
Marketing can use PriorityTier = Sales Ready for an immediate handoff or place PriorityTier = Nurture into a longer Journey Builder sequence. The Python task remains the shared decision layer, while Salesforce and Marketing Cloud receive the fields each team needs.
Step 6: Orchestrate the Complete Flow
An orchestration is what makes this an end-to-end data pipeline rather than a set of jobs run by hand. Create one with these dependencies:
| Step | Type | Depends on |
|---|---|---|
| Ingest Salesforce | Ingestion pipeline | — |
| Ingest product activity | Ingestion pipeline | — |
| Score Salesforce Leads | Python task | Both ingestion pipelines |
| Update Salesforce Leads | Activation pipeline | Python task |
| Update Marketing Cloud audience | Optional activation pipeline | Python task |
The dependency graph makes that execution contract visible. The example below brings Salesforce and Marketing Cloud data into Snowflake in parallel, runs a Python enrichment task after both inputs are ready, and then activates the result back to Salesforce. The same pattern works when the second input is product activity from another source.
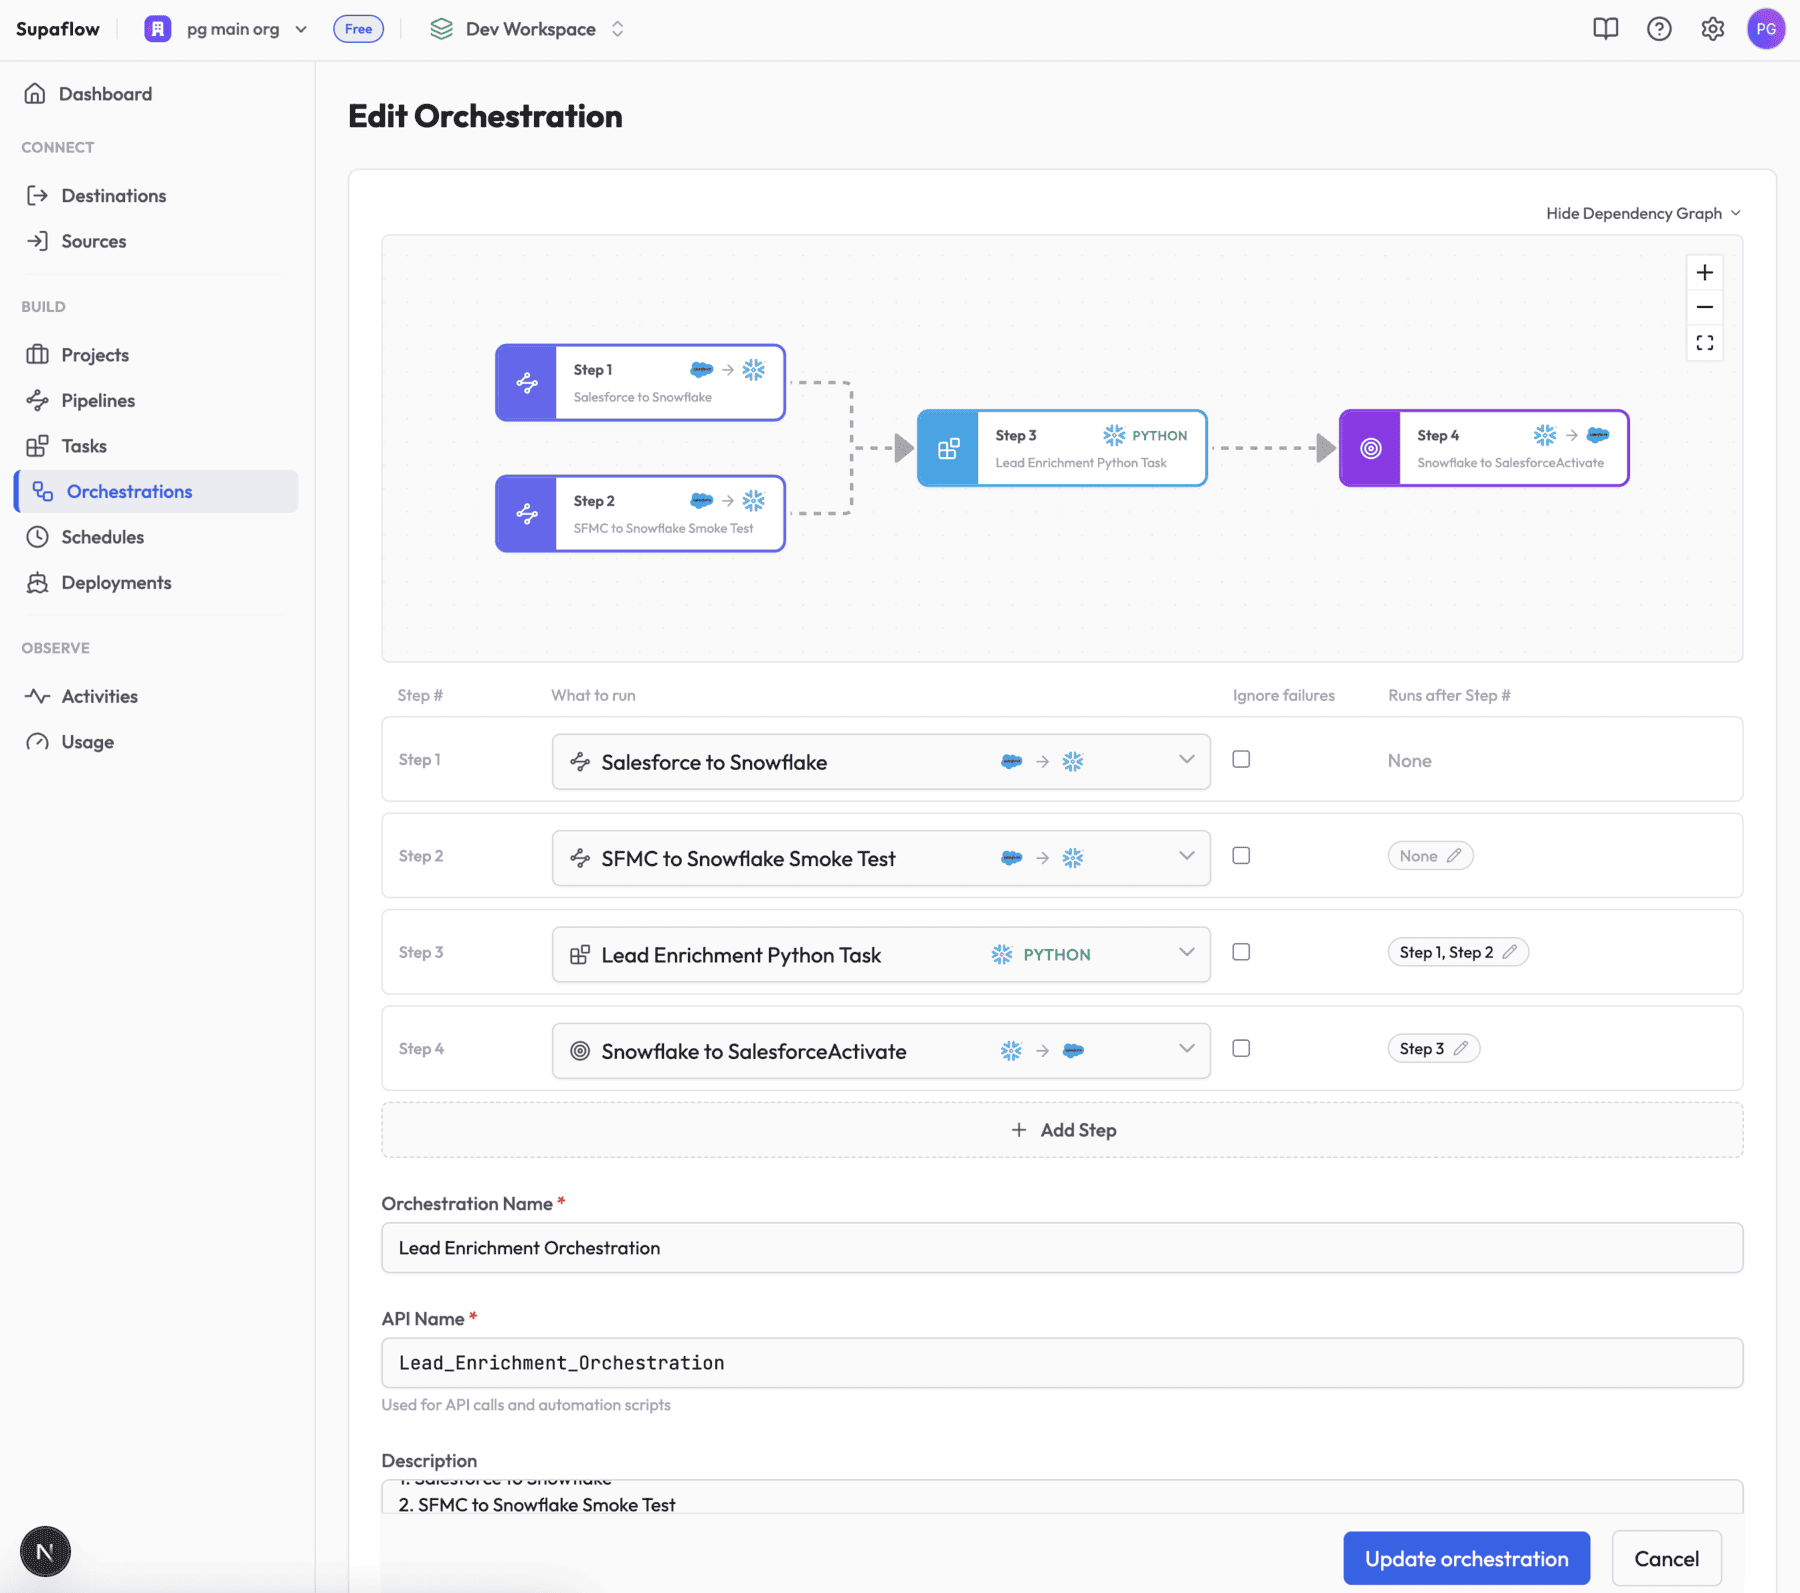
The two ingestion pipelines can run in parallel. The Python task waits for both. The activation pipelines begin only after scoring completes, and the Salesforce and Marketing Cloud branches can then run in parallel.
That ordering prevents a common failure mode: activating yesterday's score because one of today's inputs had not finished loading.
Production Checklist
Before scheduling the orchestration, verify:
- Stable identity: Keep the Salesforce ID or a valid external ID through every transformation.
- Writable fields: Map only destination fields that Salesforce allows the connected user to update.
- Idempotent writes: Use Merge and a real destination key so reruns update rather than duplicate records.
- Bounded pandas data: Filter and aggregate large inputs in Snowpark before collecting them into pandas.
- Explainable output: Write a reason or model version alongside the score so sales can understand changes.
- Incremental behavior: Update the cursor timestamp only when activation fields change if you want to avoid unnecessary API writes.
- Privacy: Do not copy sensitive fields into the activation table unless the destination needs them.
- Monitoring: Log input counts, output counts, and tier totals, then monitor each orchestration step in Activities.
Frequently Asked Questions
How is this different from Einstein Lead Scoring?
Einstein Lead Scoring is Salesforce's predictive add-on. It learns from your org's historical conversion patterns and ranks leads by similarity to leads that converted before, using data that lives inside Salesforce. The model in this guide is rules-based and runs in your warehouse, so it can score on signals Salesforce never sees, such as product activity and pricing-page visits, and every point can be traced to a rule your team wrote. The two can coexist: keep Einstein's score in its own field and write this one to separate custom fields.
What is the difference between lead scoring and lead grading?
Grading measures fit: who the lead is, based on attributes such as title, industry, and company size. Scoring measures behavior: what the lead does, such as requesting a demo or visiting the pricing page. This walkthrough combines both signal types in one score and uses the tier for routing. If your team keeps them separate, split the scoring step into a fit grade and a behavior score and write both fields to Salesforce.
Should lead scores decay over time?
Yes, and the rolling window in this model provides that by default. The behavioral inputs come from a 30-day activity table, so a lead that goes quiet loses those points on the next scoring run. If you need explicit negative scoring, such as subtracting points for unsubscribes or personal email domains, add those rules to the same scoring function.
Where should the score live in Salesforce?
This guide writes to custom fields such as Lead_Score__c and Priority_Tier__c because custom fields are reportable, usable in assignment rules and list views, and safe from conflicts with other tools. If your org already uses the standard Lead Rating field (Hot, Warm, Cold), you can map the tier to it instead of, or in addition to, a custom field.
How do the tiers relate to MQL and SQL?
Treat Sales Ready as the sales-qualified threshold that routes to a rep, and Review and Nurture as the marketing-qualified band that marketing keeps working. The 40 and 70 point boundaries in this example are starting points; calibrate them with your sales team the same way you would any MQL or SQL cutoff.
One Workflow Instead of Three Separate Tools
The important part of Python tasks is not that Python can run in Snowflake. Snowflake already supports Python stored procedures. The useful part is that the transformation can participate in the same Supaflow workflow as ingestion and activation:
- Bring the freshest source data into Snowflake.
- Apply custom Python logic where the data lives.
- Put the result into the tools where people take action.
Read the Python Tasks documentation for the handler contract and runtime details, the Activation Pipelines guide for mapping and merge keys, and the Orchestrations guide for dependencies.
Ready to build the loop? Create a Python task and turn your next warehouse model into an operational workflow.
 Ask Claude