Migrate Redshift Data to Snowflake in 30 Minutes

Need to move Redshift tables into Snowflake? Supaflow can replicate Redshift tables into Snowflake without a custom export script, copy job, scheduler, or table-by-table loader.
This guide walks through the full setup end to end: create the Snowflake destination, create the Redshift source, build the pipeline, run the first sync, and verify the data in Snowflake.
For the shorter product overview before the walkthrough, see the Redshift to Snowflake migration page.
What You Will Build
You will create a Redshift-to-Snowflake pipeline that:
- Reads tables from the Redshift schemas your database user can access
- Uses Redshift
UNLOADto write source data to an S3 staging path - Lets Snowflake read that same S3 path through a Snowflake storage integration
- Loads the selected tables into your Snowflake database and schema
- Runs a full first sync, then uses incremental sync for tables with a reliable cursor column
The Supaflow UI setup is three short steps once the AWS and Snowflake permissions are ready: about 5 minutes for the Snowflake destination, 5 minutes for the Redshift source, and 5 minutes for the pipeline. For a first migration, budget about 30 minutes total so you have time for IAM, the Snowflake storage integration, and validation.
Plan the Migration Scope
This guide covers table replication: move selected Redshift table data into Snowflake, validate the first load, and keep Snowflake current while you cut over.
Before you start, make a short inventory of what else depends on Redshift:
- Tables and columns that must move in the first wave
- Views, stored procedures, UDFs, and scheduled SQL that may need to be rewritten for Snowflake
- BI dashboards, notebooks, dbt jobs, and downstream applications that will need a new connection or schema reference
- Security rules such as Redshift users, groups, schema grants, masking policies, and row-level access patterns
- Redshift-specific physical design such as
DISTKEY,SORTKEY,VACUUM,ANALYZE, WLM queues, and query monitoring rules
Supaflow handles the data pipeline. It does not automatically rewrite every Redshift workload into Snowflake SQL. If your migration includes views, stored procedures, or application queries, plan that conversion separately from the table sync.
Also flag type-sensitive columns before the first run. Semi-structured SUPER values, geospatial columns, binary columns, time-zone-sensitive fields, approximate-count sketches, and interval-like values deserve spot checks in Snowflake after load. Snowflake's SnowConvert Redshift translation reference is useful when you are planning a larger SQL conversion.
Prerequisites
- A Supaflow account (sign up here)
- A Redshift provisioned cluster or Serverless workgroup
- A Redshift database user with
SELECTaccess to the tables you want to migrate - An S3 bucket and prefix for Redshift source files
- An AWS IAM role that Redshift can use for
UNLOAD - A Snowflake warehouse, database, and schema for the migrated tables
- A Snowflake storage integration that allows Snowflake to read the same S3 bucket and prefix
For the complete permission setup, see the Redshift source docs and Snowflake destination docs.
Step 1: Prepare Redshift Access
Create a dedicated read-only Redshift user for Supaflow:
CREATE USER supaflow_reader PASSWORD 'your_secure_password';
Grant access to each schema and table you want to replicate:
GRANT USAGE ON SCHEMA analytics TO supaflow_reader;
GRANT SELECT ON ALL TABLES IN SCHEMA analytics TO supaflow_reader;
Repeat the grants for every Redshift schema you want to include. Supaflow will show tables across the schemas this user can access.
Next, make sure Redshift can write UNLOAD files to your S3 staging path. Attach the IAM role to your Redshift cluster or Serverless namespace. If your Redshift database restricts role usage, grant the sync user permission to use the role:
GRANT ASSUMEROLE
ON 'arn:aws:iam::<account-id>:role/<redshift-unload-role>'
TO supaflow_reader
FOR UNLOAD;
You will use this same S3 bucket and prefix when configuring the Redshift source and the Snowflake storage integration.
Step 2: Create a Snowflake Destination (5 Minutes)
Before creating the pipeline, configure where the Redshift data will land. Go to the Destinations page in Supaflow.
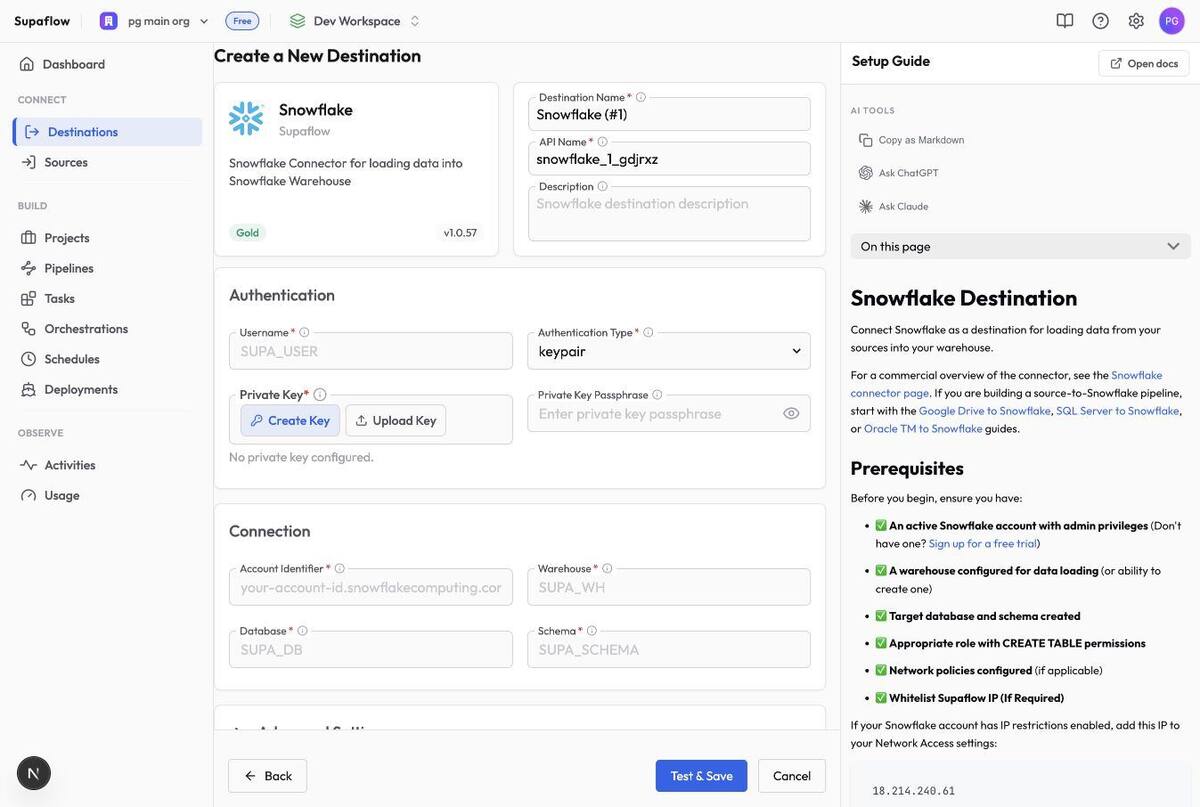
Click Create Destination and select Snowflake. Fill in your Snowflake connection details:
- Authentication Type -- choose key pair or password authentication
- Username and credentials -- enter the credentials for the Snowflake user Supaflow should use
- Account Identifier -- your Snowflake account identifier
- Warehouse -- the warehouse used for loading
- Database and Schema -- where Redshift tables will be created and loaded
- Role -- the Snowflake role Supaflow should use
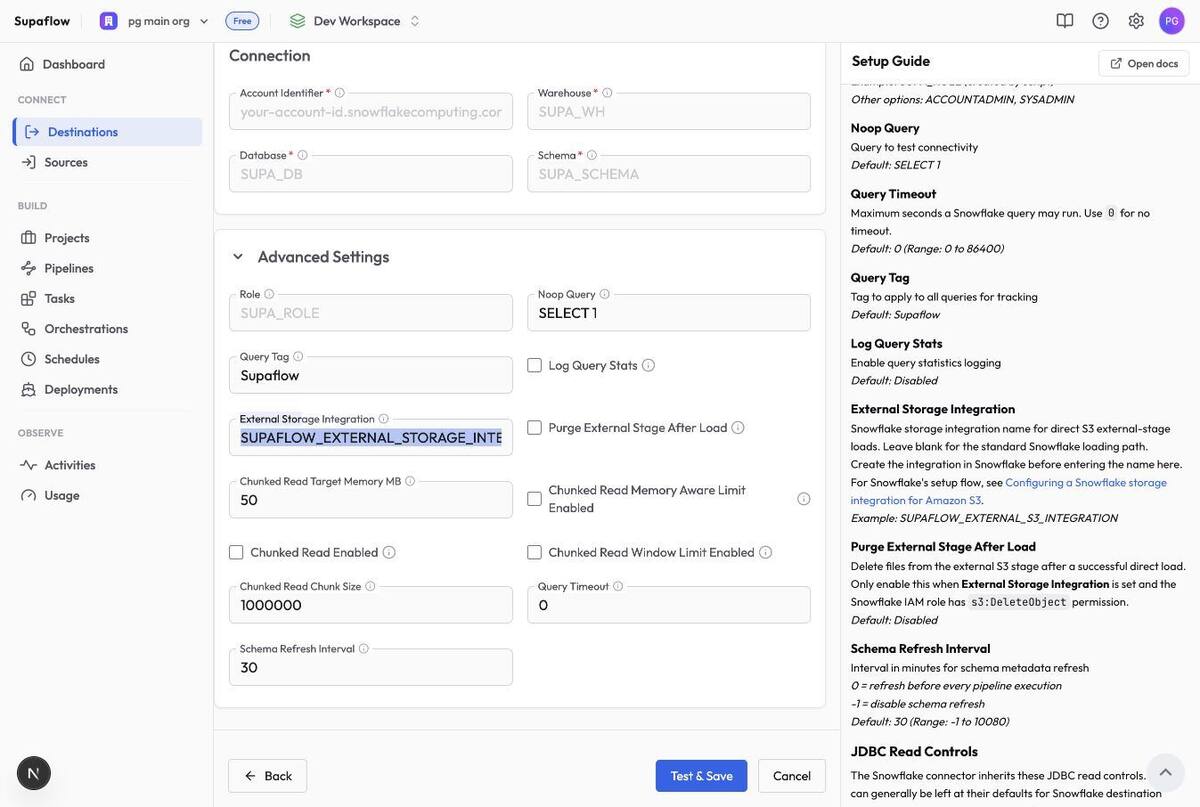
For Redshift-to-Snowflake direct loads, open Advanced Settings and set:
- External Storage Integration -- enter the Snowflake storage integration name, for example
SUPAFLOW_EXTERNAL_S3_INTEGRATION - Purge External Stage After Load -- leave disabled unless the Snowflake IAM role has
s3:DeleteObjectpermission and you want Snowflake to delete staged files after a successful load
The External Storage Integration field expects only the Snowflake integration name. Do not enter an S3 bucket, IAM role ARN, or AWS credentials in this field.
Click Test & Save to verify the Snowflake connection and permissions.
If you still need to create the integration, follow the Direct S3 External-Stage Loads section in the Snowflake destination docs. The integration's
STORAGE_ALLOWED_LOCATIONSmust cover the Redshift source S3 Staging Bucket and S3 Staging Prefix.
Step 3: Create a Redshift Source (5 Minutes)
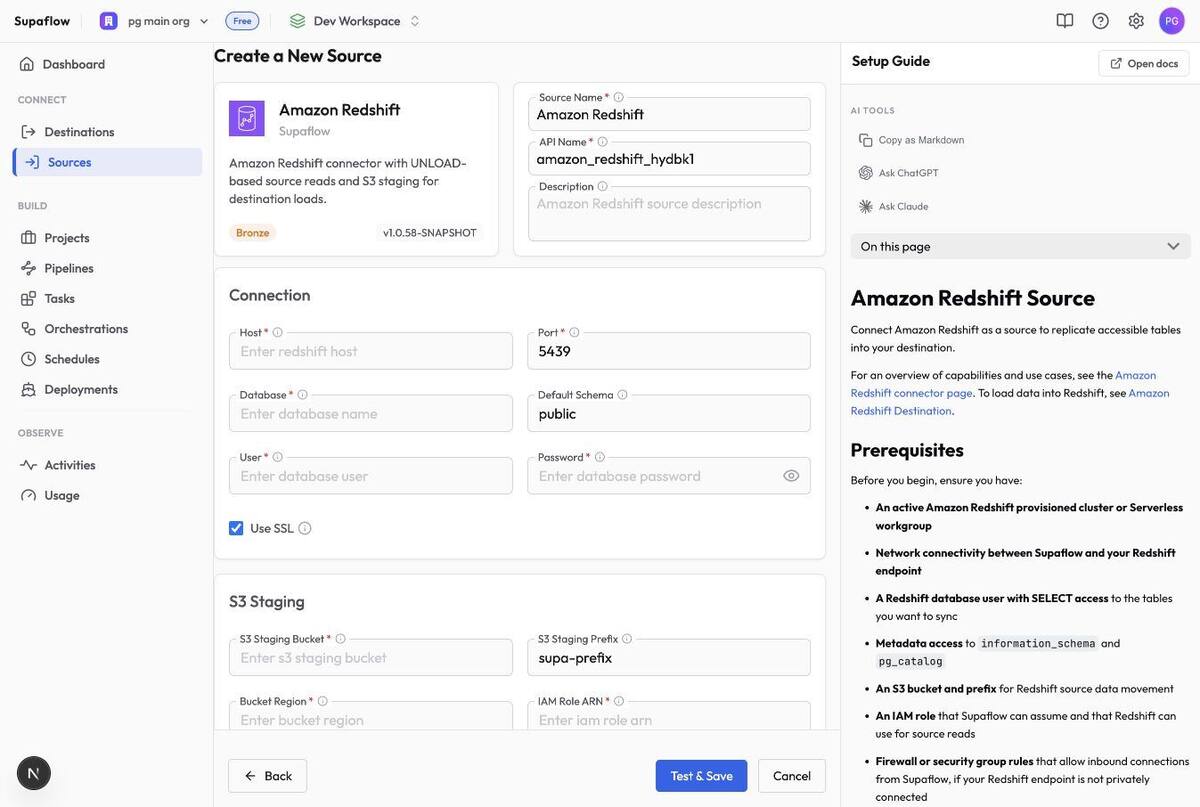
Next, set up Redshift so Supaflow can read your tables. Go to the Sources page and click Create Source. Select Amazon Redshift from the list of available source types.
Fill in the Redshift connection details:
- Host -- your Redshift cluster or Serverless endpoint, without protocol
- Port -- usually
5439 - Database -- the Redshift database to read from
- Default Schema -- usually
public, or your preferred default schema - User and Password -- the read-only user you created
- Use SSL -- leave enabled unless your Redshift environment requires otherwise
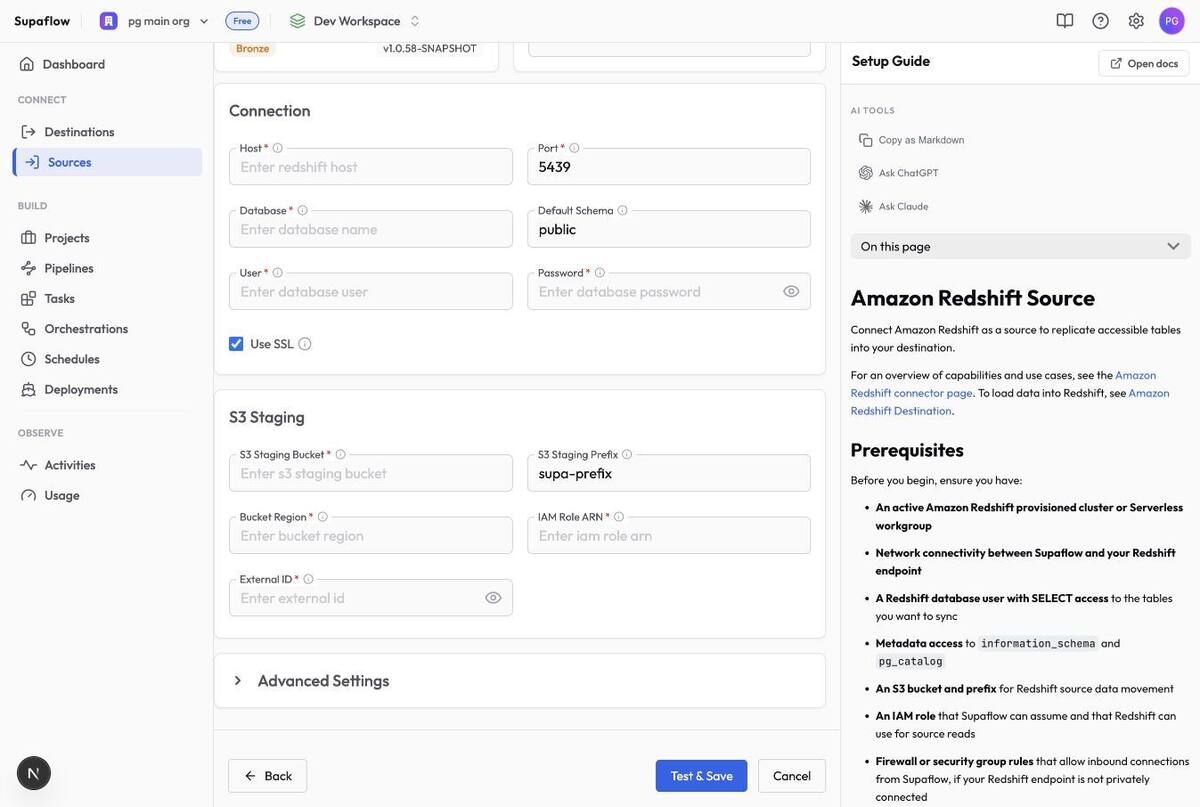
Then fill in the S3 staging details:
- S3 Staging Bucket -- the bucket Redshift writes
UNLOADfiles to - S3 Staging Prefix -- the prefix Supaflow can use for staged files
- Bucket Region -- the AWS region for the bucket
- IAM Role ARN -- the role Supaflow can assume for the staging path
- External ID -- the external ID that matches your IAM trust policy
Leave Use UNLOAD For Source enabled in Advanced Settings. This is the recommended Redshift source path and is the path used for direct Redshift-to-Snowflake loading.
For the cleanest direct-load path, keep the Redshift UNLOAD bucket and Snowflake storage integration pointed at the same bucket and prefix. If the bucket is outside the Redshift region, set Bucket Region carefully; Redshift requires the correct S3 region for cross-region UNLOAD. AWS documents the UNLOAD behavior in the Redshift UNLOAD reference, and Snowflake documents the IAM trust flow in its S3 storage integration guide.
If you use separate AWS roles for Supaflow and Redshift, enter the Redshift role in Redshift COPY and UNLOAD IAM Role ARN. Both roles must be able to access the same S3 staging path.
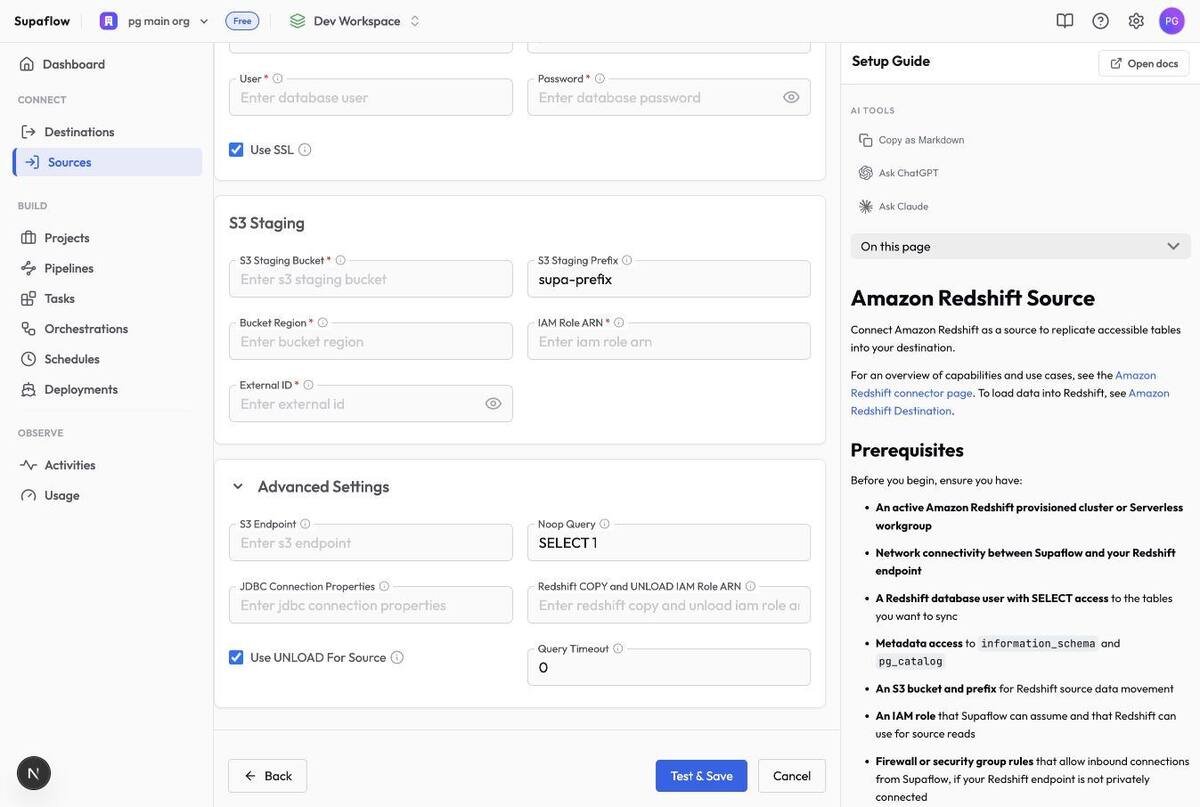
Click Test & Save to verify Redshift connectivity, metadata access, and S3 role access.
Step 4: Open Your Project
Open the project whose destination is Snowflake. In Supaflow, the project destination controls where the pipeline writes data, so create the Redshift-to-Snowflake pipeline from the Snowflake project and choose Redshift as the source in the wizard.
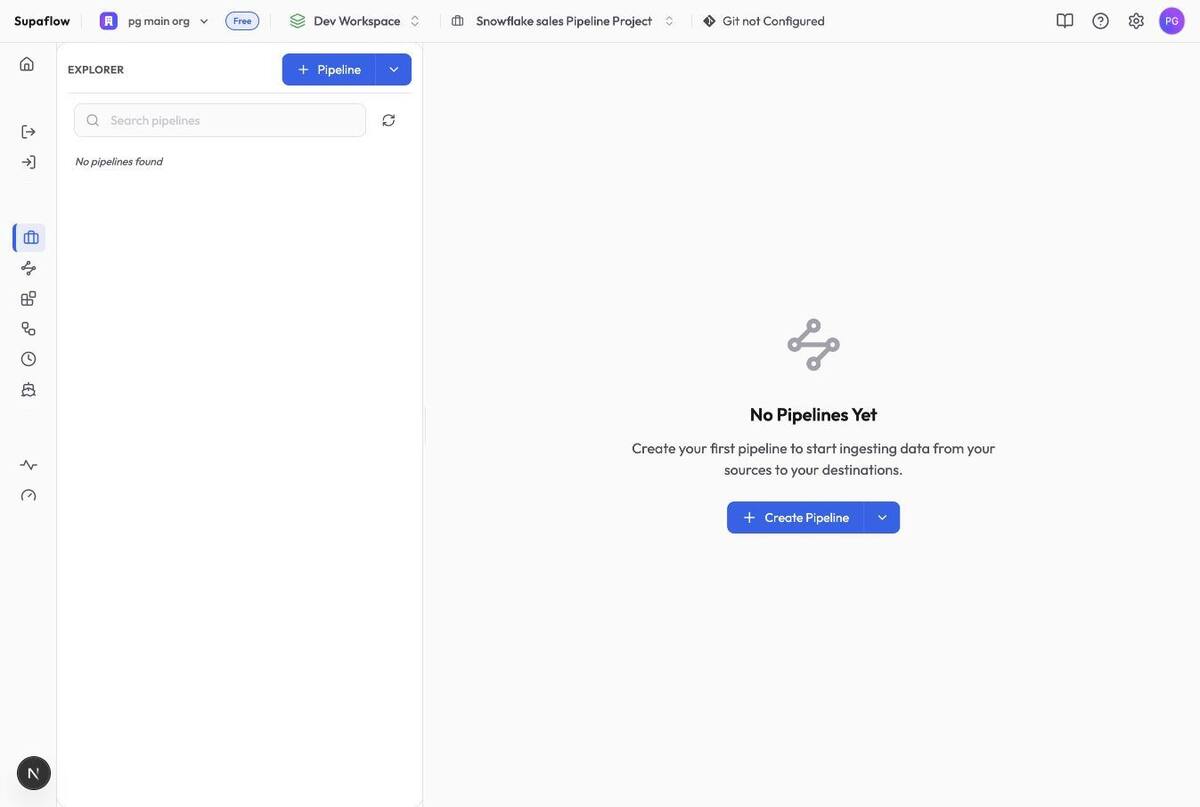
If the Redshift source is still syncing schema, wait until it becomes active or click Refresh Schema after changing database grants.
Step 5: Create a Pipeline (5 Minutes)
Inside the project, click Create Pipeline to launch the pipeline wizard.
Choose Source
Select the Amazon Redshift source you just created and click Continue.
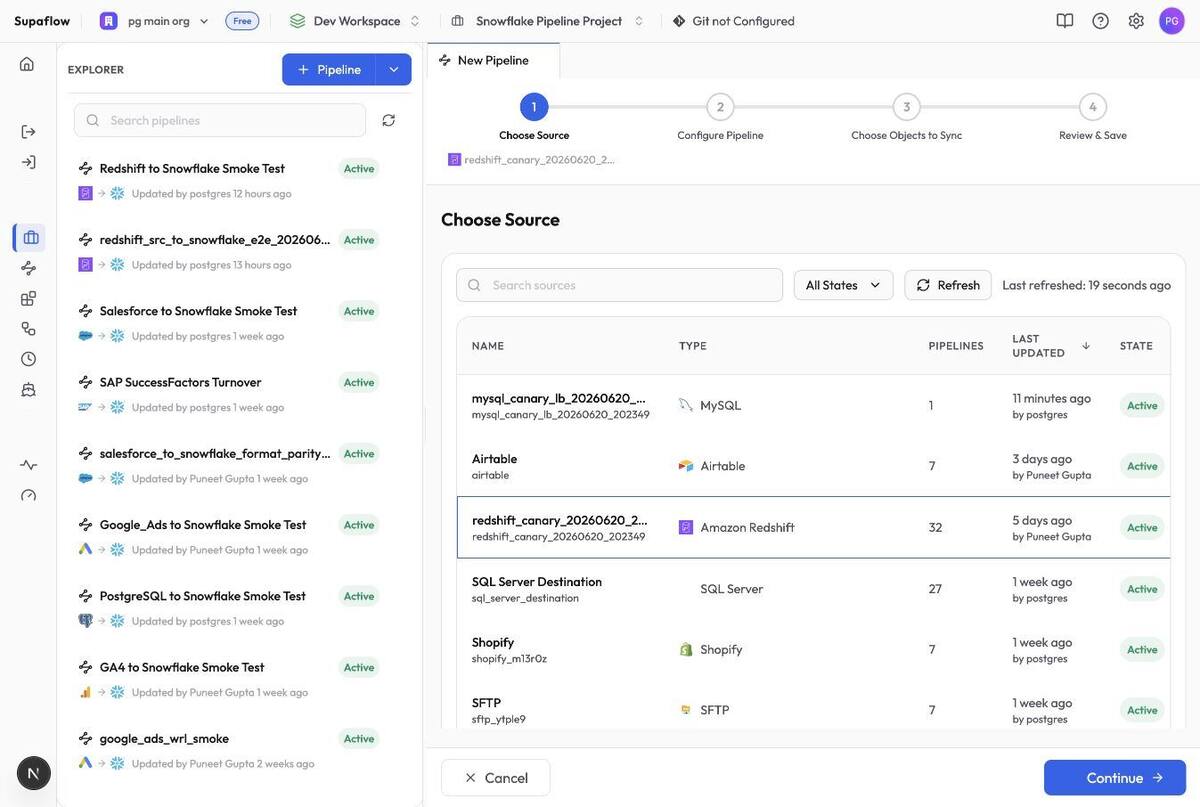
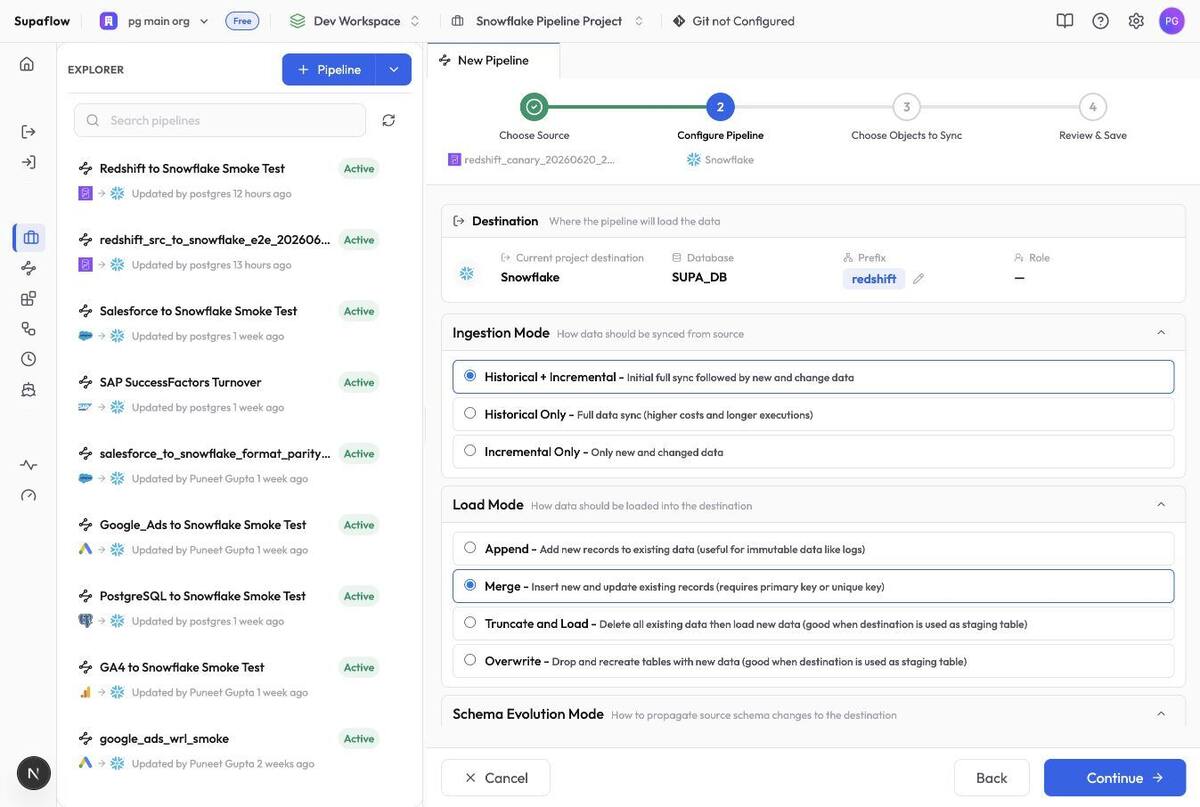
Configure Pipeline Settings
Set the sync behavior:
- Ingestion Mode: Historical + Incremental -- runs a full first sync, then uses incremental sync where selected objects support it
- Load Mode: Merge -- keeps Snowflake updated with new and changed rows
- Schema Evolution Mode: Allow All Changes -- lets Supaflow add new columns and apply compatible type changes in Snowflake
Use full refresh for small tables or tables without a reliable cursor column. Use incremental sync for larger tables with a date, timestamp, or other cursor column that advances when rows are inserted or updated.
Redshift source syncs do not read database logs and do not detect hard deletes from source tables. If delete capture is required, model deletes in the source table before cutover.
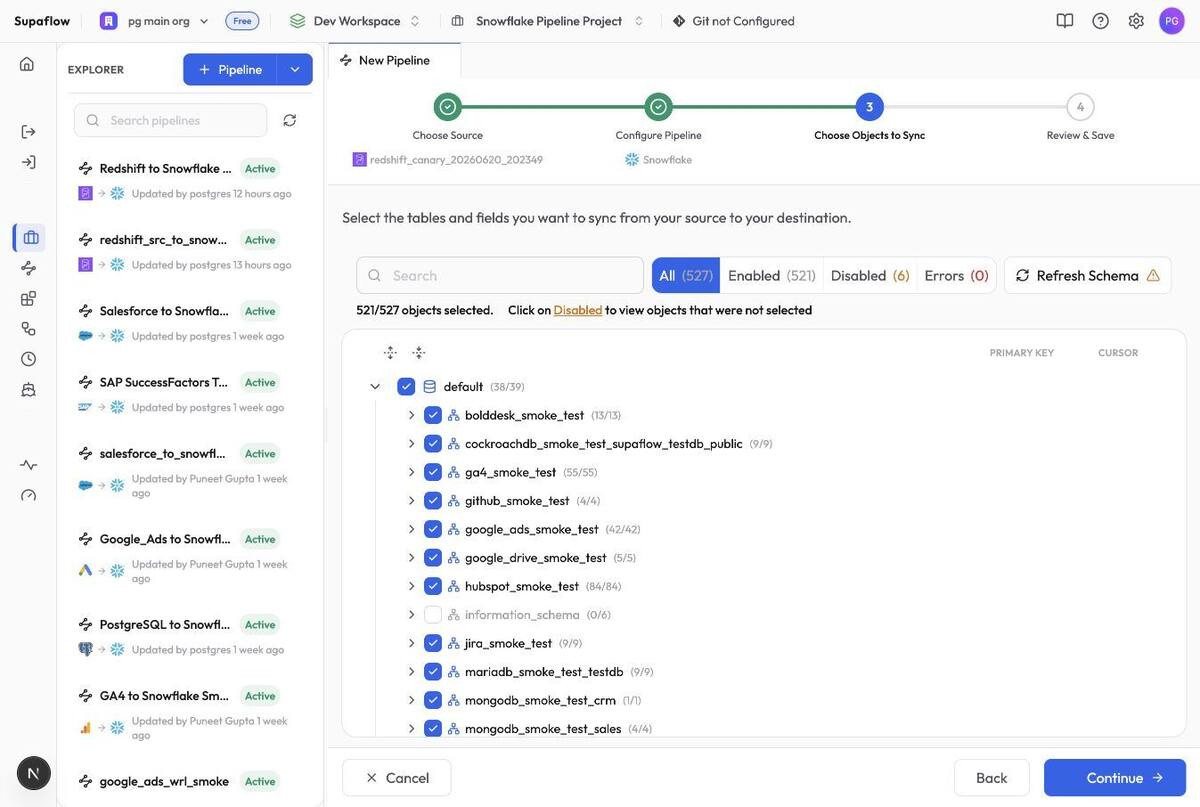
Choose Objects to Sync
Select the Redshift schemas, tables, and columns you want to migrate. Supaflow shows the tables the configured Redshift user can access.
If an expected table does not appear:
- Confirm the Redshift user has
USAGEon the schema - Confirm the user has
SELECTon the table - Refresh schema in Supaflow after updating grants
Review and Save
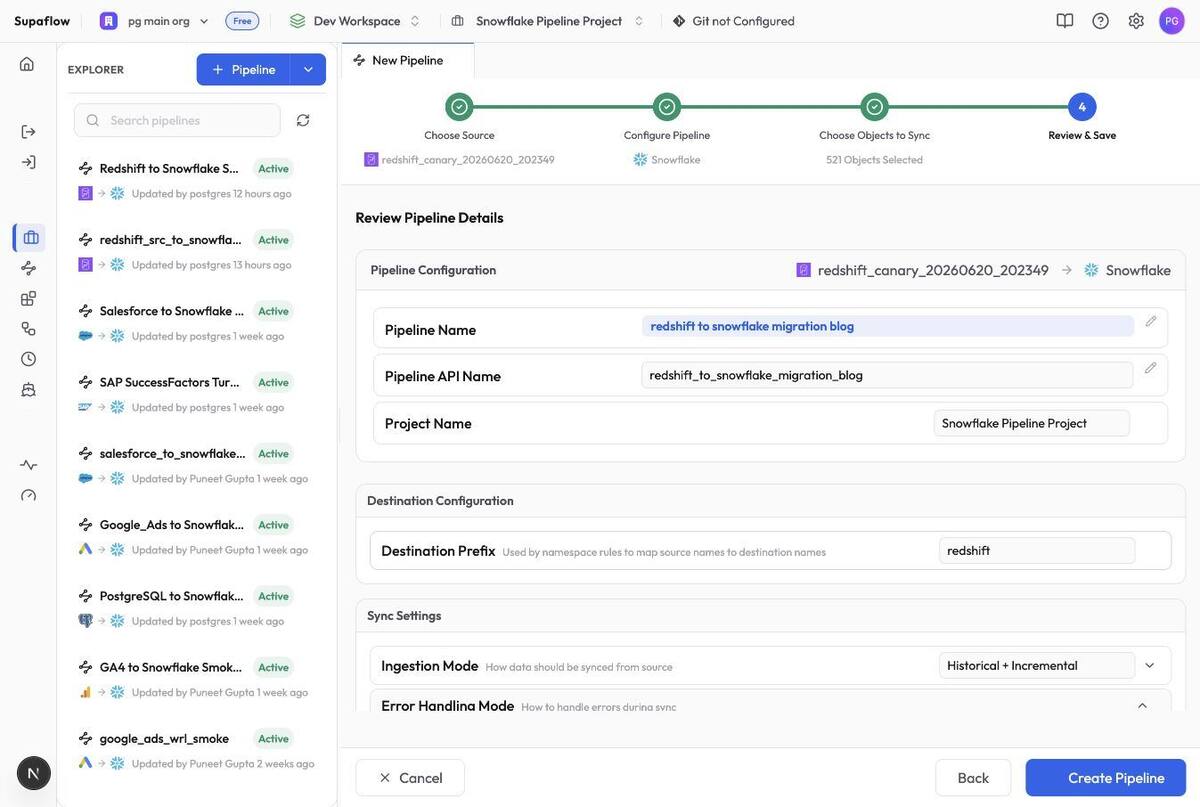
Review the pipeline summary, destination schema, selected objects, and sync settings. Click Create Pipeline.
Step 6: Run the Pipeline
The pipeline is now active. Click Sync Now to trigger the first run.
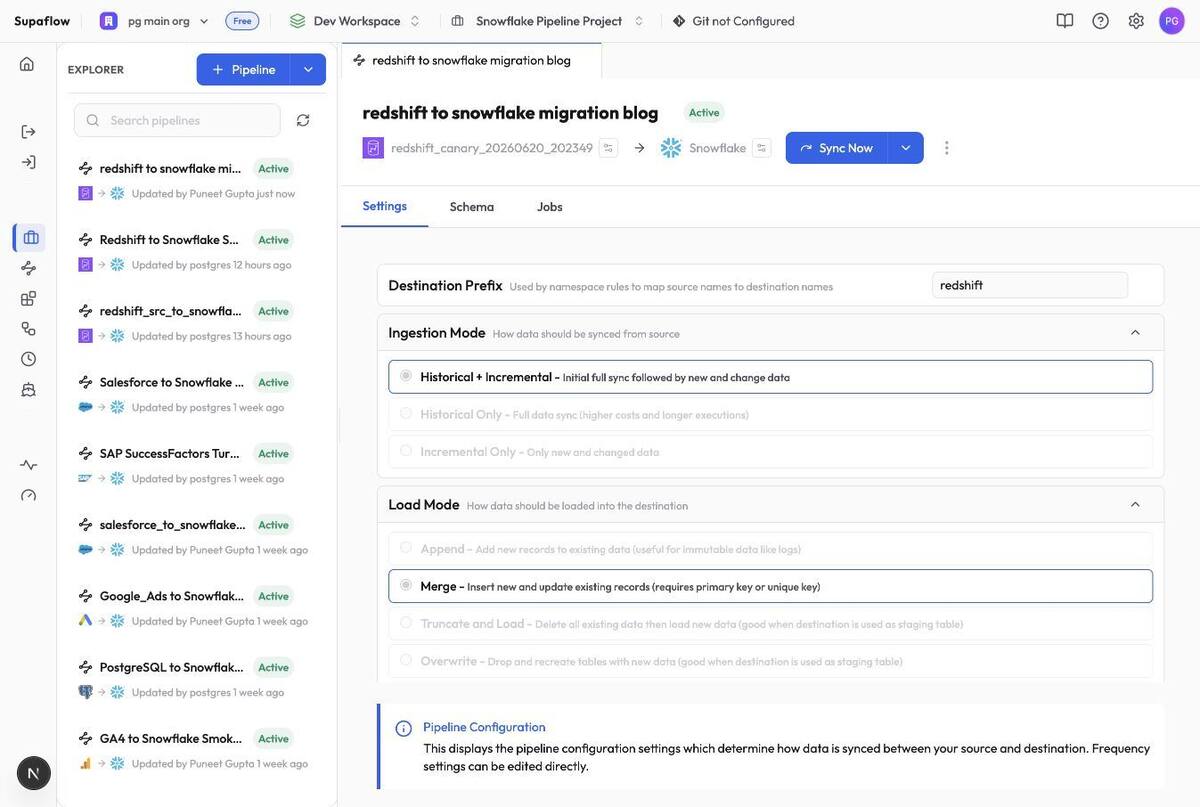
For the first run, Supaflow reads the selected Redshift tables and loads them into Snowflake. Large tables may take longer than the setup window depending on table size, Redshift capacity, Snowflake warehouse size, and S3 throughput.
Step 7: Monitor Progress
Switch to the Jobs tab to watch the pipeline run.
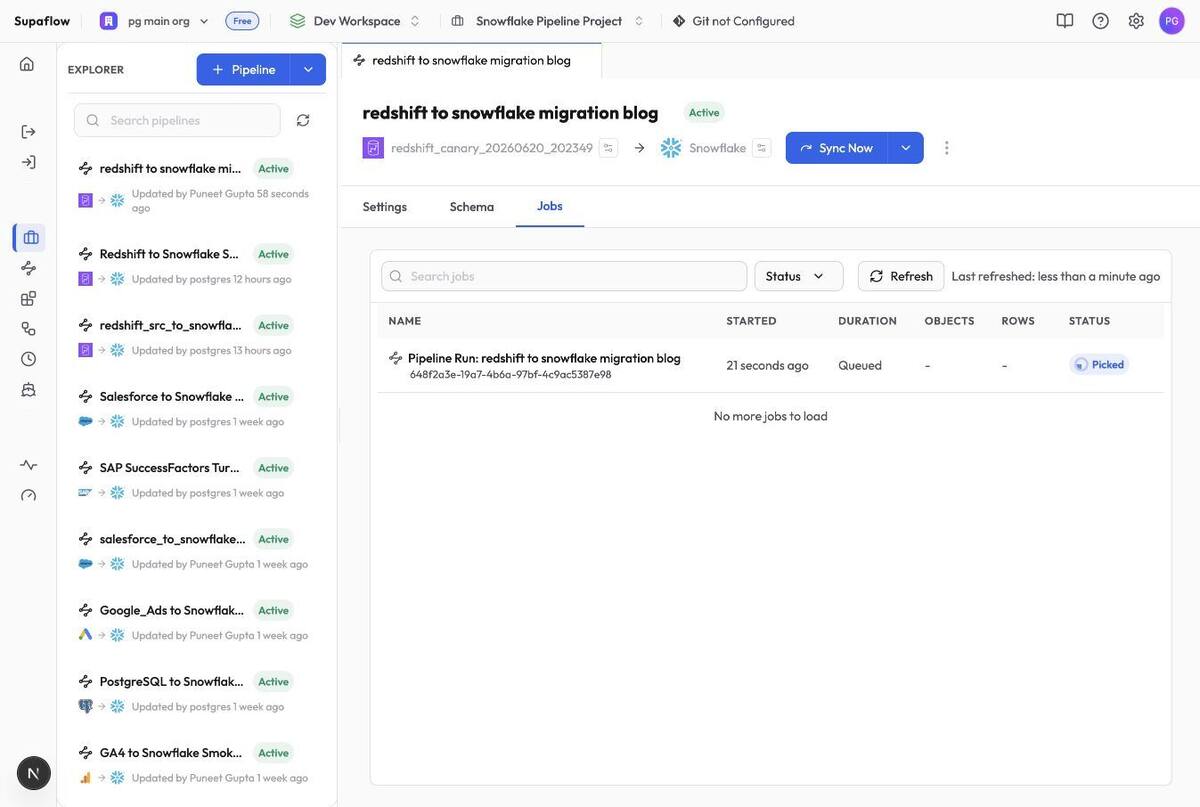
Click into the job to see per-object progress, including row counts, load status, duration, and any table-specific errors. If one table fails, use the object-level error in the job detail to fix the missing permission, S3 access issue, or load configuration.
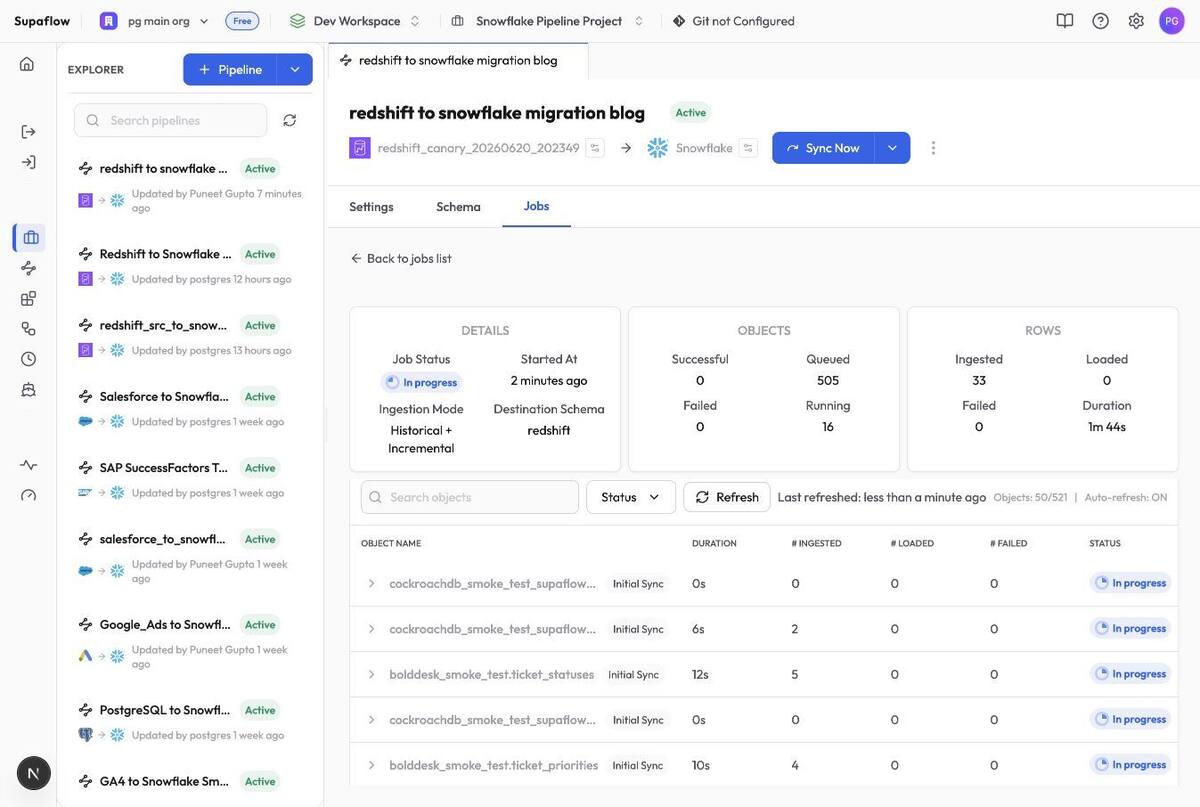
When the run completes, use the same Jobs view to confirm the final status, object count, total rows loaded, and duration.
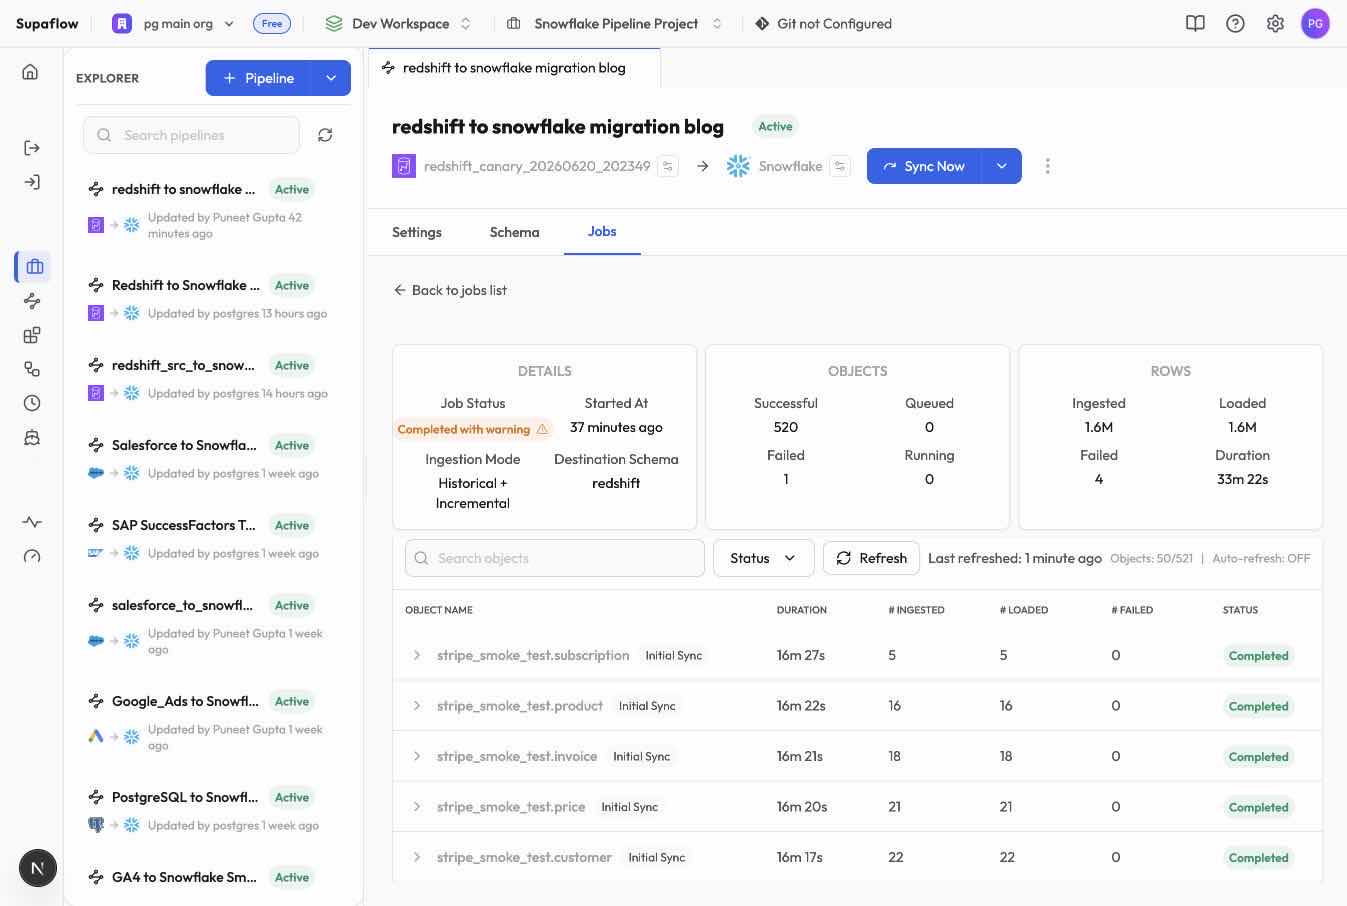
Common first-run checks:
- Redshift access -- the source user can see and select the table
- Redshift UNLOAD access -- the Redshift role can write to the staging prefix
- Snowflake storage integration --
STORAGE_ALLOWED_LOCATIONScovers the same S3 bucket and prefix - AWS trust policy -- the Snowflake IAM principal and external ID from
DESC INTEGRATIONare trusted
Step 8: Verify in Snowflake
Log into Snowflake, navigate to Catalog > Database Explorer, and browse to the database and schema you configured.
Open any migrated table to preview the data, or run a quick count:
SELECT COUNT(*) FROM SUPA_DB.SUPA_SCHEMA.YOUR_TABLE;
Compare counts against Redshift for the first few tables before expanding the migration scope. For important tables, add a few aggregate checks so you catch more than missing rows:
SELECT
  COUNT(*) AS row_count,
  COUNT(DISTINCT id) AS distinct_ids,
  MIN(updated_at) AS first_update,
  MAX(updated_at) AS last_update,
  SUM(amount) AS total_amount
FROM SUPA_DB.SUPA_SCHEMA.YOUR_TABLE;
Use columns that matter for the table. For order, invoice, payment, or usage tables, compare totals over money or quantity fields. For event tables, compare date ranges and distinct IDs. For dimension tables, sample a few primary keys and compare every business-critical column.
Pay extra attention to tables with semi-structured, geospatial, binary, time-zone-sensitive, sketch, or interval-like columns. Those are the columns most likely to need a Snowflake-specific modeling decision after the raw data lands.
Keep Snowflake Updated While Redshift Stays Live
You do not need to make the first successful load your cutover date. Keep Redshift as the production source of truth, schedule the Supaflow pipeline, and use Snowflake as a shadow environment until data owners approve the switch.
This is scheduled incremental replication, not database-log CDC. A table stays current only when its selected cursor column advances for every insert and update you need to capture. Hard deletes do not arrive as incremental events. Keep tables without a reliable cursor on full refresh, or model deletions explicitly in Redshift before relying on incremental runs.
Use this parallel-run sequence:
- Finish the historical backfill. Let the first load complete before measuring incremental freshness. Record the Redshift and Snowflake row counts, date boundaries, distinct-key counts, and business totals that form your baseline.
- Set a freshness target. Decide how stale Snowflake may be during the overlap period, then schedule the pipeline accordingly. Measure freshness from the latest completed run and the maximum cursor value in each critical table, not from the schedule alone.
- Keep Redshift as the only production writer. Point dashboards and jobs at Snowflake for shadow testing, but avoid writing business changes to both warehouses. Dual writes create a second consistency problem that the replication pipeline cannot resolve.
- Validate every critical run. Start with the per-object row counts in Supaflow Job Details. Then compare Redshift and Snowflake aggregates using the same business cutoff. For high-value tables, sample stable primary keys and compare every business-critical column.
- Control schema changes. Review new columns and type changes before they reach downstream Snowflake models. Refresh source metadata when a new Redshift table must join the migration, and keep destructive source changes out of the overlap window when possible.
- Shadow-test downstream workloads. Run BI dashboards, dbt models, scheduled queries, and access-control checks against Snowflake. Record query differences and obtain owner sign-off before repointing production consumers.
Parallel-run validation gates
| Gate | What to compare | Stop condition |
|---|---|---|
| Pipeline health | Latest job status, object-level failures, rows read, rows loaded | Any critical object fails or stops advancing |
| Freshness | Maximum selected cursor value in Redshift and Snowflake | Snowflake exceeds the agreed staleness target |
| Completeness | Counts, distinct primary keys, minimum and maximum dates | An unexplained gap remains after the same cutoff is applied |
| Business parity | Revenue, order quantity, usage, balances, or other table-specific totals | A difference exceeds the tolerance approved by the data owner |
| Row-level parity | Stable primary-key samples and business-critical columns | Values differ after accounting for expected type or time-zone conversion |
| Downstream behavior | Dashboard totals, dbt tests, scheduled queries, grants, and row-access rules | A production consumer or security owner has not signed off |
Run aggregate comparisons against a stable cutoff whenever Redshift is still receiving writes. A live source can change between two queries, so an unbounded COUNT(*) comparison may report a difference even when the pipeline is healthy.
Cutover and rollback criteria
Cut over only after the initial backfill and several scheduled runs complete without unexplained gaps. Critical dashboards and models should pass against Snowflake, schema changes should be accounted for, and every production consumer should have an owner and a rollback instruction.
For rollback, keep Redshift available and avoid destructive cleanup during the observation window. If a Snowflake validation gate fails after traffic moves, point consumers back to Redshift, correct the pipeline or downstream model, run another synchronization and validation cycle, and repeat the cutover gate. Snowflake's own Redshift migration guidance likewise treats final synchronization, validation, cutover, and fallback as separate phases.
Cut Over to Snowflake
Once validation looks clean, treat cutover as a short controlled change:
- Run one final sync after the initial backfill is complete.
- Pause or narrow Redshift writes if your source process allows it.
- Validate critical tables again with row counts, date ranges, and business totals.
- Repoint BI tools and jobs to the Snowflake database and schema.
- Keep Redshift available for rollback until downstream owners confirm the Snowflake results.
- Schedule the Supaflow pipeline if Snowflake needs to stay current during a phased migration.
For a one-time migration, you can stop after validation and cutover. For an incremental migration, keep the pipeline scheduled until Redshift is no longer serving production consumers.
What Happens Next
After the initial sync, Supaflow can keep Snowflake updated on a schedule:
- Incremental tables read new and updated rows based on the cursor column you select
- Full-refresh tables can run on the refresh cadence you configure
- New Redshift tables appear after schema refresh and can be added to the pipeline
- Schema changes are applied to Snowflake according to your schema evolution mode
For ongoing replication, watch for schema changes and cursor quality over the first few scheduled runs. A table that is rebuilt upstream may be better as full refresh. A table with a reliable update marker can stay incremental.
Get Started
Sign up at app.supa-flow.io and connect Redshift to Snowflake in minutes. For the migration overview, see the Redshift to Snowflake connector page. If your source is SQL Server and your destination is Redshift, use the SQL Server to Redshift migration guide instead. For full setup details, see the Redshift source docs, the Snowflake destination docs, and the pipeline configuration guide. If you have questions, reach out at support@supa-flow.io.
 Ask Claude