Snowflake Native App Deployment Guide
A step-by-step walkthrough for deploying Supaflow as a Snowflake Native App. This guide covers everything from initial Snowflake setup to running your first pipeline.
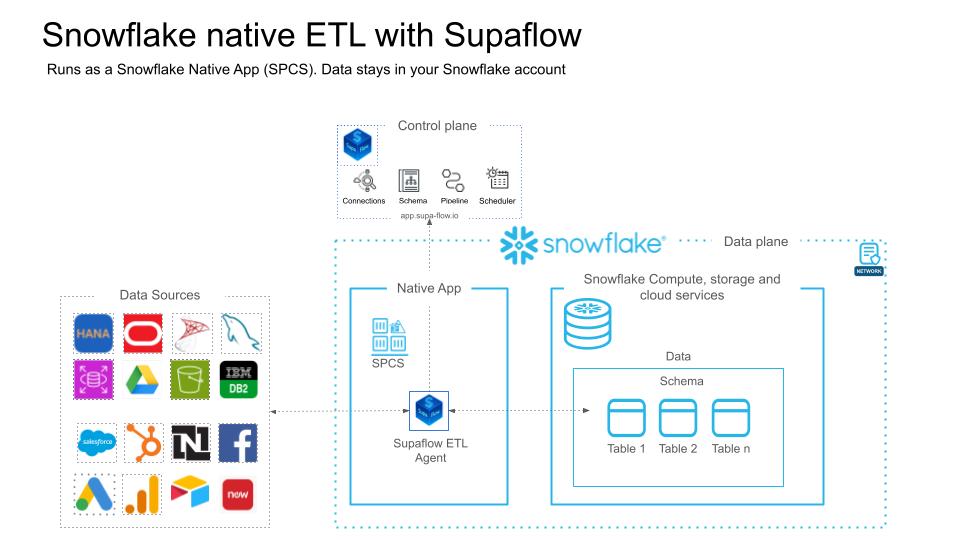
This process takes approximately 15-20 minutes end to end.
Prerequisites
Before you begin, ensure you have:
- A Supaflow account with admin role (Sign up if you don't have one)
- A paid Snowflake account with ACCOUNTADMIN access (trial accounts do not support External Access Integrations, which are required for the Native App)
- Access to Snowflake Worksheets (Snowsight)
Run the Snowflake Setup Script
A Snowflake account admin needs to run this script before you can install the Native App. If this has already been done for your account, skip to Phase 1.
- Log in to your Snowflake account as ACCOUNTADMIN
- Click Projects > Worksheets > + (New Worksheet)
- Copy the script below and paste it into the worksheet
- Optionally modify the variable values at the top: role_name, user_name, warehouse_name, database_name, or schema_name
- Click the dropdown arrow next to the Run button and select "Run All"
Don't use the regular "Run" button -- it only executes the current statement. Use "Run All" to execute the entire script.
This script creates a dedicated role (SUPA_ROLE), service user (SUPA_USER), warehouse (SUPA_WH), and database (SUPA_DB). Supaflow automatically generates and assigns the key pair for authentication -- no manual key setup is required.
-- create variables for user / password / role / warehouse / database (needs to be uppercase for objects)
set role_name = 'SUPA_ROLE';
set user_name = 'SUPA_USER';
set warehouse_name = 'SUPA_WH';
set database_name = 'SUPA_DB';
set schema_name = 'SUPA_SCHEMA';
set fqn_schema_name = concat($database_name,'.',$schema_name);

-- change role to securityadmin for user/role steps
use role securityadmin;

-- create role for Supaflow
create role if not exists identifier($role_name);
grant role identifier($role_name) to role SYSADMIN;

-- create a user for SupaFlow
create user if not exists identifier($user_name)
   type = SERVICE
   default_role = $role_name
   default_warehouse = $warehouse_name;

grant role identifier($role_name) to user identifier($user_name);

-- set binary_input_format to BASE64
ALTER USER identifier($user_name) SET BINARY_INPUT_FORMAT = 'BASE64';

-- change role to sysadmin for warehouse/database steps
use role sysadmin;

   -- create a warehouse for Supaflow
   create warehouse if not exists identifier($warehouse_name)
   warehouse_size = xsmall
   warehouse_type = standard
   auto_suspend = 60
   auto_resume = true
   initially_suspended = true;

   -- create database for Supaflow
create database if not exists identifier($database_name);

create schema if not exists identifier($fqn_schema_name);


-- grant supaflow role access to warehouse
grant USAGE on warehouse identifier($warehouse_name) to role identifier($role_name);

-- grant supaflow access to the database
grant ALL on database identifier($database_name) to role identifier($role_name);
grant ALL on ALL schemas in database identifier($database_name) to role identifier($role_name);
grant ALL on schema identifier($fqn_schema_name) to role identifier($role_name);

-- change role to ACCOUNTADMIN for STORAGE INTEGRATION support (only needed for Snowflake on GCP)
use role ACCOUNTADMIN;

-- transfer ownership of database and schema to SUPA_ROLE
GRANT OWNERSHIP ON DATABASE identifier($database_name)
  TO ROLE identifier($role_name) COPY CURRENT GRANTS;
GRANT OWNERSHIP ON SCHEMA identifier($fqn_schema_name)
  TO ROLE identifier($role_name) COPY CURRENT GRANTS;

grant CREATE INTEGRATION on account to role identifier($role_name);
grant CREATE EXTERNAL VOLUME on account to role identifier($role_name);
grant CREATE DATABASE on account to role identifier($role_name);
GRANT EXECUTE TASK ON ACCOUNT TO ROLE identifier($role_name);
GRANT EXECUTE MANAGED TASK ON ACCOUNT TO ROLE identifier($role_name);

grant all on future schemas in database identifier($database_name) to role identifier($role_name);
grant all on future tables in database identifier($database_name) to role identifier($role_name);
grant all on future views in database identifier($database_name) to role identifier($role_name);

-- grants for querying Iceberg tables via external volume + catalog integration
grant CREATE TABLE on all schemas in database identifier($database_name) to role identifier($role_name);
grant CREATE TABLE on future schemas in database identifier($database_name) to role identifier($role_name);

-- grant usage on future file formats and stages
GRANT USAGE ON FUTURE FILE FORMATS IN DATABASE identifier($database_name) TO ROLE identifier($role_name);
GRANT USAGE ON FUTURE STAGES IN DATABASE identifier($database_name) TO ROLE identifier($role_name);
Values to Note Down
After running the script, note down the following values. You will need them when creating the Snowflake destination datasource in Phase 1.
| Value | Script Default | Where to Find |
|---|---|---|
| Account Identifier | -- | Your Snowflake account URL (e.g., orgname-account_name.snowflakecomputing.com). Find it in the bottom-left corner of Snowsight. |
| Username | SUPA_USER | The user_name variable in the script |
| Role | SUPA_ROLE | The role_name variable in the script |
| Warehouse | SUPA_WH | The warehouse_name variable in the script |
| Database | SUPA_DB | The database_name variable in the script |
| Schema | SUPA_SCHEMA | The schema_name variable in the script |
If you customized any of the variable values at the top of the script, use your custom values instead of the defaults shown above.
Phase 1: Create Snowflake Destination Datasource
Create a Snowflake destination datasource using the SUPA_USER created in the prerequisites. This datasource will later be assigned as the controller for the Native App agent. For full details on Snowflake destination configuration, see the Snowflake Destination docs.
Step 1: Create a Snowflake Destination
- In Supaflow, go to Destinations in the sidebar
- Click Create Destination
- Select Snowflake from the connector list
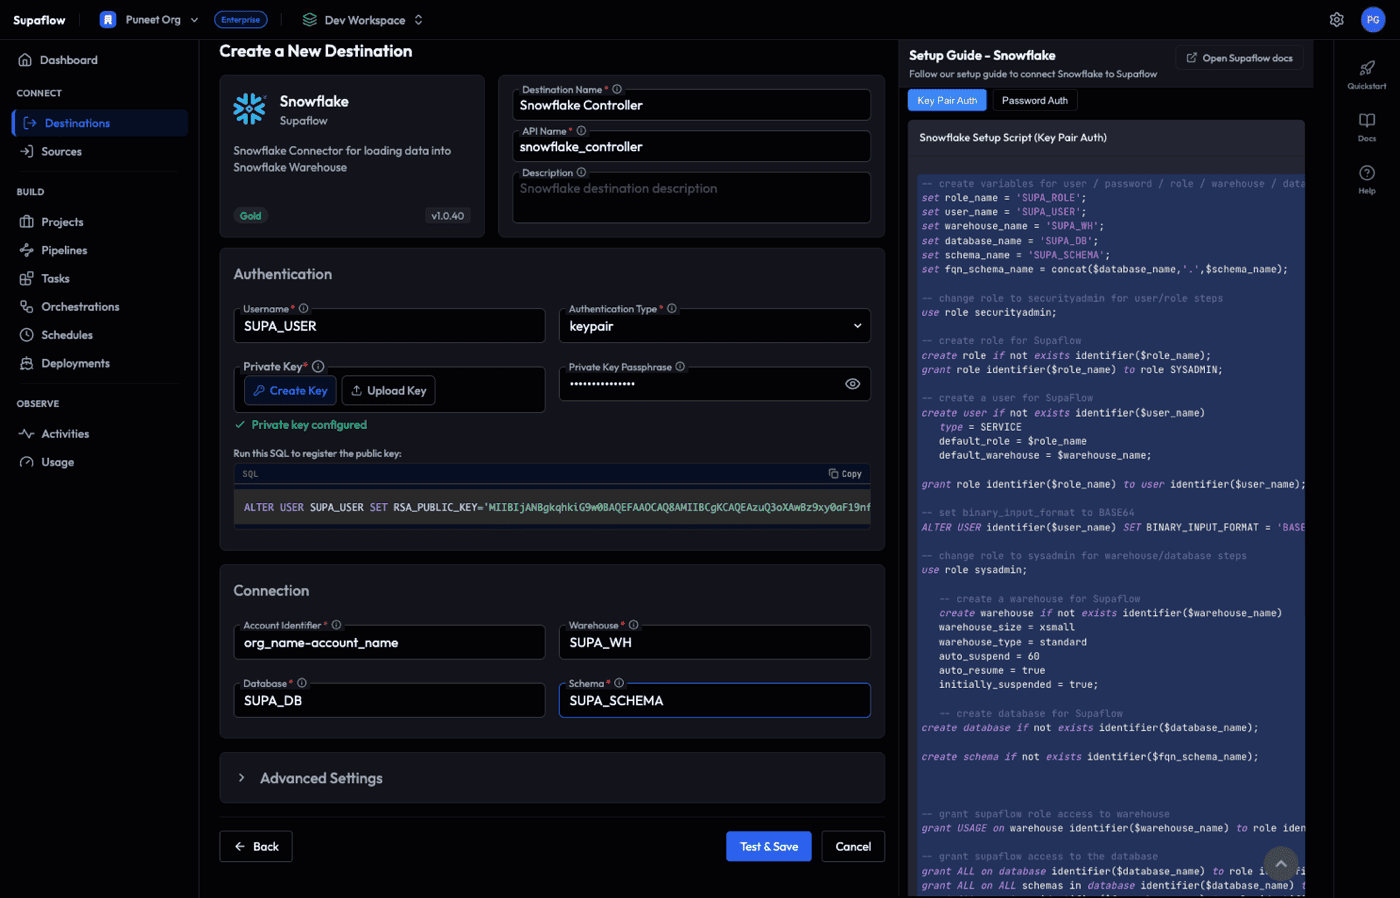
This opens the Snowflake destination form. Fill in the fields below using the values from the setup script. If you kept the script defaults, use the values shown in the Default column.
Destination Info
| Field | Required | Default | Description |
|---|---|---|---|
| Destination Name | Yes | Snowflake (#1) | A display name for this datasource. Choose something descriptive (e.g., Snowflake Controller). |
| API Name | Yes | Auto-generated | Auto-generated from the destination name. Used as an internal identifier. |
| Description | No | -- | Optional description for your reference. |
Authentication
| Field | Required | Default | Description |
|---|---|---|---|
| Username | Yes | -- | The Snowflake user created by the setup script. Default: SUPA_USER |
| Authentication Type | Yes | keypair | Select keypair. The other options (basic, spcs_oauth) are not used for the controller datasource. |
| Private Key | Yes | -- | Click Create Key to have Supaflow generate a key pair automatically. See the important step below. Alternatively, click Upload Key to use an existing key. |
| Private Key Passphrase | No | -- | Only required if your private key is encrypted with a passphrase. Leave blank if you used Create Key. |
After clicking Create Key, Supaflow generates a key pair and displays a SQL statement under the heading "Run this SQL to register the public key:"
ALTER USER SUPA_USER SET RSA_PUBLIC_KEY='MIIBIjAN...';
- Click Copy to copy the SQL statement
- Open a Snowflake worksheet as SECURITYADMIN (or ACCOUNTADMIN)
- Paste and run the SQL statement
- This registers the public key with your Snowflake user so key pair authentication works
You must complete this step before the connection test will succeed.
Connection
| Field | Required | Default from Script | Description |
|---|---|---|---|
| Account Identifier | Yes | -- | Your Snowflake account identifier (e.g., orgname-account_name.snowflakecomputing.com) |
| Warehouse | Yes | SUPA_WH | The warehouse created by the setup script |
| Database | Yes | SUPA_DB | The database created by the setup script |
| Schema | Yes | SUPA_SCHEMA | The schema created by the setup script |
Advanced Settings (Optional)
Click Advanced Settings to expand. These can generally be left at their defaults.
| Field | Default | Description |
|---|---|---|
| Role | -- | The Snowflake role to use. Set to SUPA_ROLE (created by the setup script). |
| Noop Query | SELECT 1 | Query used to test connectivity. No need to change. |
| Query Tag | Supaflow | Tag applied to all queries for tracking in Snowflake. |
| Log Query Stats | Disabled | Enable to log query execution statistics. |
| Query Timeout | 0 | Query timeout in seconds. 0 means no timeout. |
| Schema Refresh Interval | 30 | Interval in minutes for schema metadata refresh. |
Step 2: Test and Save the Datasource
- Click Test & Save to verify connectivity and save the datasource
- The status indicator at the bottom shows the connection test progress
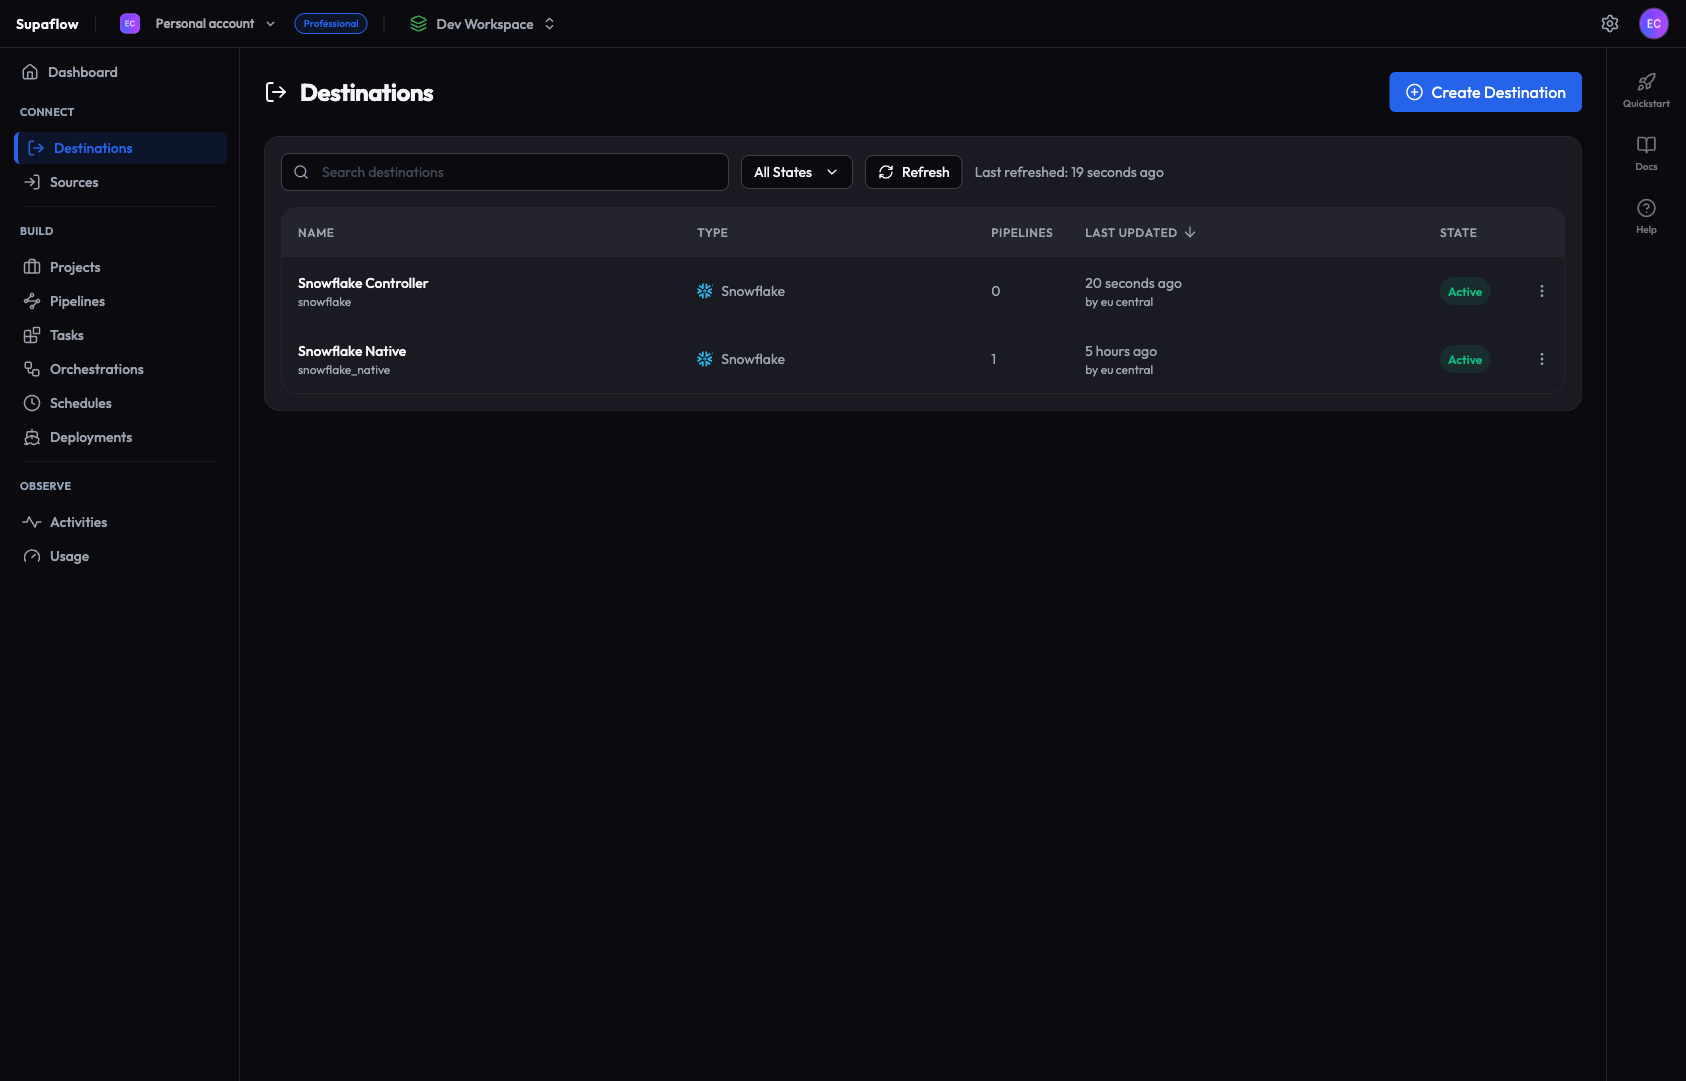
- On success, you are redirected to the Destinations list
- The new datasource appears with an Active state (it may briefly show "Synching Schema" first)
If the connection test fails, check that your account identifier, username, and private key are correct. Make sure you ran the ALTER USER SQL in Snowflake to register the public key. See the Snowflake Destination docs for common troubleshooting steps.
Phase 2: Install the Snowflake Native App
Install the Supaflow Native App from the Snowflake Marketplace, link it to your Supaflow account, and deploy the agent.
Step 3: Install the Native App
- In Snowsight, navigate to Data Products > Marketplace
- Search for Supaflow
- Click on the Supaflow app listing
- Click Get to begin installation
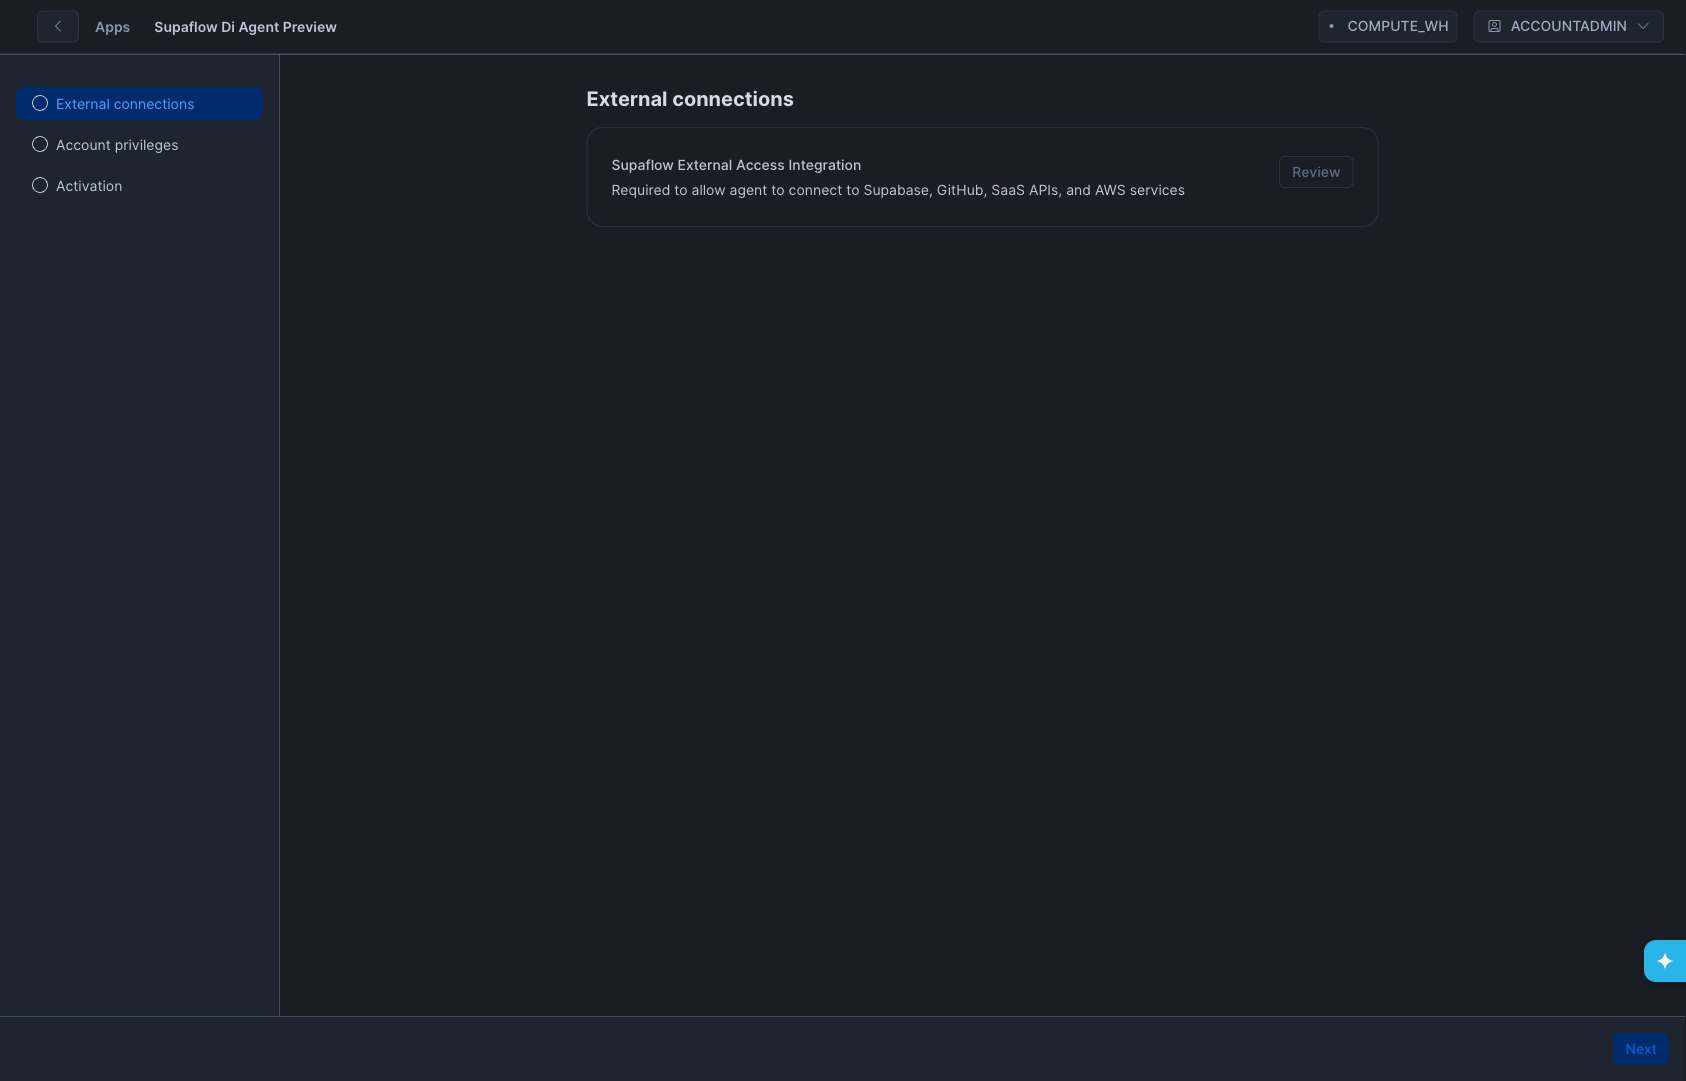
Step 4: Configure the App
After clicking Get, Snowflake opens a configuration wizard. Complete the following steps:
- Review External Connections -- The first screen shows the Supaflow External Access Integration under "External connections." This integration allows the Native App to make outbound connections to Supabase, GitHub, SaaS APIs, and AWS services.
- Click Review to inspect the list of allowed endpoints
- Review the endpoints, then click Connect to approve the External Access Integration

-
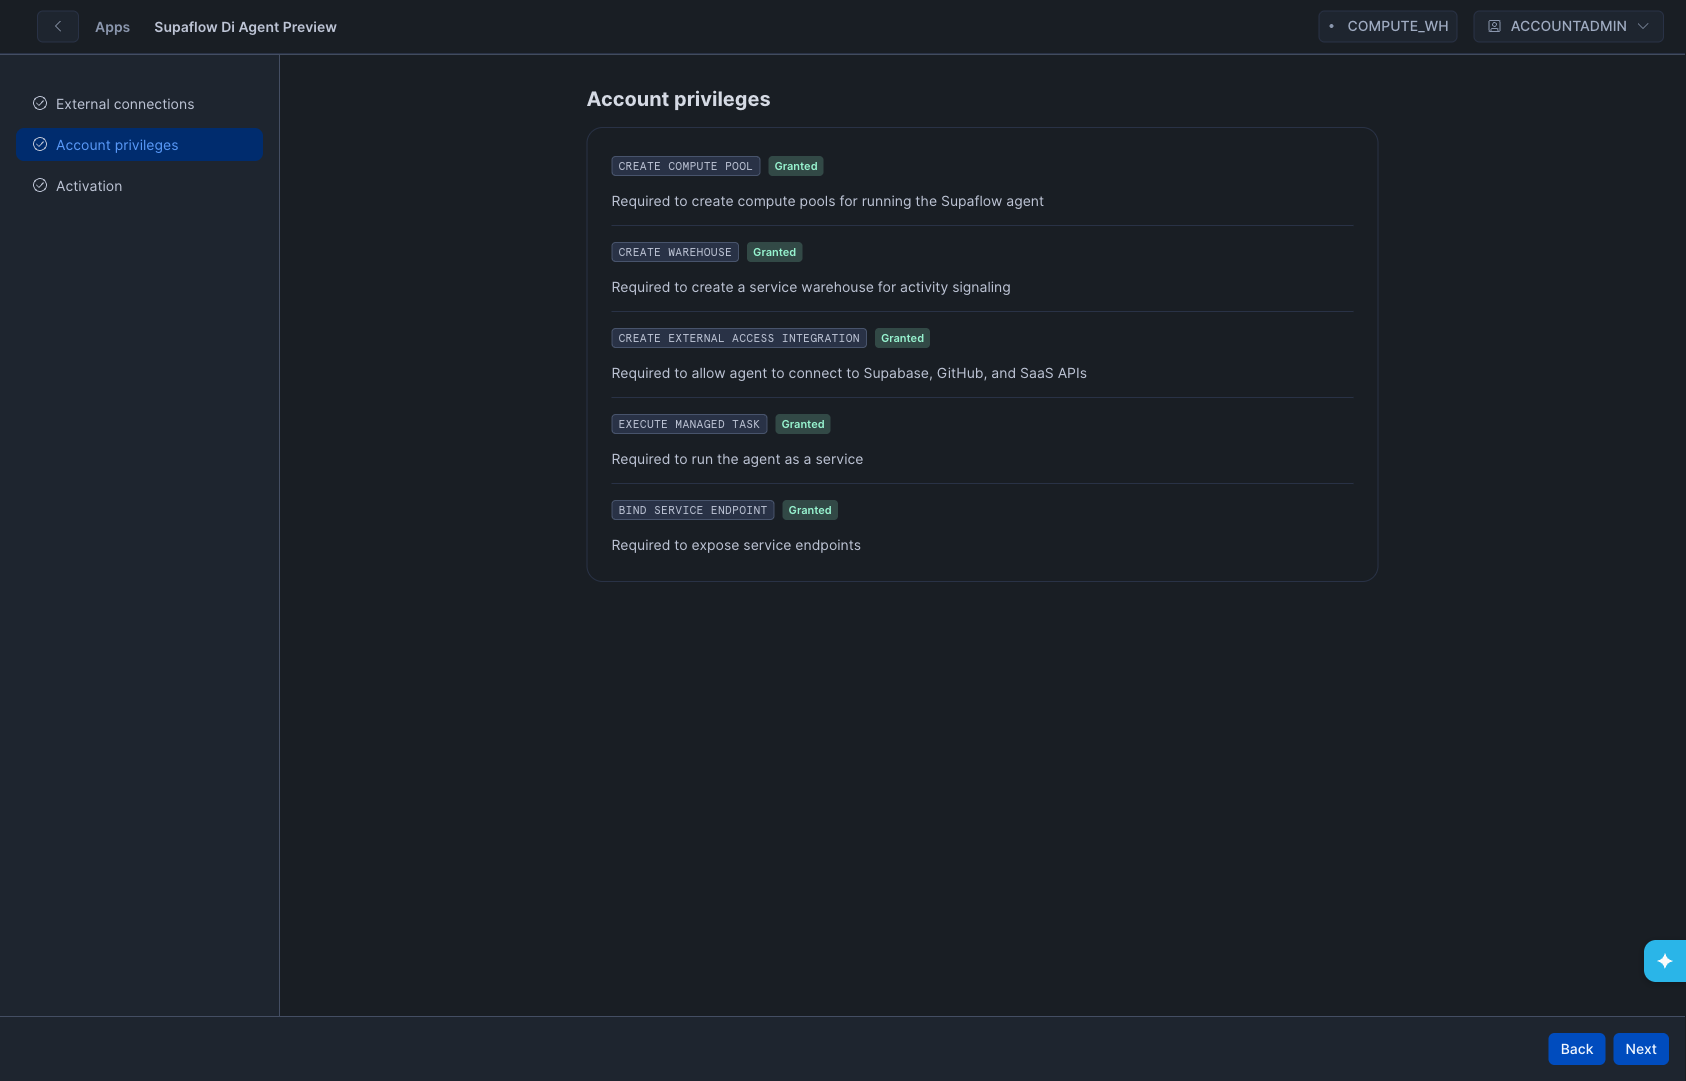
Grant Account-Level Privileges -- Grant all five required privileges:
Privilege Description CREATE COMPUTE POOLRequired to create compute pools for running the Supaflow agent CREATE WAREHOUSERequired to create a service warehouse for activity signaling CREATE EXTERNAL ACCESS INTEGRATIONRequired to allow agent to connect to Supabase, GitHub, and SaaS APIs EXECUTE MANAGED TASKRequired to run the agent as a service BIND SERVICE ENDPOINTRequired to expose service endpoints -
Click Next after all privileges show Granted.

- Click Proceed to app -- This takes you to the app overview page.
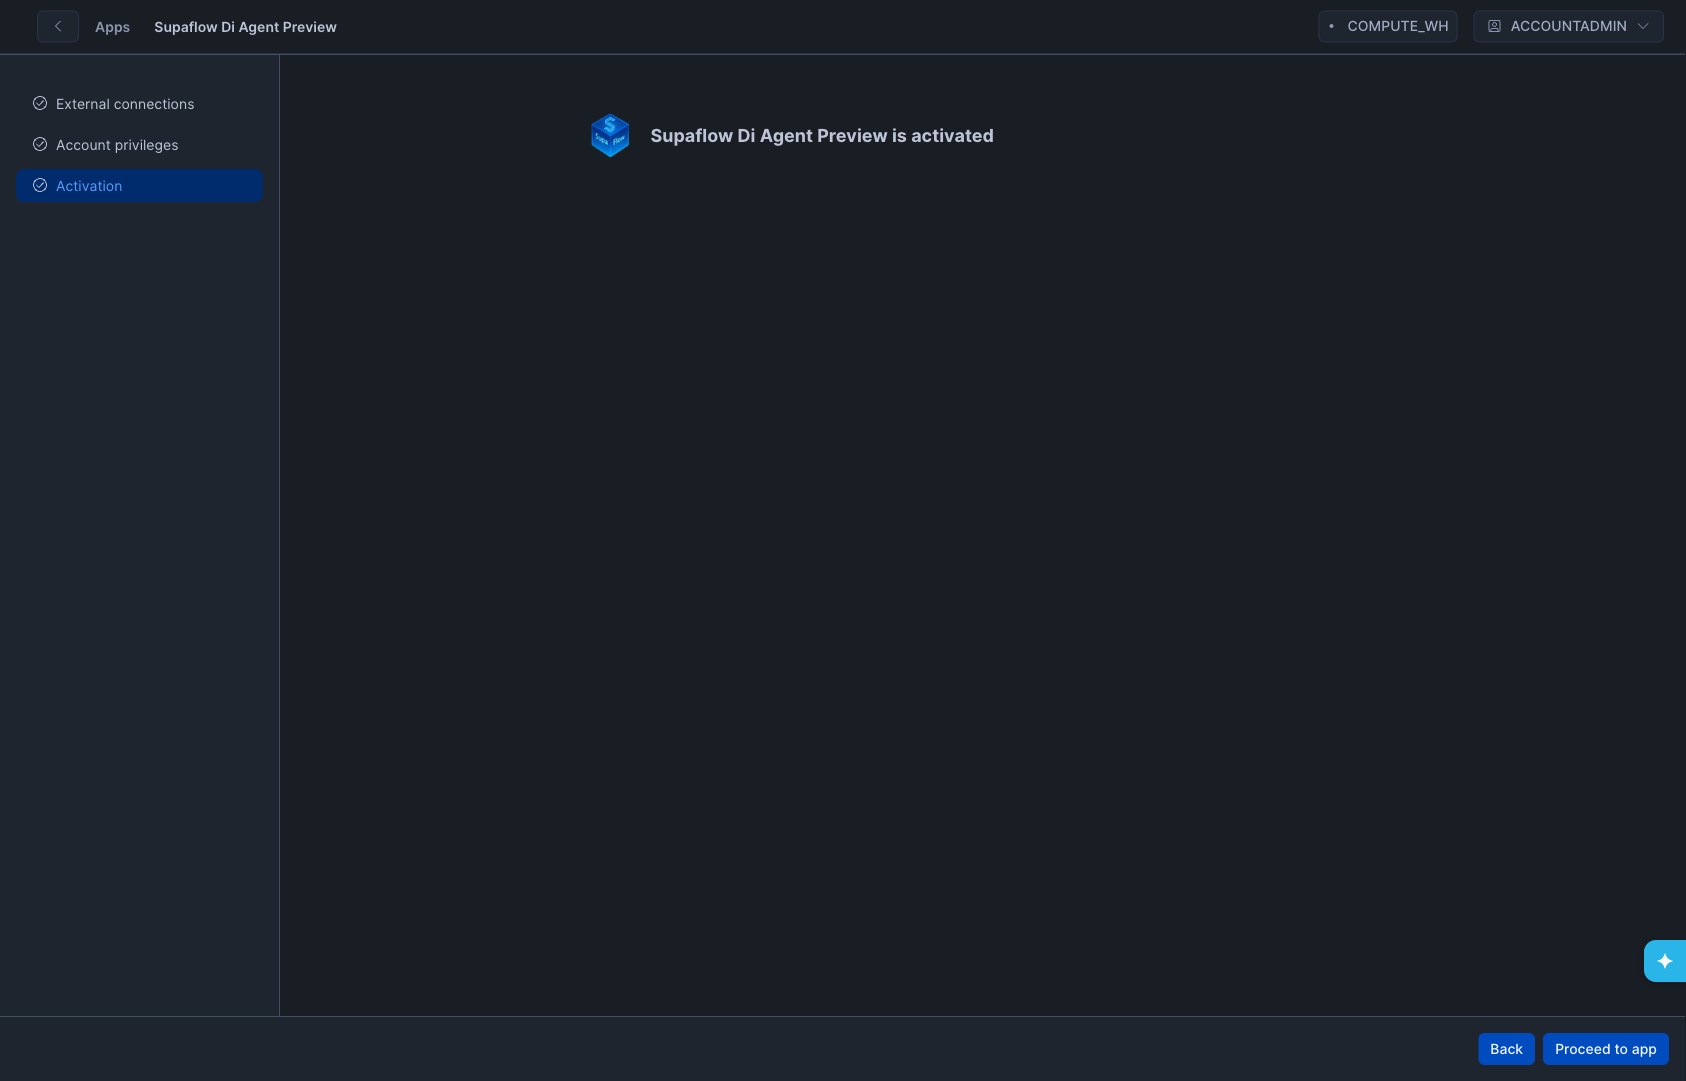
- Click Launch app -- This opens the Supaflow Streamlit interface inside Snowflake.
The Streamlit interface may take a minute or two to load on first launch. If it appears stuck on "Loading Supaflow...", go back to the app overview page and click Launch app again.
Step 5: Link the App to Supaflow
After launching, the Streamlit interface loads and shows the Link Supaflow Account screen.
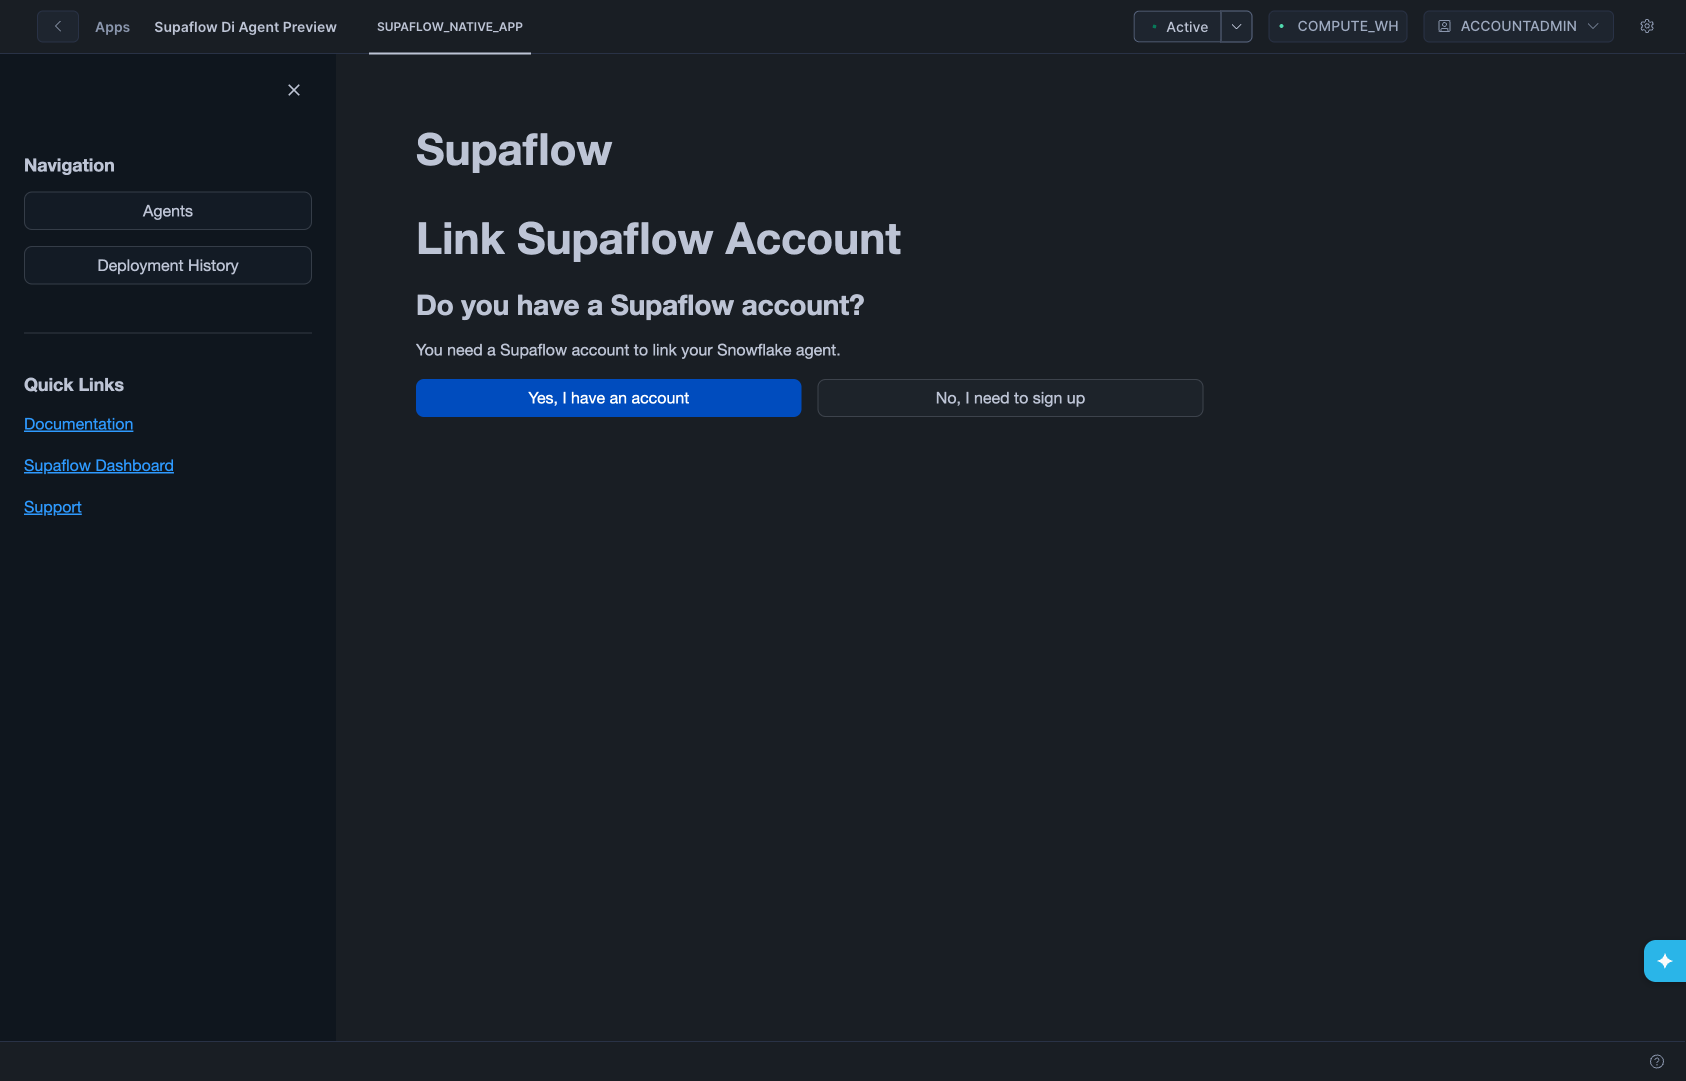
- Click Yes, I have an account (since you already have a Supaflow account from the prerequisites)
- The app generates encryption keys automatically
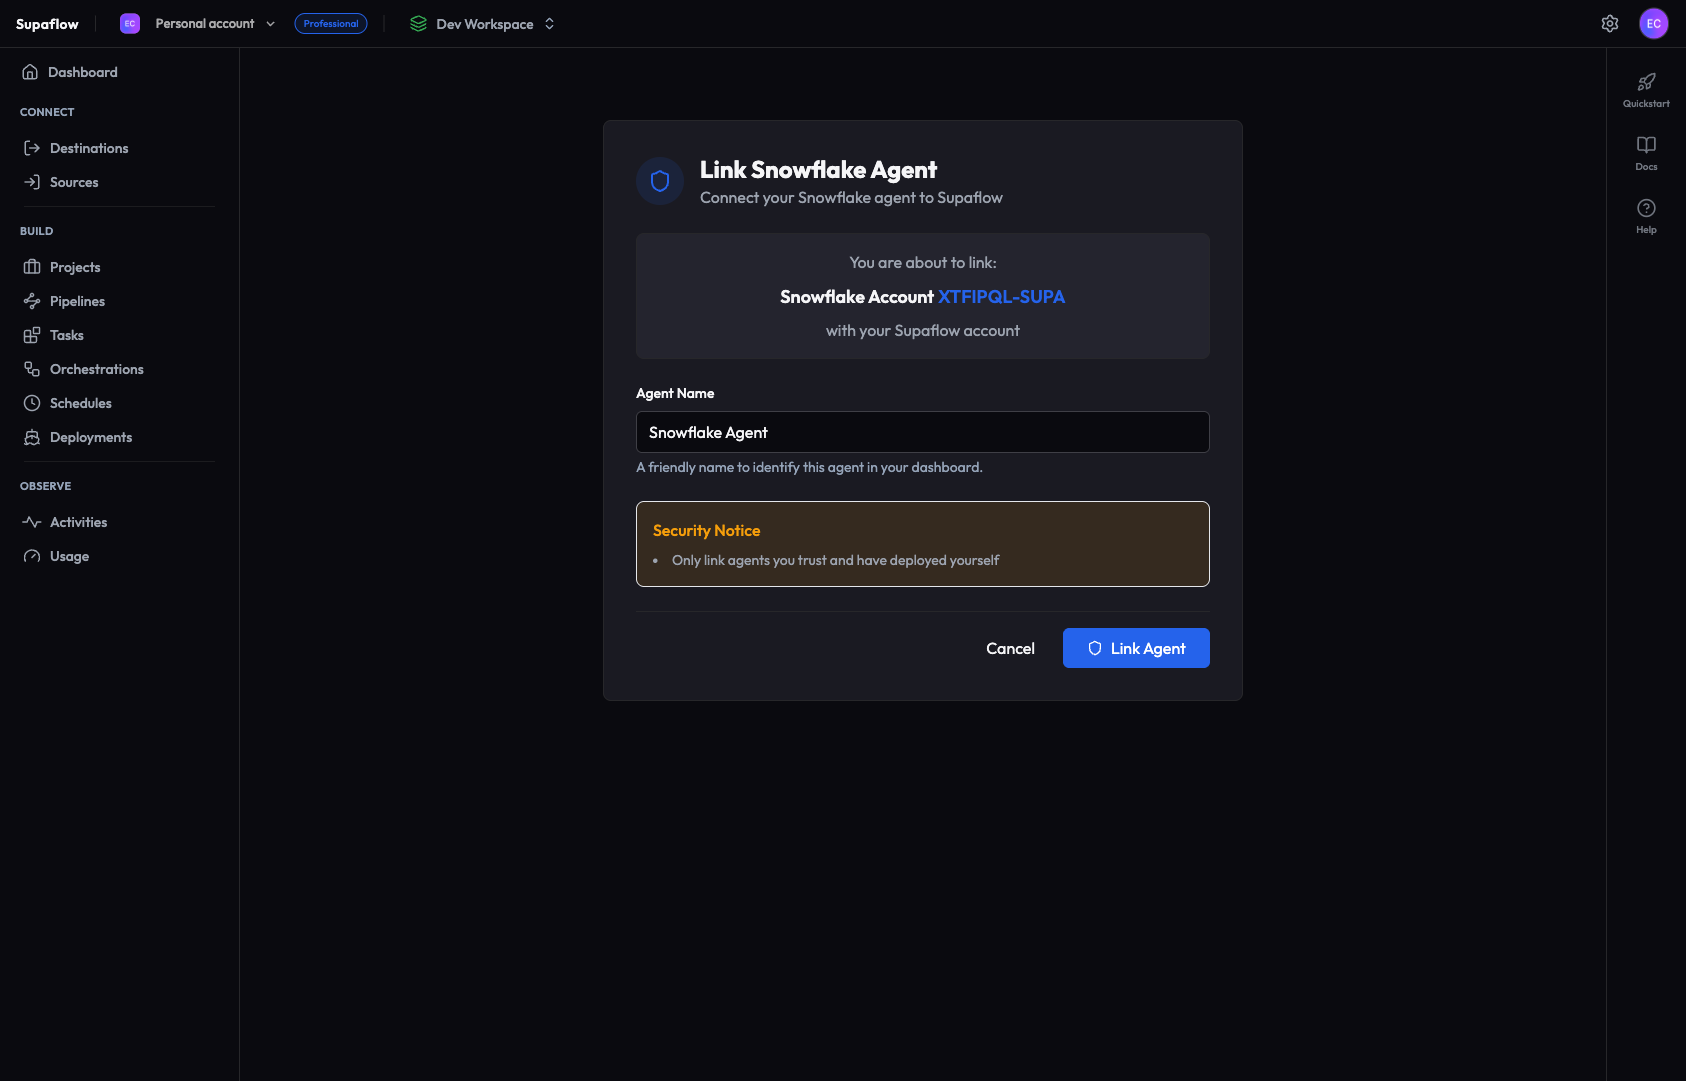
- Click Open Supaflow to Link Account -- This opens Supaflow in a new tab
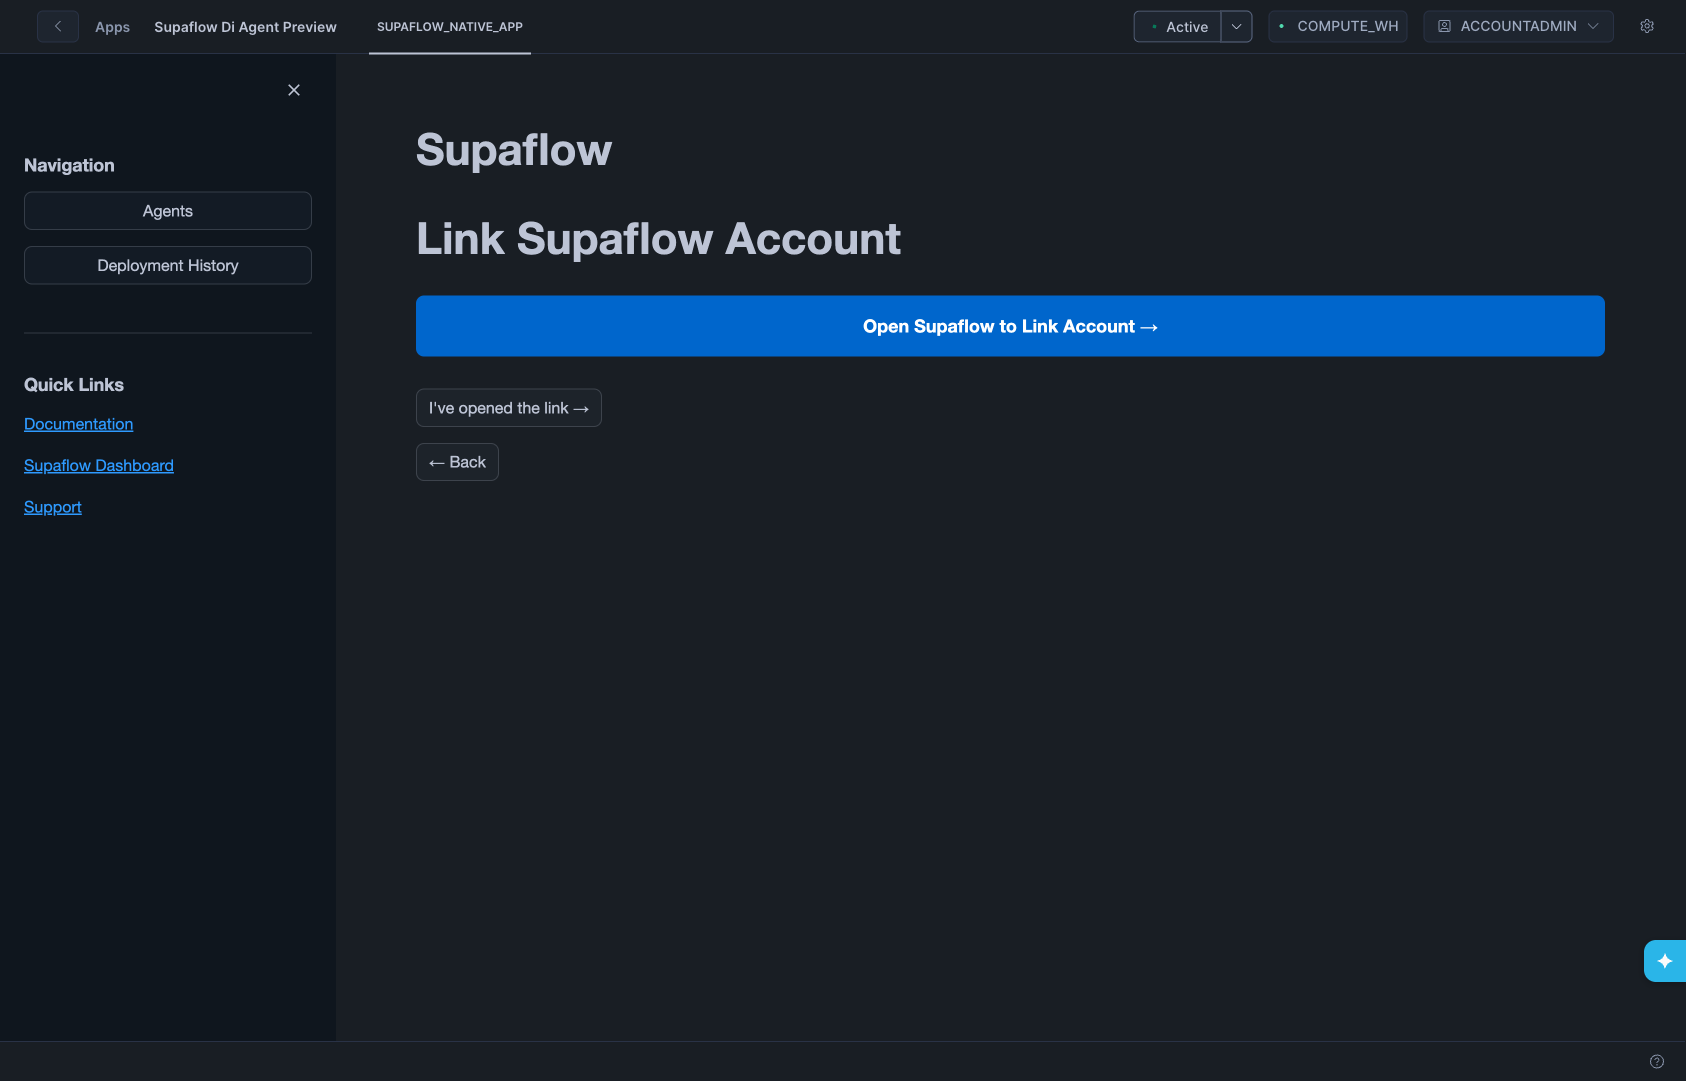
- In Supaflow, name your agent and click Link Agent
- After linking, you are redirected back to the Streamlit UI showing "Link completed!"
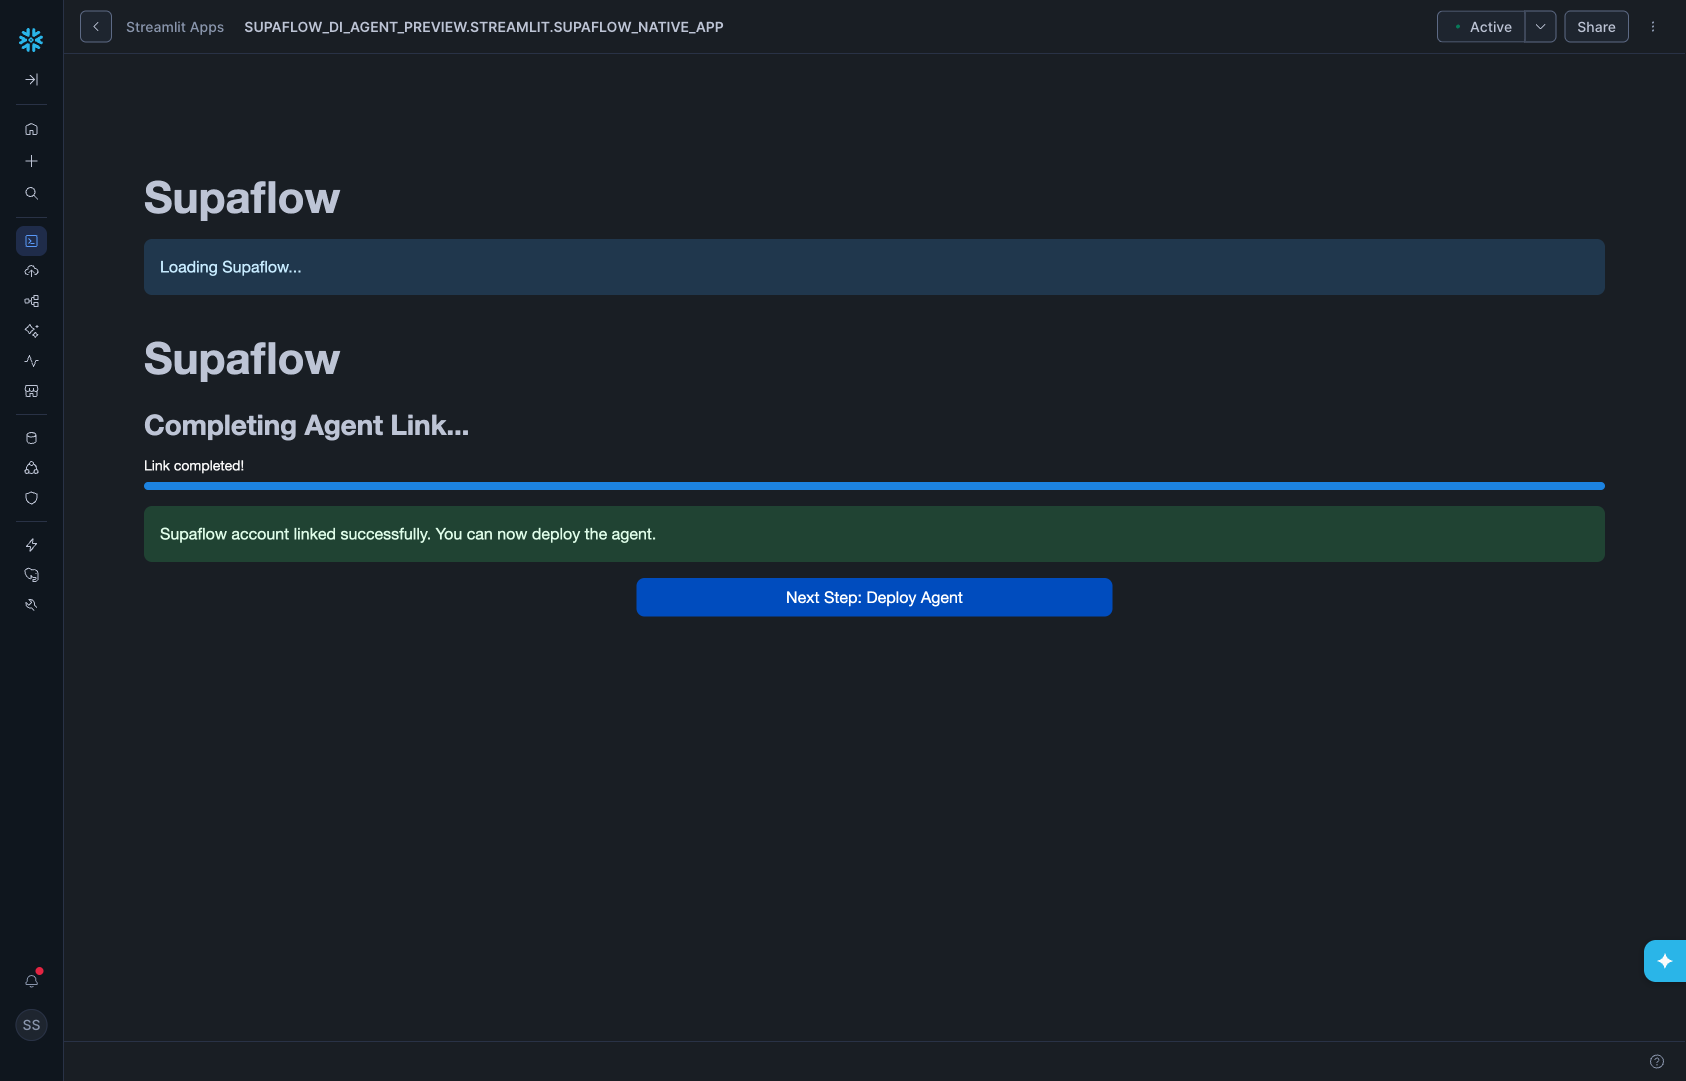
Close the Streamlit browser tab after linking to avoid unnecessary Snowflake warehouse credit consumption. You will reopen it briefly for agent deployment in the next step.
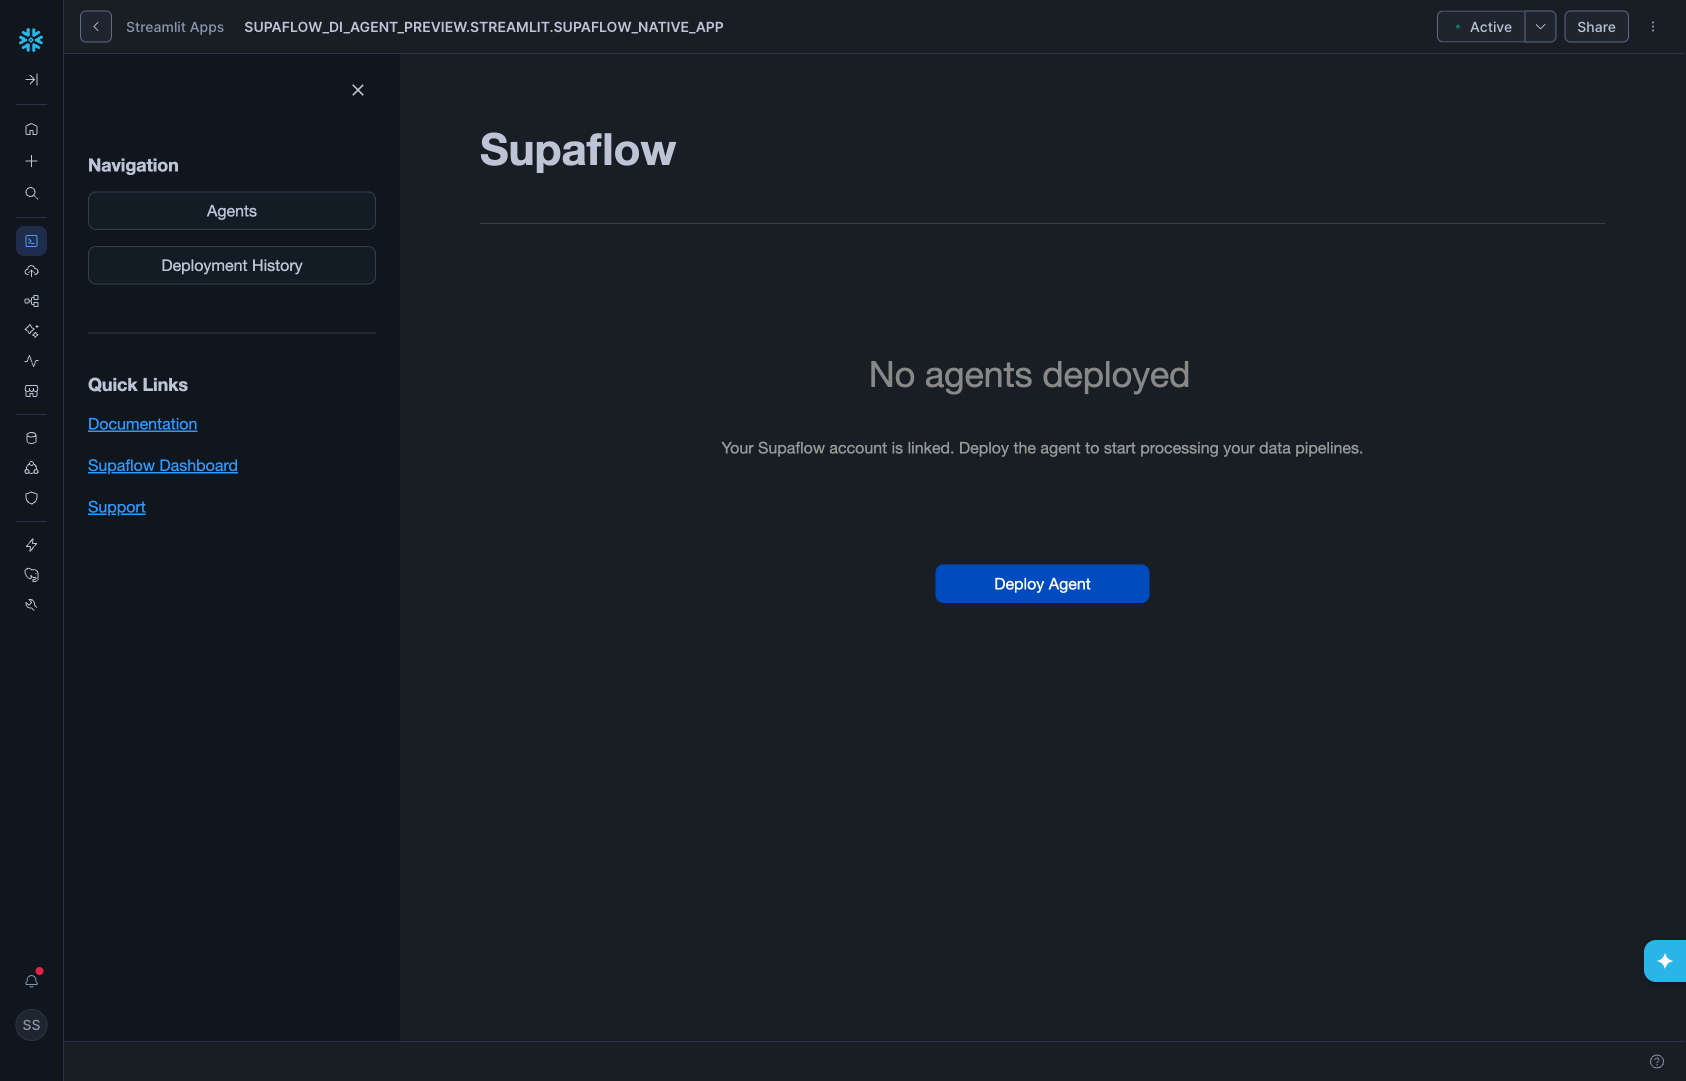
Step 6: Deploy the Agent
Once linked, deploy the agent service:
- In the Streamlit UI, click Deploy Agent
- Select a Compute Configuration from the dropdown (default: Medium - 3 CPU, 13 GB)
- Click Deploy Agent
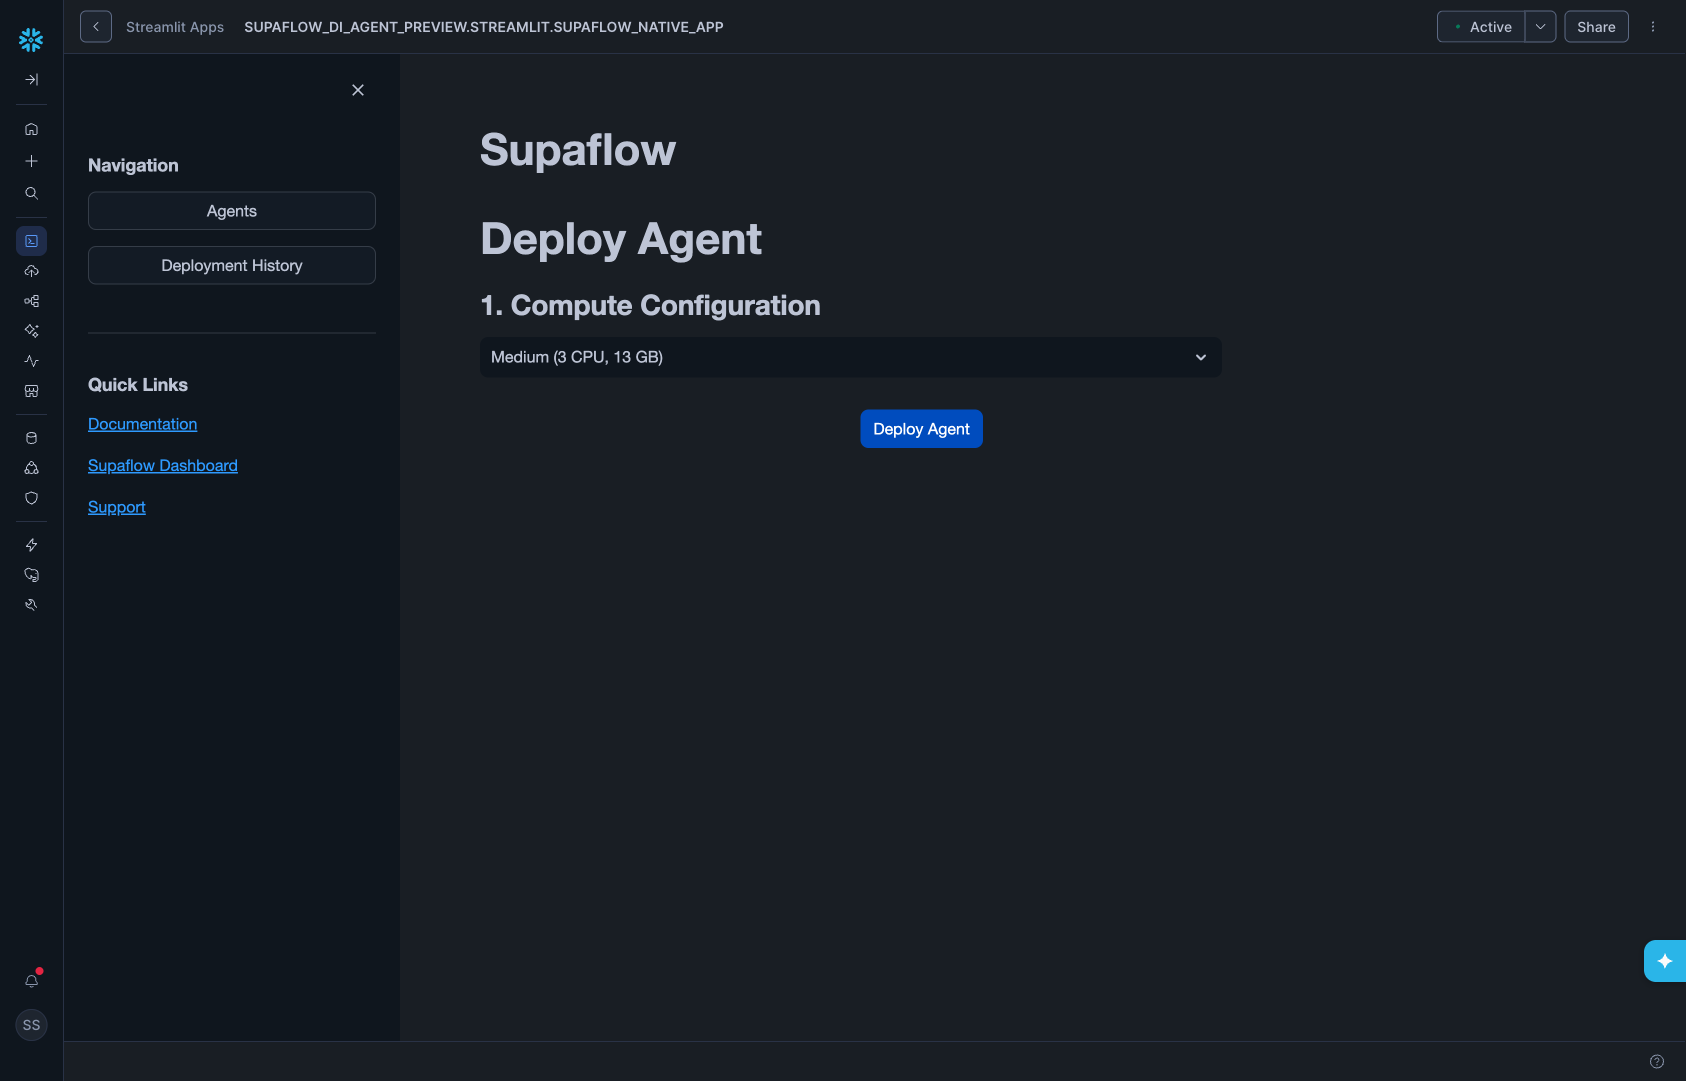
- The app creates the compute pool, warehouse, and agent service
- Wait for all deployment steps to complete
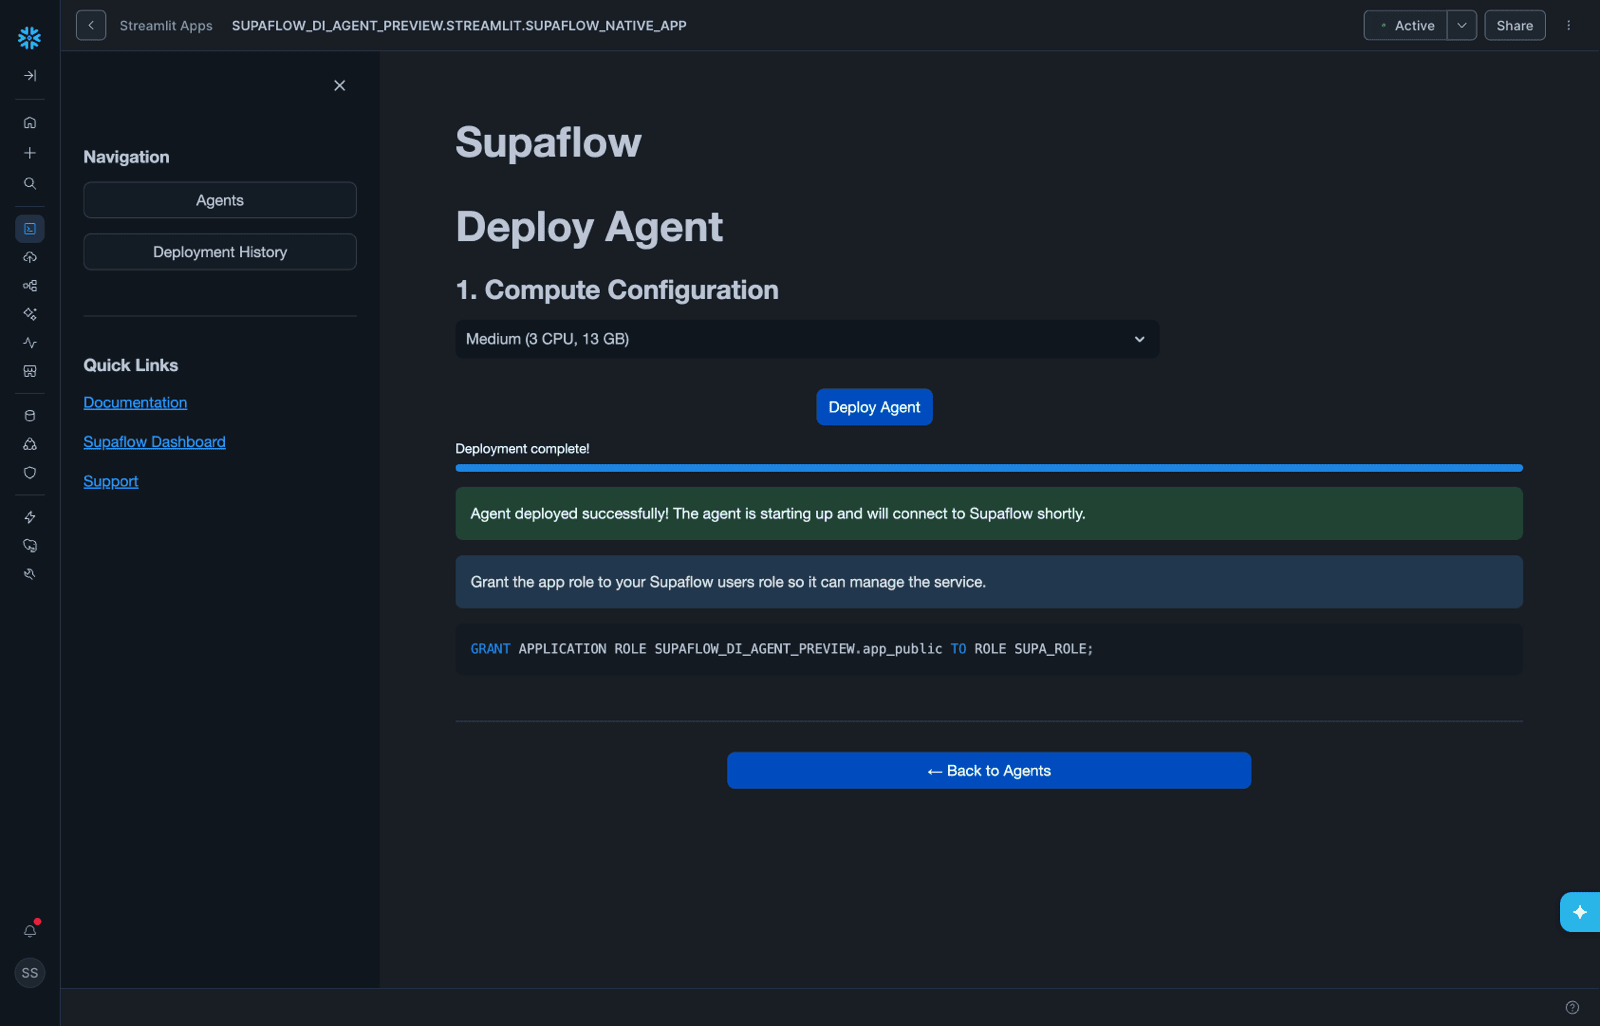
- Click Back to Agents to verify the agent status is Running
- Click the Supaflow dashboard link in the info banner to open Supaflow in a new tab
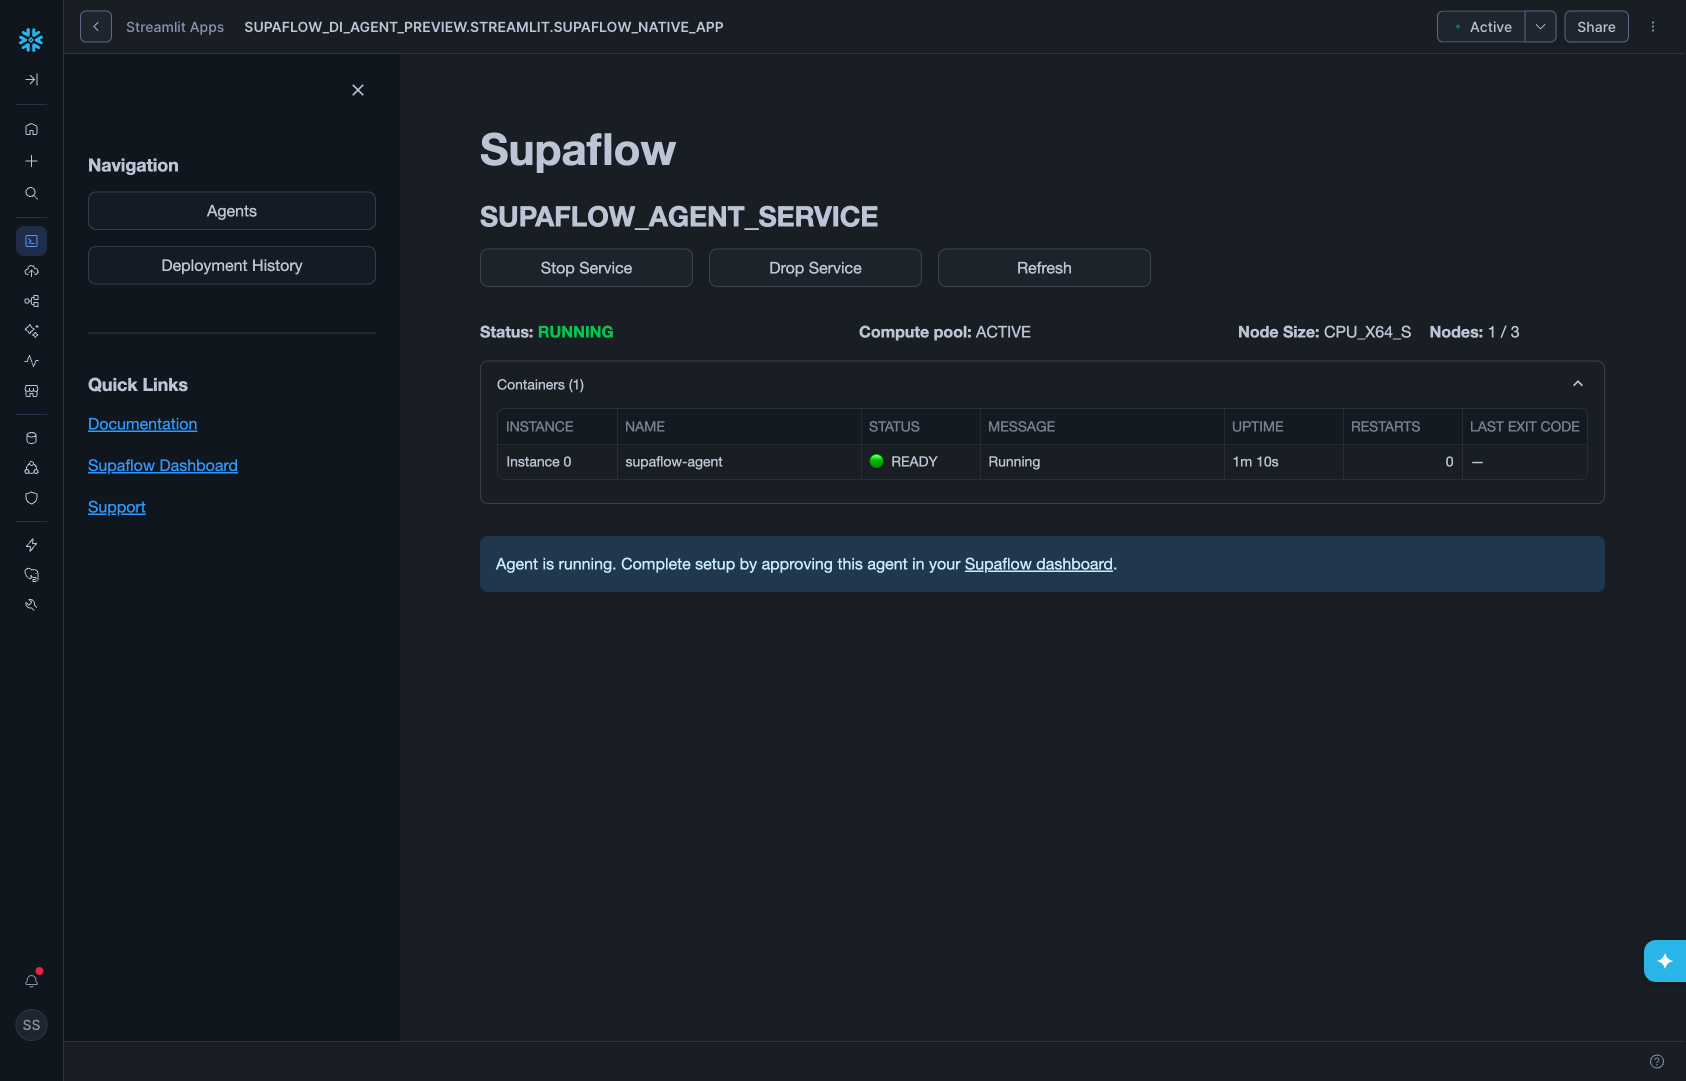
Close the Streamlit browser tab after confirming the agent is running. Keeping it open consumes Snowflake warehouse credits unnecessarily.
Phase 3: Approve Agent and Build Pipeline
Approve the agent in Supaflow, assign the controller datasource, and create your first pipeline. For more on agent management, see the Agents docs.
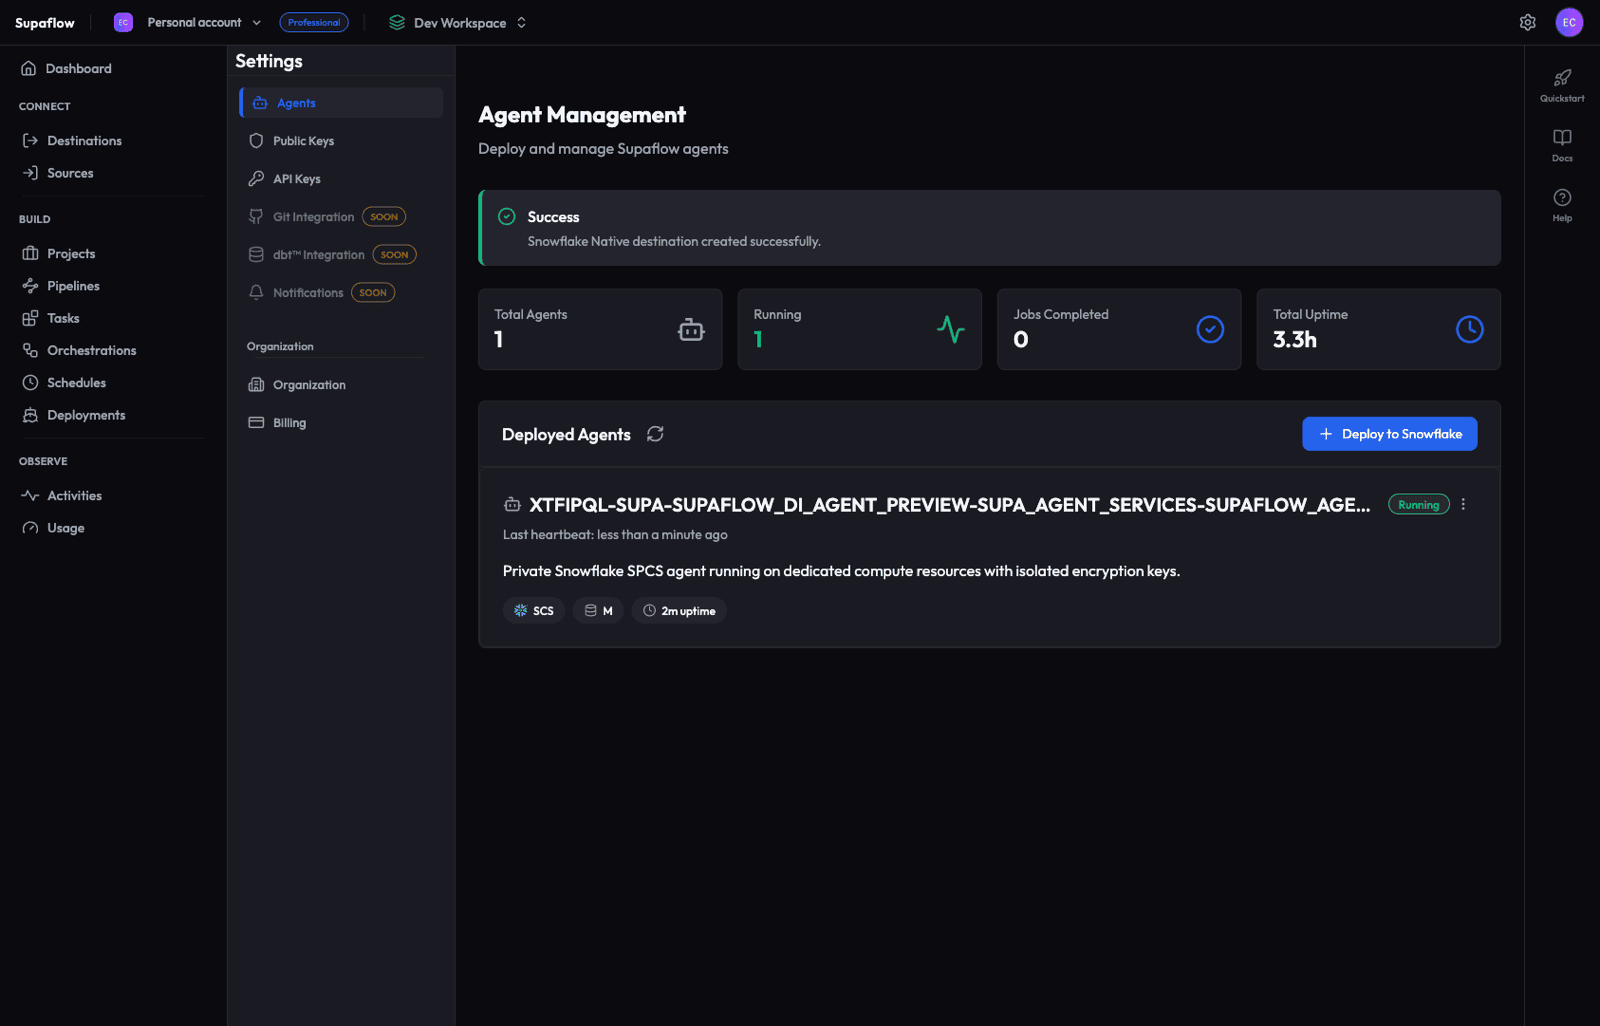
Step 7: Approve the Agent
- In Supaflow, go to Settings > Agents
- Your new agent appears with a Registered status
- Click the green Approve button
- Wait for the agent to activate -- you'll see a spinner with "Approving agent... Waiting for agent to connect..."
- The agent transitions to Running
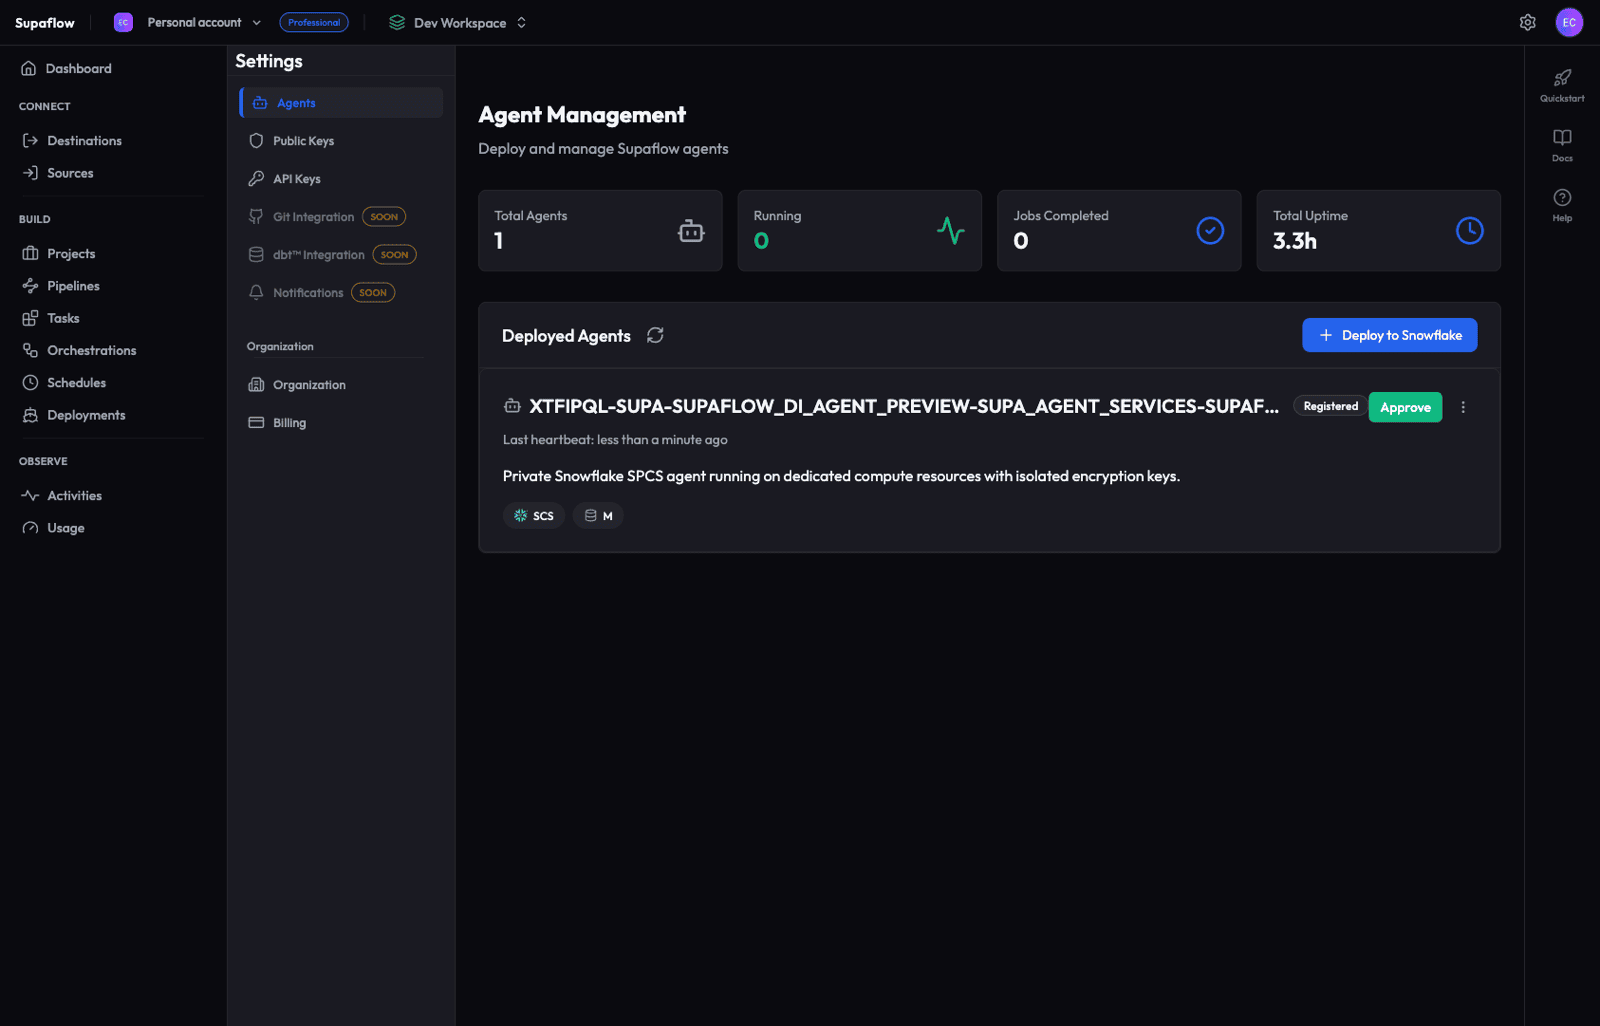
Approval is a security gate -- it ensures only explicitly trusted agents can execute jobs in your environment.
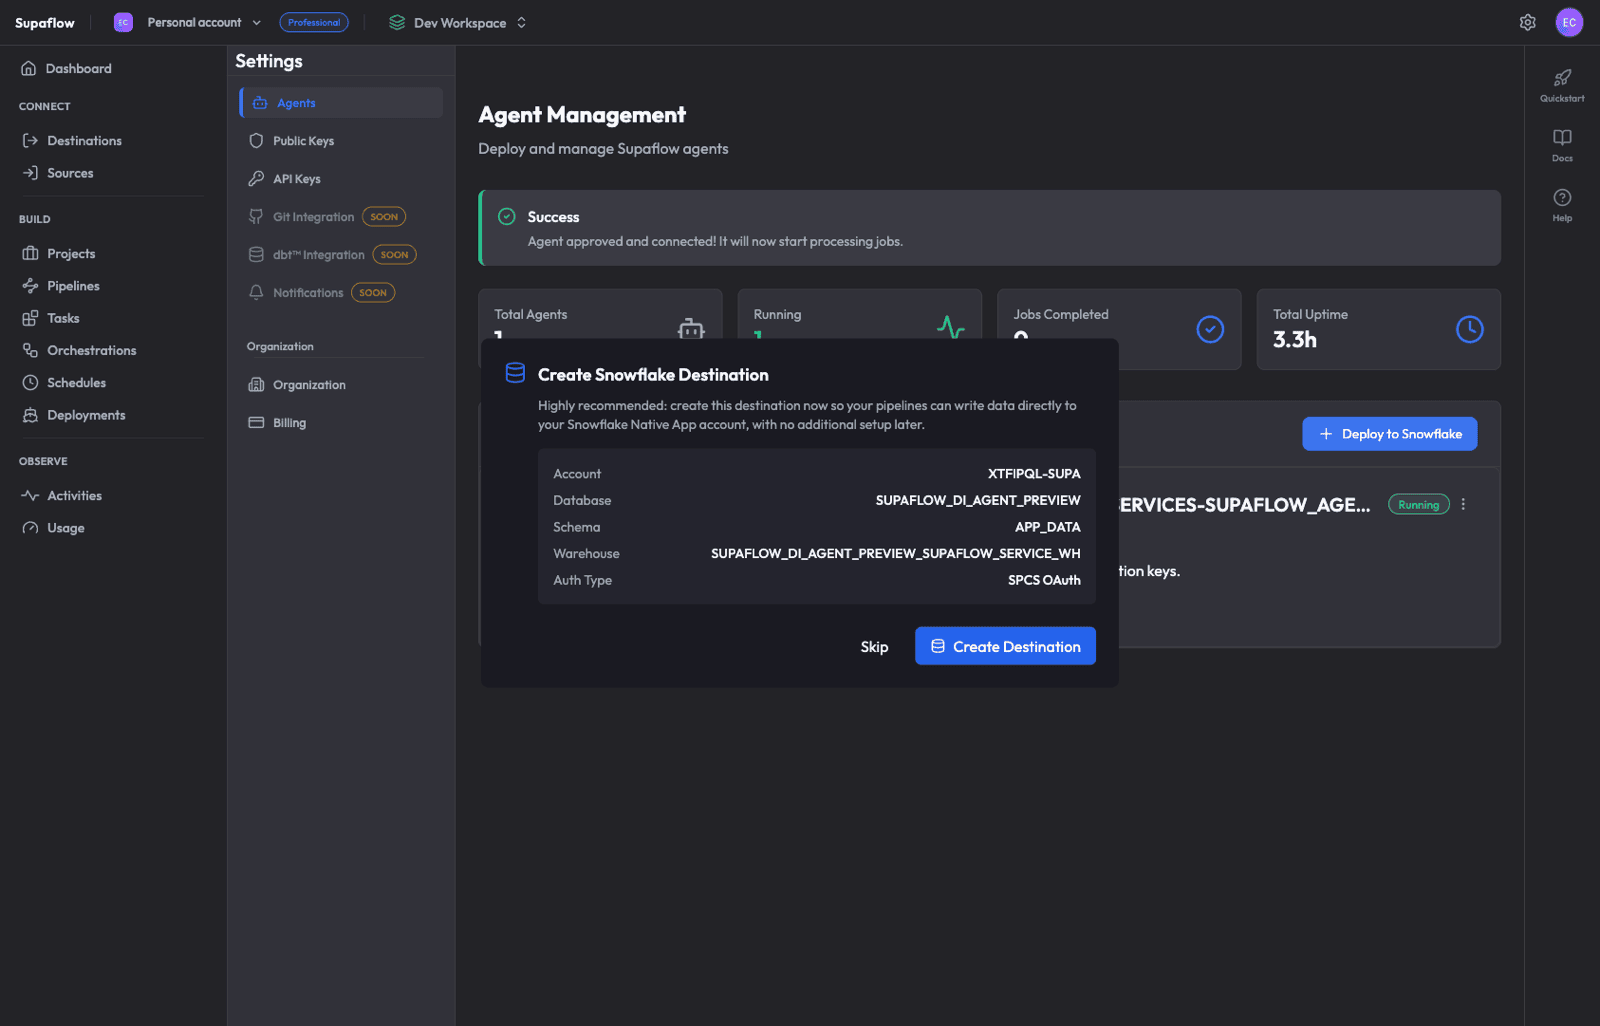
Step 8: Create a Native App Destination
Immediately after approval, Supaflow displays a Create Snowflake Destination prompt. This destination uses the Native App's internal warehouse and database with SPCS OAuth authentication.
- Review the pre-configured details (Account, Database, Schema, Warehouse, Auth Type)
- Click Create Destination
- A success banner confirms: "Snowflake Native destination created successfully."
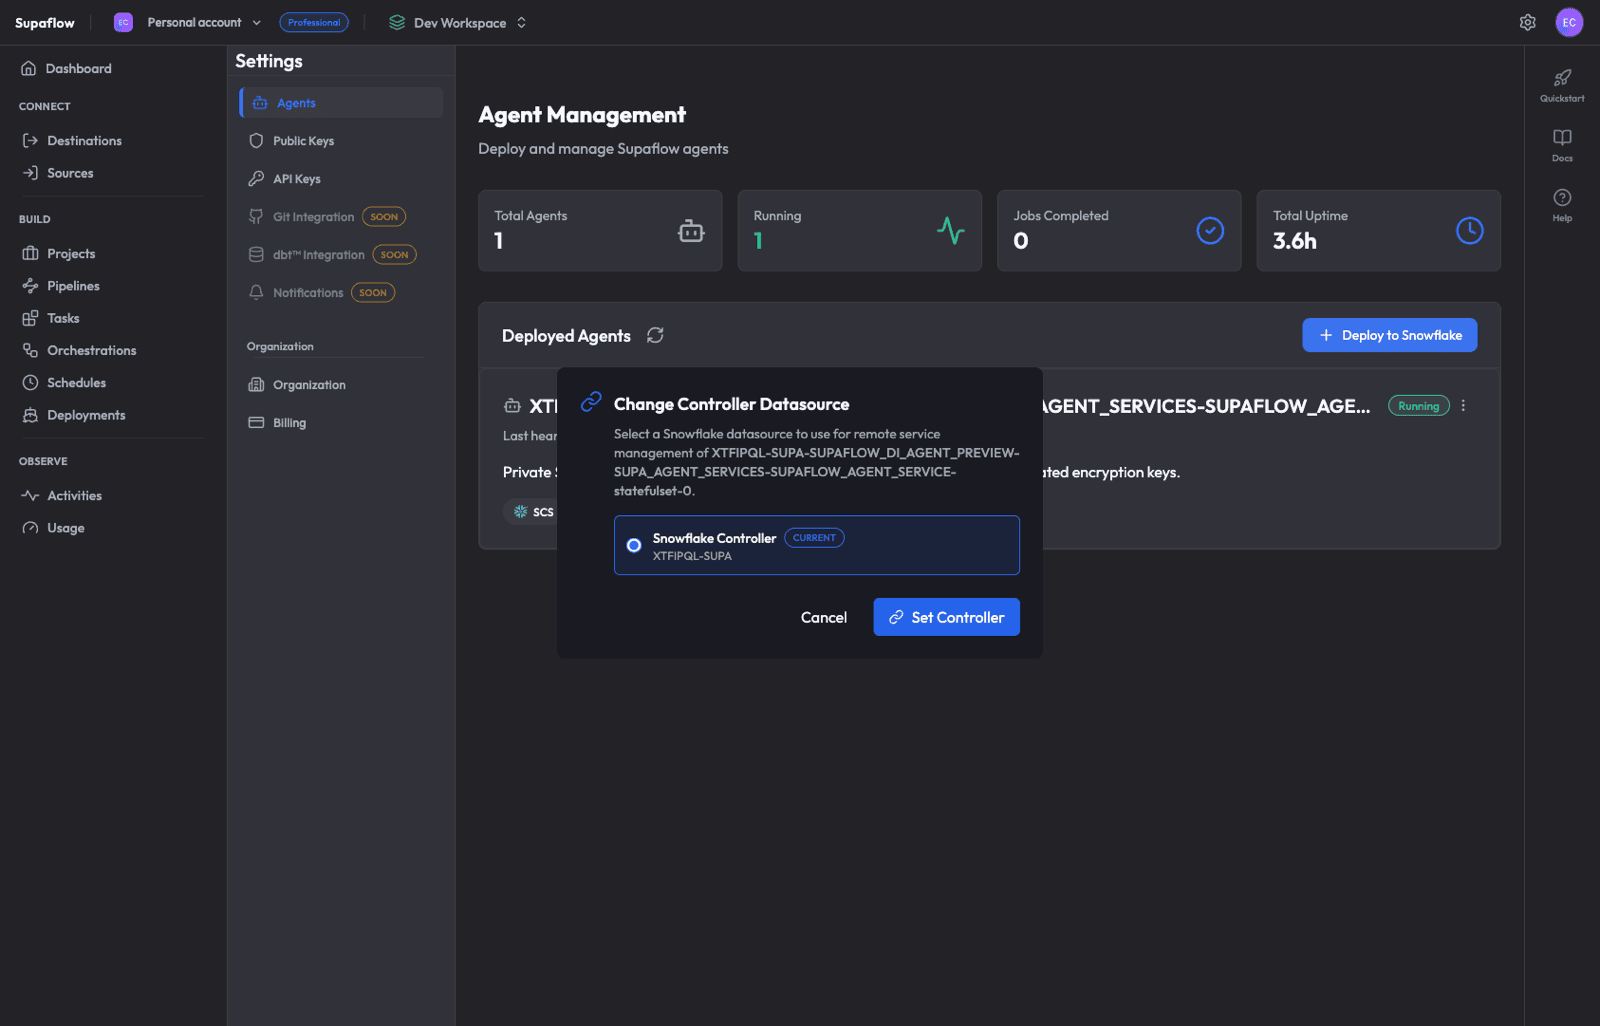
Step 9: Verify the Controller Datasource
The controller datasource is typically set automatically during deployment. Verify it points to the Snowflake datasource you created in Phase 1:
- On the Agents page, click the three-dot menu on your agent
- Select Change Controller
- Confirm that Snowflake Controller is selected and shows CURRENT
- Verify the account identifier matches your Snowflake account
- Click Cancel (no change needed) or Set Controller if you need to change it
Step 10: Grant the Application Role
For the controller datasource to manage the Native App service, run this in a Snowflake worksheet as ACCOUNTADMIN:
GRANT APPLICATION ROLE <native_app_database>.app_public TO ROLE SUPA_ROLE;

-- Example (production):
GRANT APPLICATION ROLE SUPAFLOW_DI_AGENT.app_public TO ROLE SUPA_ROLE;
Without this grant, the controller datasource cannot start or stop the Native App agent service.
Step 11: Create a Source Datasource
Add the data source you want to pull from:
- Go to Sources in the sidebar
- Click Create Source
- Choose your source connector (e.g., Salesforce, HubSpot, PostgreSQL)
- Configure the connection and test it
See the Sources documentation for connector-specific setup guides, or watch the video below:
Step 12: Build Your First Pipeline
With both source and destination datasources configured, create a pipeline:
- Go to Pipelines in the sidebar
- Click + Create Pipeline
- Walk through the 4-step wizard:
- Choose Source -- Select the source datasource
- Configure Pipeline -- Review and adjust sync/load/schema settings (project destination is pre-selected)
- Choose Objects to Sync -- Select tables and fields
- Review & Save -- Confirm details
- Click Create Pipeline
See the Ingestion Pipelines documentation for detailed configuration options, or watch the video below:
Verification Checklist
After completing all phases, verify:
- Consumer account setup objects --
SUPA_ROLE,SUPA_USER, andSUPA_DBexist - Native App database --
SUPAFLOW_DI_AGENTexists (or your installed Native App database name) - Native App -- Installed and showing in Snowflake Apps
- Agent -- Shows Running status on the Supaflow Agents page
- Controller datasource -- Set on the agent with matching account ID
- Application role --
<native_app_database>.app_publicgranted toSUPA_ROLE(for prod:SUPAFLOW_DI_AGENT.app_public) - Pipeline -- First sync completes successfully
Troubleshooting
Agent stuck in "Registered" after deployment
The agent may take a few minutes to start. In Snowflake, check the compute pool status:
SHOW COMPUTE POOLS LIKE '%_POOL';

-- Replace with your Native App database name:
DESCRIBE COMPUTE POOL <native_app_database>_POOL;

-- Example (production):
DESCRIBE COMPUTE POOL SUPAFLOW_DI_AGENT_POOL;
If the pool is still provisioning, wait for it to reach ACTIVE status.
Connection test fails for controller datasource
Verify that:
- The private key matches the public key registered with
SUPA_USER - The account identifier is correct (format:
ORG-ACCOUNT, e.g.,MYORG-MYACCOUNT) SUPA_ROLEhas the required grants
Agent shows "Running" but jobs fail
Check the agent logs in Snowflake:
SELECT SYSTEM$GET_SERVICE_LOGS('SUPA_AGENT_SERVICES.SUPAFLOW_AGENT_SERVICE', 0, 'supaflow-agent', 100);
Native App Streamlit UI not loading
Ensure the compute pool is active and the service is running:
SHOW SERVICES IN SCHEMA SUPA_AGENT_SERVICES;
SELECT SYSTEM$GET_SERVICE_STATUS('SUPA_AGENT_SERVICES.SUPAFLOW_AGENT_SERVICE');
Related Pages
- Sources -- Source connector setup guides (Salesforce, HubSpot, PostgreSQL, and more)
- Destinations -- Destination connector setup guides
- Snowflake Destination -- Snowflake destination configuration reference
- Ingestion Pipelines -- Create and configure data ingestion pipelines
- Activation Pipelines -- Push transformed data back to SaaS applications
- Orchestrations -- Combine ingestion, transformation, and activation into scheduled flows
- Schedules -- Configure pipeline and orchestration schedules
- Activities -- Monitor job runs and sync history
- Agents -- Agent management reference
Support
Need help? Contact us at support@supa-flow.io