SQL Server to Redshift Migration: Setup, Test, Cut Over

Migrating SQL Server to Amazon Redshift is not a backup-and-restore job. SQL Server is an operational database; Redshift is an analytical warehouse. The safest approach is to move table data continuously, validate it while SQL Server stays live, and switch downstream analytics only after the Redshift copy passes your checks.
This guide shows how to build that migration with Supaflow's SQL Server connector and Amazon Redshift connector. You will configure Redshift as the destination, connect SQL Server as the source, run an initial load, test ongoing changes, and use a controlled cutover checklist instead of betting everything on one migration window.
What You Will Build
You will create a SQL Server-to-Redshift pipeline that:
- Loads selected SQL Server tables into Amazon Redshift
- Starts with a historical load, then reads only new changes where the source supports it
- Uses SQL Server Change Tracking when you need inserts, updates, and deletes
- Merges changes into Redshift by primary key
- Keeps SQL Server available as the source of truth during validation
Supaflow handles table-data movement and destination schema evolution. It does not automatically translate every SQL Server view, stored procedure, trigger, SQL Agent job, security rule, or application query into Redshift SQL. Treat those as a separate migration workstream.
Choose the Right SQL Server Sync Mode
Supaflow offers two SQL Server Query Mode options:
| Query mode | How it finds changes | Detects hard deletes? | Best for |
|---|---|---|---|
| STANDARD | Uses a reliable date, datetime, datetime2, or datetimeoffset cursor column | No | Tables with a dependable updated_at-style column |
| CHANGE_TRACKING | Reads SQL Server Change Tracking versions | Yes | Ongoing migration when inserts, updates, and deletes must stay aligned |
Do not treat SQL Server timestamp as a date-and-time column. It is the deprecated name for the binary rowversion type, so it is not the temporal cursor implied by an updated_at field.
Use STANDARD when you only need inserts and updates and every large table has a cursor column that advances on every change. Tables without a usable cursor run as full refresh.
Use CHANGE_TRACKING for a lower-risk cutover. It does not require a cursor column, but every selected table must have a primary key and Change Tracking must be enabled on the database and table.
Microsoft recommends sizing the Change Tracking retention period to cover the longest possible gap between syncs. If change records are cleaned up before a pipeline returns, the previous sync version is no longer a safe baseline. See Microsoft's Change Tracking configuration guidance and security requirements.
Before You Move Data: Assess What Must Change
Inventory more than tables before you create the pipeline:
- Tables, row counts, primary keys, and expected growth
- Views, stored procedures, functions, triggers, and SQL Agent jobs
- Computed columns, temporal tables, sparse columns, and other SQL Server-specific features
- Power BI models, dashboards, notebooks, dbt projects, and applications that query SQL Server
- Users, roles, row-level security, masking, and audit requirements
- Redshift distribution and sort-key decisions for large tables
For a large heterogeneous migration, run an AWS Schema Conversion Tool assessment before converting SQL code. Its assessment report identifies objects that cannot be converted automatically and estimates the manual work. See the AWS SCT assessment report documentation.
If you are comparing migration tools, AWS also publishes a SQL Server-to-Redshift pattern using AWS DMS. AWS DMS is a strong AWS-native option, but its SQL Server source and Redshift target each have documented limitations. Review the current SQL Server source limitations and Redshift target limitations before choosing a path.
Prerequisites
- A Supaflow account
- SQL Server 2016 or later, or Azure SQL Database
- Network connectivity from Supaflow to SQL Server
- A SQL Server user with
SELECTaccess to the tables you will migrate - An Amazon Redshift provisioned cluster or Serverless workgroup
- A Redshift user that can create schemas, tables, and temporary tables and insert rows
- An S3 bucket and prefix for Redshift staging
- An IAM role that Supaflow can assume and Redshift can use for
COPY
The detailed permission templates are in the SQL Server source docs and Amazon Redshift destination docs.
Step 1: Prepare SQL Server
Create a dedicated read-only login and database user. Adjust the scope to match your security policy:
USE [master];
CREATE LOGIN supaflow_reader WITH PASSWORD = 'your_secure_password';

USE [your_database];
CREATE USER supaflow_reader FOR LOGIN supaflow_reader;
GRANT SELECT ON SCHEMA::[dbo] TO [supaflow_reader];
For Azure SQL Database, create a contained database user instead of a server login:
USE [your_database];
CREATE USER supaflow_reader WITH PASSWORD = 'your_secure_password';
GRANT SELECT ON SCHEMA::[dbo] TO [supaflow_reader];
If you will use Change Tracking, enable it on the database and every table you plan to sync:
ALTER DATABASE [your_database]
SET CHANGE_TRACKING = ON
(CHANGE_RETENTION = 7 DAYS, AUTO_CLEANUP = ON);

ALTER TABLE [dbo].[customers] ENABLE CHANGE_TRACKING;
ALTER TABLE [dbo].[orders] ENABLE CHANGE_TRACKING;

GRANT VIEW CHANGE TRACKING ON SCHEMA::[dbo] TO [supaflow_reader];
Seven days is a practical starting point, not a universal value. Set retention longer than the maximum interval between successful pipeline runs, including maintenance windows and incident recovery.
Finally, allow the Supaflow network path through the SQL Server firewall. The current public Supaflow IP is listed in the SQL Server source prerequisites. Use private connectivity instead when your security policy does not permit a public database endpoint.
Step 2: Prepare Amazon Redshift and S3
Create a destination user. A read-only Redshift user will fail because the pipeline needs to create and evolve target tables.
CREATE USER supaflow_writer PASSWORD 'your_secure_password';
GRANT CREATE, TEMPORARY ON DATABASE your_database TO supaflow_writer;
If you will load into an existing schema, grant access there as well:
GRANT USAGE, CREATE ON SCHEMA your_schema TO supaflow_writer;
Create an S3 staging bucket or dedicated prefix, then create an IAM role that:
- Trusts Supaflow with an external ID
- Allows the required read, write, list, and cleanup operations under that prefix
- Can be used by the Redshift cluster or Serverless namespace for
COPY
The Amazon Redshift destination guide includes complete trust and S3 policy templates. If your organization separates duties, use one role for Supaflow's S3 access and a second role for Redshift COPY.
Step 3: Create the Amazon Redshift Destination
In Supaflow, go to Destinations, click Create Destination, and choose Amazon Redshift.
Enter the Redshift connection settings:
- Host -- the provisioned-cluster or Serverless workgroup endpoint, without protocol or port
- Port --
5439unless your endpoint uses another port - Database -- the destination database
- Default Schema --
publicor your preferred target schema - User and Password -- the destination user you created
- Use SSL -- leave enabled unless your environment explicitly requires otherwise
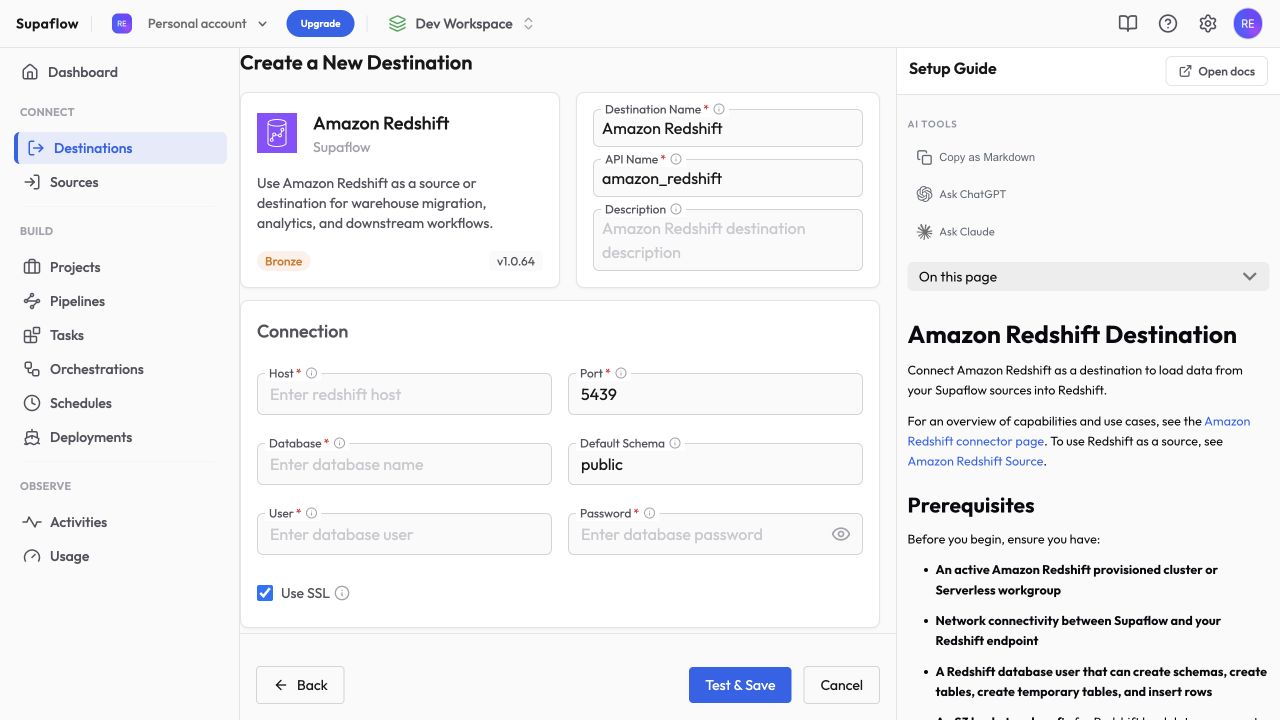
Under S3 Staging, enter:
- S3 Staging Bucket
- S3 Staging Prefix
- Bucket Region
- IAM Role ARN
- External ID
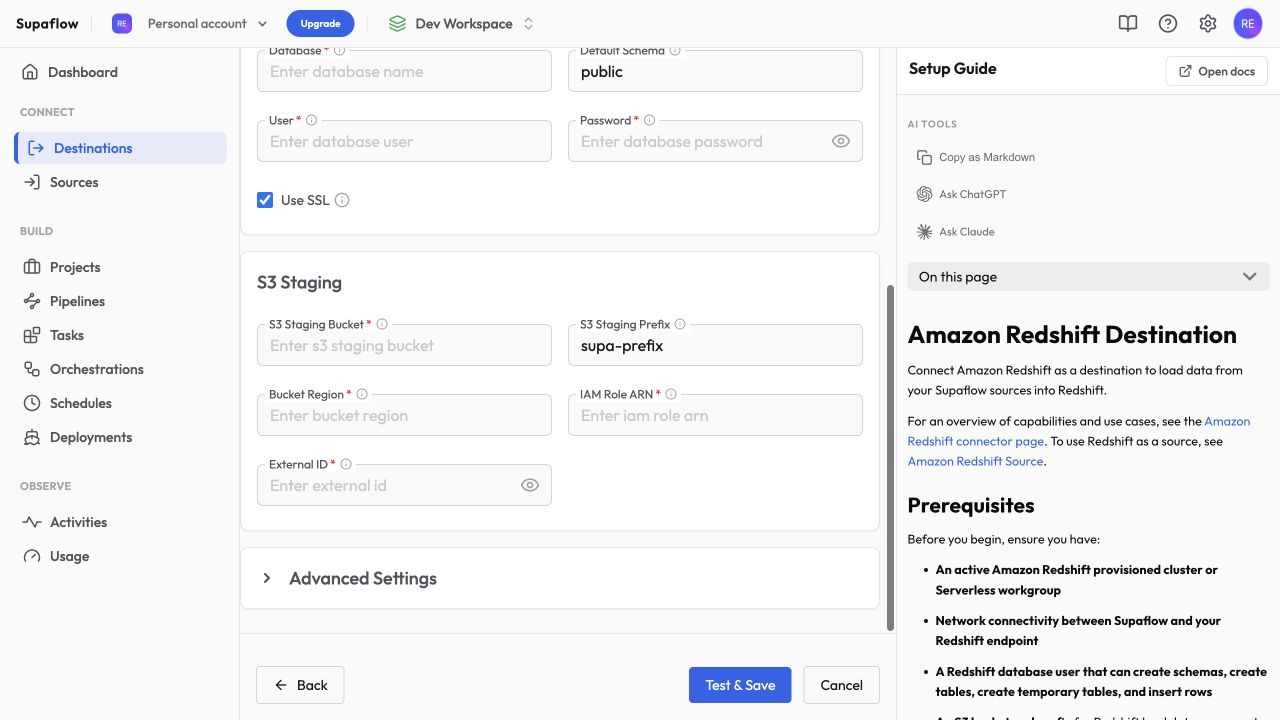
Click Test & Save. This checks more than the JDBC login: the destination setup also needs working metadata access, write permissions, and S3 role assumption.
Step 4: Create the SQL Server Source
Go to Sources, click Create Source, and select SQL Server.
Enter:
- Database Host
- Database Port -- normally
1433 - Database Name
- Database Username and Database Password
- Query Mode -- choose
CHANGE_TRACKINGfor delete-aware replication orSTANDARDfor cursor-based sync - Encrypt -- leave
truefor encrypted connections; usestrictonly when your server supports and requires TDS 8.0 strict encryption - Trust Server Certificate -- leave disabled unless you intentionally use a self-signed certificate
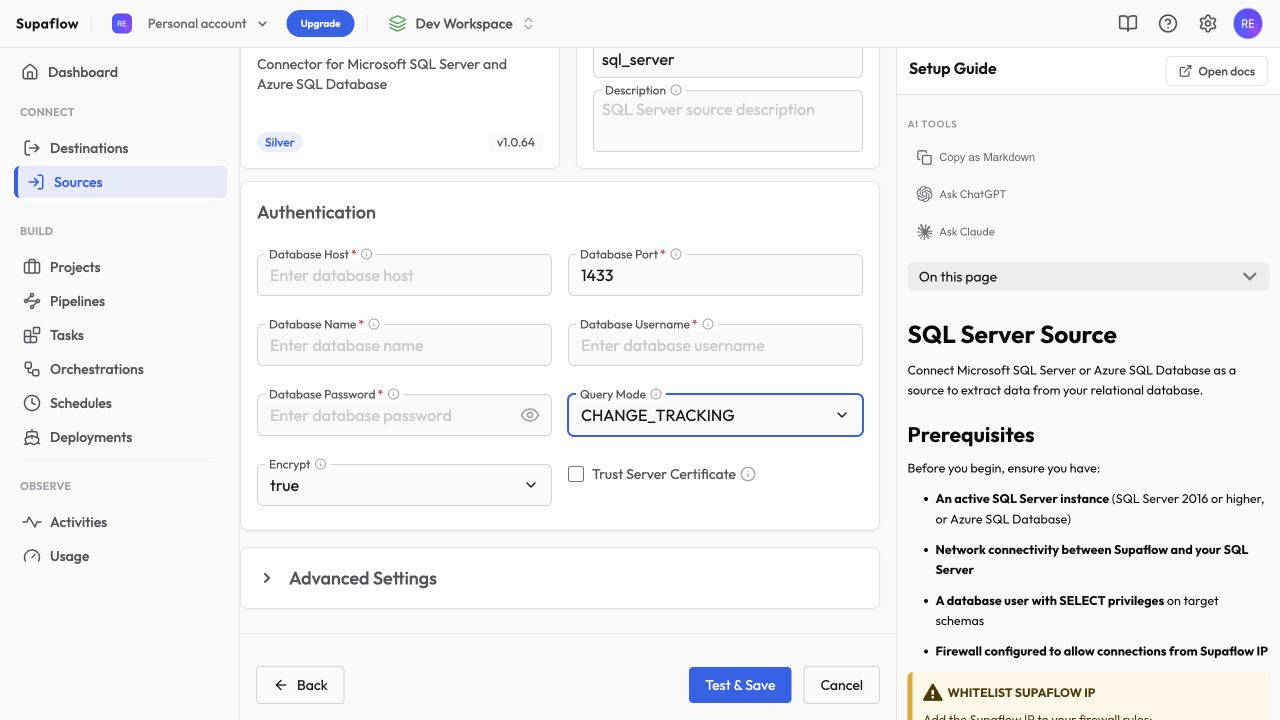
Click Test & Save. Wait for schema discovery to finish before creating the pipeline. In Change Tracking mode, tables without Change Tracking are skipped and shown with the reason; they do not silently fall back to another mode.
Step 5: Create the SQL Server-to-Redshift Pipeline
Open the project connected to your Amazon Redshift destination and click Create Pipeline.
Choose the source
Select the SQL Server source you created, then continue.
Configure the migration
For a staged migration, use these starting settings:
- Ingestion Mode: Historical + Incremental
- Load Mode: Merge
- Schema Evolution Mode: Allow All Changes
- Destination Namespace Rules: Mirror Source
Merge inserts new rows and updates existing rows by key. It is the natural choice for keeping Redshift current while SQL Server remains live. If a selected table has no usable key, resolve that before cutover instead of assuming updates will merge cleanly.
If you are using Change Tracking, decide how destination deletes should behave:
- Leave Perform Hard Deletes disabled when you want deleted records retained with deletion metadata for audit or downstream filtering.
- Enable Perform Hard Deletes only when a source delete should physically remove the matching Redshift row.
For an existing Redshift schema, use Fail if Table Exists during the first controlled test unless you have deliberately mapped the pipeline onto Supaflow-managed tables. This prevents an accidental collision from modifying an unrelated table.
Choose objects
Start with a representative wave, not the entire database:
- One small dimension table
- One high-volume fact or event table
- One table with decimal values
- One table with date and time-zone-sensitive fields
- One table with nullable or semi-structured values, if applicable
Select only the columns needed in Redshift. Excluding unused large text or binary columns reduces transfer time and validation scope.
Review the destination, sync settings, and selected objects, then create the pipeline.
Step 6: Run and Validate the Initial Load
Click Sync Now and open Activities to watch the job. Confirm every selected object reaches Completed and compare the rows read and loaded for each object.
Do not treat a green job as the entire validation. Compare SQL Server and Redshift at three levels.
1. Row counts
Run the count on SQL Server:
SELECT COUNT_BIG(*) AS row_count
FROM dbo.orders;
Then run the equivalent count in Redshift:
SELECT COUNT(*) AS row_count
FROM <target_schema>.<orders_table>;
If SQL Server is still receiving writes, record the comparison time or validate a closed date range so the source does not move underneath the check.
2. Business aggregates
Counts can match while important values differ. Compare measures that matter:
SELECT
  COUNT(*) AS row_count,
  COUNT(DISTINCT order_id) AS distinct_orders,
  MIN(updated_at) AS first_update,
  MAX(updated_at) AS last_update,
  SUM(order_total) AS total_value
FROM <target_schema>.<orders_table>;
Run the equivalent query in SQL Server over the same time window. For financial or operational tables, agree on acceptable differences before cutover.
3. Type-sensitive samples
Spot-check rows containing:
- High-precision decimals
datetimeoffsetor other time-zone-sensitive values- Long Unicode text
- Binary data
- Nullable keys and measures
- JSON or XML source values
The Redshift destination maps JSON values to SUPER, binary values to VARBYTE, and SQL Server XML values to VARCHAR(65535) because Redshift has no native XML type. You do not need to exclude a column solely because its source type is XML, but check large documents against Redshift's VARCHAR size limit before cutover.
Step 7: Prove Incremental Changes Before Cutover
After the initial load, test the exact operations your production tables perform:
- Insert a disposable validation row in SQL Server
- Run the pipeline and verify the row appears in Redshift
- Update that row, run again, and verify the target changed rather than duplicated
- Delete the row, run again, and verify the configured soft- or hard-delete behavior
Use a dedicated validation table or a clearly isolated test record. Do not test deletes on an arbitrary production row.
In STANDARD mode, the delete test will not propagate because the deleted row no longer exists for a cursor query to find. Use CHANGE_TRACKING when delete parity is part of the cutover requirement.
Step 8: Cut Over with a Rollback Window
Use this sequence for each migration wave:
- Freeze schema changes. Pause nonessential DDL on the selected SQL Server tables.
- Keep SQL Server live. Let the scheduled pipeline continue while analysts test Redshift.
- Run a final sync. Record its completion time and verify every object.
- Repeat validation. Compare counts, aggregates, latest timestamps, and critical sample rows.
- Switch consumers. Move dashboards, dbt jobs, notebooks, or applications to Redshift in a controlled order.
- Monitor both sides. Watch pipeline failures, query correctness, and latency through an agreed observation window.
- Retain rollback. Keep SQL Server and the pipeline available until the owners approve the Redshift results.
Do not decommission SQL Server immediately after the first successful Redshift load. A completed transfer proves that data moved; it does not prove that every report, query, permission, or workload behaves correctly on the new platform.
Troubleshooting
SQL Server connection times out
- Confirm the host and port are reachable from the Supaflow network path
- Allow the current Supaflow IP in the firewall, or use approved private connectivity
- For Azure SQL Database, verify the server firewall rule and database name
- Leave Encrypt enabled and avoid Trust Server Certificate unless the certificate is intentionally self-signed
Expected SQL Server tables are missing
- Confirm the source user has
SELECTon the table or schema - In Change Tracking mode, confirm Change Tracking is enabled on both the database and table
- Confirm the table has a primary key
- Refresh the source schema after changing grants or Change Tracking settings
Redshift Test & Save fails
- Confirm the endpoint, port, security group, database, and credentials
- Verify the destination user can create schemas, tables, and temporary tables and insert rows
- Confirm the IAM role trust policy uses the same External ID entered in Supaflow
- Confirm both Supaflow and Redshift can access the configured S3 bucket and prefix
- If Redshift uses a separate role for
COPY, set Redshift COPY and UNLOAD IAM Role ARN in Advanced Settings
Counts do not match
- Re-run both counts over the same closed time window
- Check whether SQL Server changed while you were comparing it
- Confirm every expected object and column was selected
- Review object-level activity errors and destination collision settings
- Verify whether the pipeline is retaining soft-deleted records
Deletes do not match
- STANDARD mode cannot detect a hard-deleted source row
- Confirm Change Tracking retention has not expired between runs
- Confirm the table has a primary key and Change Tracking enabled
- Check whether Perform Hard Deletes is enabled or whether the destination is intentionally retaining deletion metadata
SQL Server to Redshift Migration Checklist
- Inventory tables and non-table database objects
- Choose STANDARD or CHANGE_TRACKING for each migration wave
- Create least-privilege SQL Server and Redshift users
- Configure Redshift S3 staging and IAM trust
- Test both connections in Supaflow
- Start with a representative set of tables
- Run the historical load
- Compare row counts, business aggregates, and type-sensitive samples
- Test insert, update, and delete behavior
- Freeze DDL before the final sync
- Switch downstream consumers gradually
- Keep SQL Server available through the rollback window
Frequently Asked Questions
Can Amazon Redshift restore a SQL Server backup?
No. SQL Server and Redshift are different database engines with different storage, SQL, and workload models. Move the table data through a migration or replication service, and convert SQL Server-specific database objects separately.
Can I migrate SQL Server to Redshift with AWS DMS?
Yes. AWS publishes a prescriptive pattern for SQL Server-to-Redshift migration with AWS DMS. Compare its source and target limitations, operational model, and validation workflow with the managed pipeline approach you want to operate after cutover.
Does the migration include stored procedures and views?
The Supaflow pipeline moves selected table data. Convert and test views, procedures, functions, jobs, and application SQL separately. AWS SCT can help assess conversion effort.
How do I keep Redshift updated while SQL Server stays live?
Run a historical-plus-incremental pipeline on a schedule. Use SQL Server Change Tracking when you need inserts, updates, and deletes, then cut over downstream consumers only after the Redshift copy passes validation.
How long does a SQL Server-to-Redshift migration take?
Connection setup can take minutes after firewall, IAM, S3, and database permissions are ready. Data-transfer time depends on table size, row width, source load, network throughput, Redshift capacity, and merge work. Measure a representative wave before estimating the full migration.
Start the Migration
Create a Supaflow account, then follow the SQL Server source and Amazon Redshift destination setup guides. For migration planning or a private-connectivity review, contact support@supa-flow.io.
 Ask Claude